netTerrain 9.6 Installation Guide

Document Code. GN_D_nT9-10 Last revision: 02/22/2023
© 2023 Graphical Networks LLC. All rights reserved.
Graphical Networks and netTerrain are registered trademarks of Graphical Networks LLC. Other product names mentioned in this manual may be trademarks or registered trademarks of their respective companies and are hereby acknowledged and stuff. If rash, irritation, redness, or swelling develops, discontinue reading. Safety goggles may be required during use. Do not eat this guide. Bada bing bada boom.
Image: Fjords in Norway.
Graphical Networks LLC
Telephone: +1-240-912-6223
Fax: 1-240… never mind
1 Introduction
This guide provides the steps to successfully install the netTerrain product from scratch. If you already have netTerrain installed and want to upgrade to a newer version, please refer to the upgrade guide. We appreciate your business.
1.1 Hardware requirements
netTerrain is a modern n-tiered web-based enterprise-grade software for network, fiber and data center documentation that can be deployed in a variety of configurations. The data tier (database server) and the application tier (application server) can be deployed on the same or on separate (physical or virtual) machines.
These specifications may not yield a fast-performing system if there is a high volume of activity associated with other applications or database systems running in parallel, abnormal spikes in user activity or other external factors that can slow down disk, CPU or memory usage. Translation: we can keep adding more fancy words to give you this warm fuzzy feeling that you’ll have the exact server you need, but we know better. Server sizing and estimation is more an art than a science. Take the table below with a huge grain of salt.
| Server Hardware | Minimum1 | Standard2 | Optimal3 |
|---|---|---|---|
| Processor | Intel Core-I7 | Intel Xeon processor (E5 or E7 or better processor family) or similar. Or multiple virtual sockets and CPUs (4 x 1) core allocation for VM instances. | Intel Xeon processor (E5 or E7 or better processor family) or similar. Or multiple virtual sockets and CPUs (4 x 2) core allocation for VM instances. |
| RAM | 8GB | 32GB | 64GB |
| Hard Disk Space4 | 10 GB Free space | High Speed w/ 40 GB Free space | High Speed SSD w/ 100 GB Free space |
1.2 Server – Software
The software requirements are the following:
-
Windows 2016, 2019, 2022 Server (other Windows desktop operating systems are also supported)
-
MS SQL Server 2016, 2019 or 2022 Standard or Enterprise Edition with SQL Server Management Studio (SSMS). SQL Server Express is also supported for smaller deployments (usually less than 10 concurrent users and less than 10,000 devices – please consult with support@graphicalnetworks.com before deploying netTerrain with SQL Express).
-
MS IIS 8.0 or better for the application server
-
.NET Framework 4.7.2 or greater for the application server
-
Certain configuration requirements for IIS and SQL Server apply
1.3 Notes on Server Sizing
Below are some user and device thresholds to determine which server configuration is best for your environment:
-
Minimum requirements are based on a medium sized deployment with up to 10 concurrent Users and 500 devices.
-
Standard requirements are based on a large sized deployment with 25 concurrent Users and 2500 devices.
-
Optimal requirements are based on a very large deployment supporting up to 100 concurrent Users and 25,000 devices.
Concurrent users are counted as users entering or updating the system through the browser at the same time.
The total number of named users supported is usually the number of concurrent viewers multiplied by a factor that depends on the probability of two users accessing the server concurrently during peak usage. A conservative estimate is a factor of 10, which would yield the following counts for named users:
- Number of named users for minimum configuration: up to 100
- Number of named users for standard configuration: up to 250
- Number of named users for optimal configuration: up to 1000
Take these numbers with a huge grain of salt. Sizing and performance are closer to an art than a science since many factors come into play. The above mentioned these limitations are based on conservative estimates. For additional named users and devices in any of these configurations, additional servers in a netTerrain site license mode can be set up.
2 Installation process
The netTerrain installer has many steps that can be automated. Using the automated features, the application and the database can be created automatically, and it checks for IIS requirement compatibility. However, in some cases, these automated steps may not work, such as the database not being currently accessible, or permissions being limited on the app server.
We recommend trying the automated steps when the app server and database are on the same machine (or the database is easily accessible from the installation machine) and resorting to the manual process when you know in advance that access to the database is restricted or the setup of IIS needs to be fine-tuned by hand. A hybrid approach is also possible where the installer automates certain parts and you take care of the rest manually.
2.1 Installing netTerrain
We will review the automated installer first and then in section 2.2 we will go over the process of manually installing netTerrain.
The installation process consists of 5 easy steps. You should be up and running in not time but first make sure you have the netTerrain installer executable file. It is typically called ‘netTerrain_FULL-9.6.XXX.YYYY-Setup’ (XXX being the database version and YYYY the build number). For example, a valid name would be netTerrain_FULL-9.6.902.5457-Setup. After the installation is complete you will need a valid license key to activate netTerrain.
2.1.1 Step 1: Running the installer file
Run the installation file and wait for it to check for file integrity. In the unlikely event that you see an error during this step, you may have received a corrupt file. If you downloaded it from dropbox or some other remote location, try downloading it again.
Checking for file integrity
Once the integrity has been checked you will be greeted by our welcome banner:
Our witty welcome banner
2.1.2 Step 2: Starting the basic installation process
After you clicked on ‘Next’ in the previous step, the general installation options dialog lets you change the default installation directory. We suggest sticking with the default, as it may make your future upgrades more seamless. If you change this directory, you may need to proceed with certain manual steps during a future upgrade to move files from one folder to another.
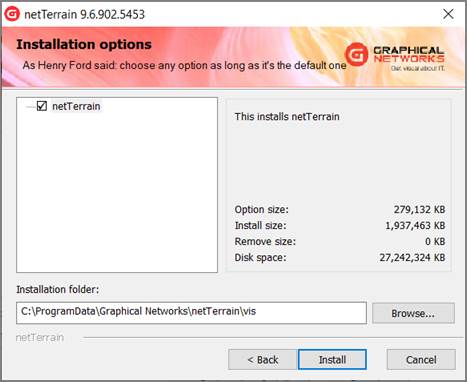
General installation options
Take the plunge and start the installer by clicking on ‘Install’. The installer will now start moving files from the executable package to your server.
Installation operation in progress
After all the files have been installed, the installer opens a new dialog box to start the application set up. You may also see one or two cmd line windows pop-up and also the operation in progress in the background, which you don’t have to worry about.
IIS Settings dialog
2.1.3 Step 3: Setting up the application
In this step you can set up the name of the application that IIS will configure for the netTerrain web server.
The installer will check any missing IIS components and proceed to activate them, whenever possible.
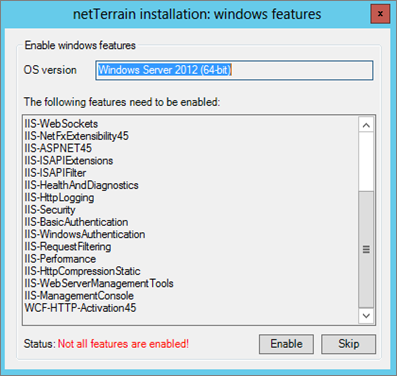
Missing Windows features dialog
You can choose to enable the missing features or skip this step; in which case you have to enable them manually. If you let the installer enable the features for you, a dialog showing the progress pops up:
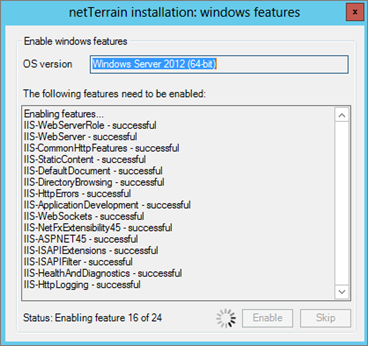
Enabling missing Windows features
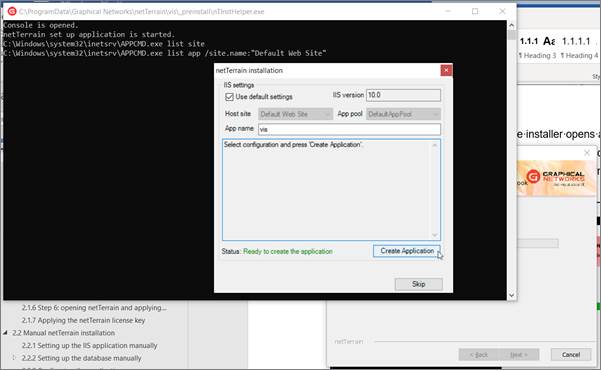
After this is done, proceed with the setup of the IIS application, as displayed below:
App name setting
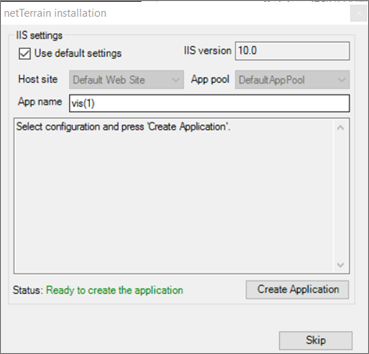
In the dialog above you can choose the default settings, which means that netTerrain will install the application on the web server using the default Host site and default Application pool. Alternatively you can change these settings by unchecking the ‘Use default settings’ checkbox.
Next, select a name for the netTerrain application on the server (for example GNCORE) and click on ‘Create Application’.
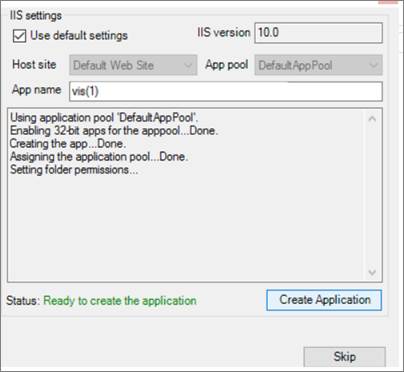
Application created
The application creation process usually takes only a few seconds and netTerrain shows a log of changes. In case of errors (such as picking a name for an application that was already used) the installer will inform you of the error and you can retry or skip this step altogether (in which case you need to install the IIS app manually).
After the application is created click on the ‘Next’ button.
2.1.4 Step 4: Setting up the database
The process of creating the database is very simple. From the database set up dialog that popped up, choose a database server you want to use to house the netTerrain database and provide the credentials to connect to it. the installer supports both SQL and Windows authentication. You may need to request access to the DBA.
As mentioned initially, this process may be restricted if, for example, you don’t have access to the DB server. In that case proceed with a manual installation of the database, which is reviewed later.
After you selected the database engine and provided the credentials you can test the connection.
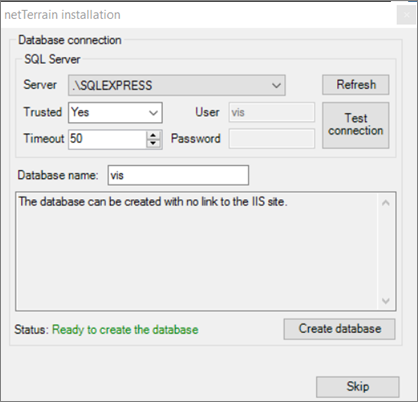
Database creation process
If the connection was successful proceed to name the database (such as ‘VIS’) and click on the ‘Create database’ button.
Just as with the application creation, netTerrain shows a log of changes. In case of errors (such as picking a name for the database that was already used by some other database) the installer will inform you of the error and you can retry or skip this step altogether (in which case you need to install the database manually).
If the database was created successfully click the ‘Next’ button.
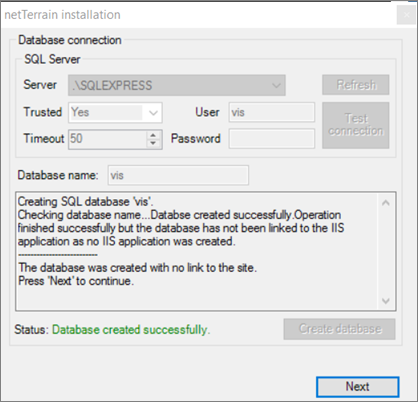
Successful database creation
2.1.5 Step 5: setting up the images
The netTerrain catalog is quite large, so much so, that we don’t ship the images associated with the devices in the regular installer. Instead, there is a separate file included in your installer package (CD or link), usually called images.rar.
The imags.rar file, as the name suggests, is a compressed rar file, which needs to be unpacked. To do this follow this process:
- Take the image.rar file from your installation package and copy it to the images folder (usually located under ProgramData\Graphical Networks\netTerrain\vis\Images)
- Inside the images folder unpack the contents by using the ‘Extract here’ feature
- As a result you should have four sub folders inside the images folder, including the ‘Backgrounds’ and ‘Nodes’ sub folders in addition to the existing ‘Categories’ and ‘System’ folders.
- After netTerrain has been installed, double check that this process worked as expected by logging in to netTerrain and navigating to the catalog and making sure that the devices in the device section include a vendor icon
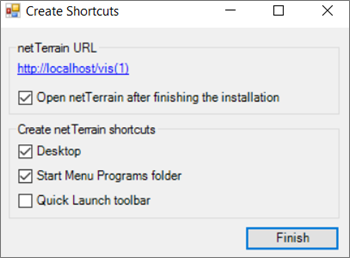
2.1.6 Step 6: opening netTerrain and applying the license
Once the database is installed, a pop-up window appears, showing some post installation options as shown below:
Post installation options
We suggest leaving the ‘Open netTerrain...’ option checked, so that you can apply a valid license key. After you click on ‘Finish’ the installer runs an external program that applies some folder permissions and once that is done, the installation is basically complete. You just need to apply your license key, which we will review below.
2.1.7 Applying the netTerrain license key
If in the previous step you had the ‘Open netTerrain...’ option checked, a new browser window should open, showing the netTerrain login page. The default netTerrain user is ‘admin’ and the default password is ‘WelcomeToTheMachine’. Of course, you can change that later. Note that this is the netTerrain user and is not related to any database user credentials you provided in previous steps.
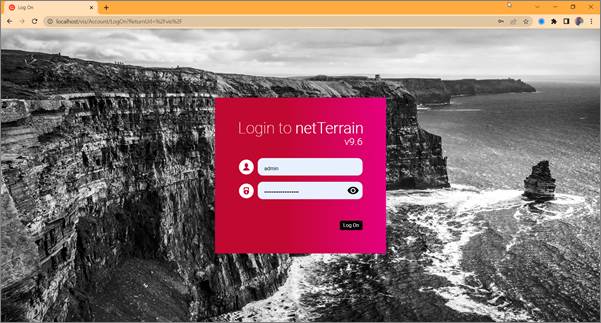
netTerrain login. Use 'admin' and 'WelcomeToTheMachine' to log in for the first time
After providing those netTerrain credentials, you are presented with a license info page. Click on the ‘Activate new license key’ link and enter the valid netTerrain license in the ‘Key’ field, as displayed below.
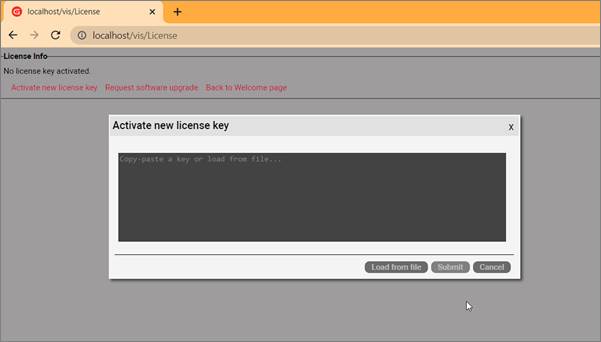
Activating new license key
After applying the license key, log back in and voila, you are done!
2.2 Manual netTerrain installation
If you want to install the netTerrain application and/or database components manually, proceed with steps 1 and 2, as explained in the previous section by running the installer executable files.
If you must set up IIS manually, skip step 3. Additionally, if you must install the database manually, skip step 4, as displayed below.
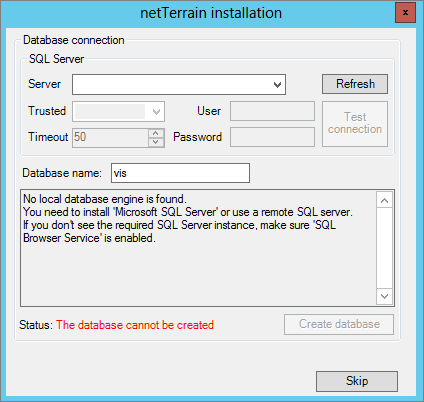
Skipped database setup step during installation
Once you have skipped the IIS and database automated processes of the installation, you must set these up manually. Before setting up the application and database, you may have to enable IIS and role services, as depicted in the dialog below. How to access server roles and enable or disable missing windows features that the installer detected in step 3 could vary from OS to OS (just Google it, mkey?).
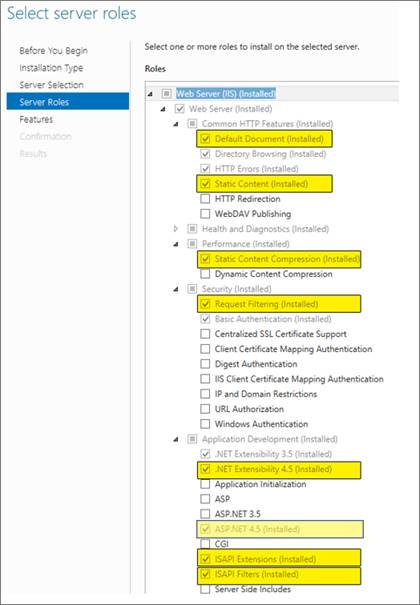
Enabling up server roles
netTerrain requires SQL server 2012, 2014, 2016 or 2019 and although not mandatory, it is recommended to have SQL Server Management Studio (SSMS) available on some machine, with the netTerrain database engine connected. SQL server can be on the same machine as the netTerrain application server or on a separate one. The machine can be physical or virtual. It is recommended that you enable SQL server mixed mode authentication if you are installing SQL server for the first time.
2.2.1 Setting up the IIS application manually
Once the application server components have been installed, if you skipped step 3 from section 2.1, an application needs to be created on the web server.
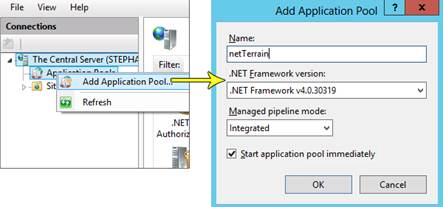
1) Open IIS on the application server machine and add a new application pool called ‘netTerrain’ and ensure the .NET Framework is set to version 4 and pipeline mode integrated. (.NET Framework could be v4.5).
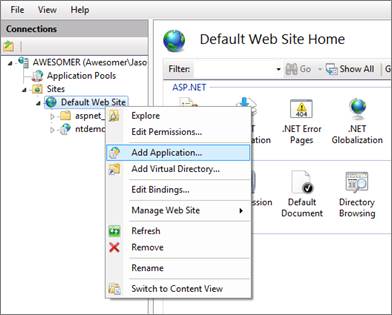
2) Create a new application called ‘vis’ (other names are also permitted).
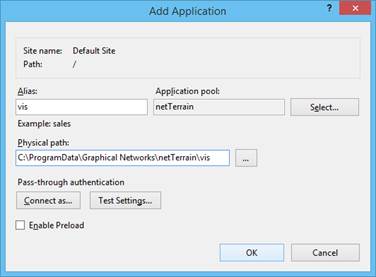
3) Retain the default parameters associated with this application and point the physical folder to the ‘vis’ folder that was created by the installer under C:\ProgramData\Graphical Networks\netTerrain\vis. Note that on Windows the ‘ProgramData’ folder is typically hidden by default. If you moved this folder during installation, then you will need to point at the alternate location.
4) The application pool in IIS should be set to ‘netTerrain’ which has a minimum configuration of .NET Framework v4.0 or v4.5.
a. If there is no option for setting ‘netTerrain’, then you must create one manually. Return to the beginning of point 1.
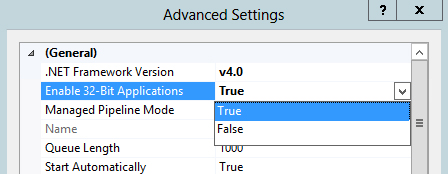
5) Next, open the Application pools feature in IIS and right click on the ‘netTerrain’. Select Advanced Settings to modify application pool parameters.
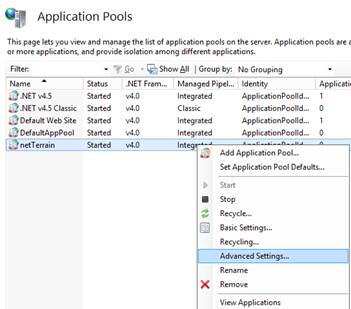
In the advanced settings dialog, proceed to enable 32-Bit Applications, by selecting “True” from the drop down box.
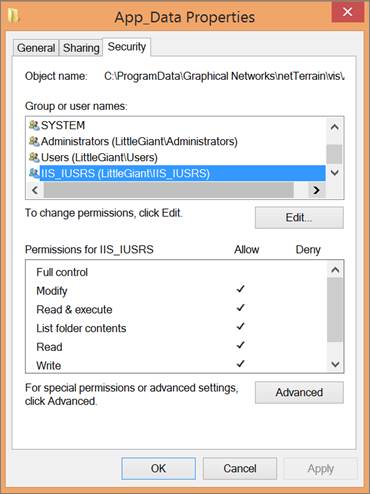
After the above steps are completed go to the App_Data folder that is in “C:\ProgramData\Graphical Networks\netTerrain\vis” and right click the folder. Select the properties option and then go to the Security tab. Add “Modify” permissions for the IIS_IUSRS account to this folder. These permissions should also be applied to the EmbeddedDocs folder located in the same directory.
2.2.2 Setting up the database manually
Once the application server components have been installed on the server, if you skipped step 4 from section 2.1, you must manually install the netTerrain database.
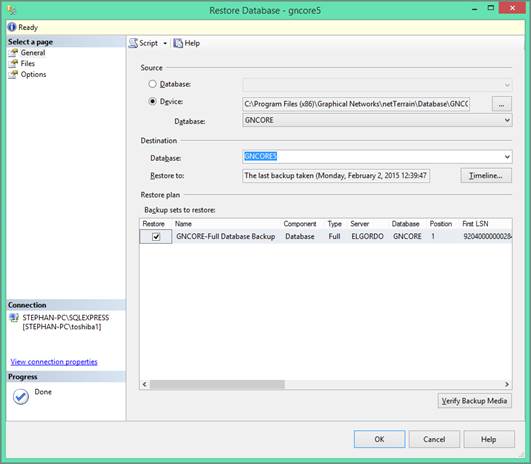
Proceed to restore the netTerrain database file as follows:
1) If no netTerrain database has been created, proceed to create one in SSMS. Any name may be used for the database, so during restoration ensure the data and log files are pointing to the correct database.
2) Locate the “GNCORE.bak” database restore file located in “C:\Program Files (x86)\Graphical Networks\netTerrain\Database”.
3) Open SQL Server Management Studio and restore the database called GNCORE.
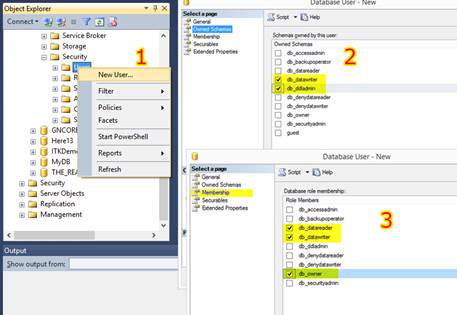
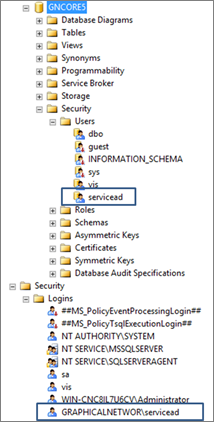
4) Once the database has been restored, create a new SQL user, which will be mapped to the netTerrain database.
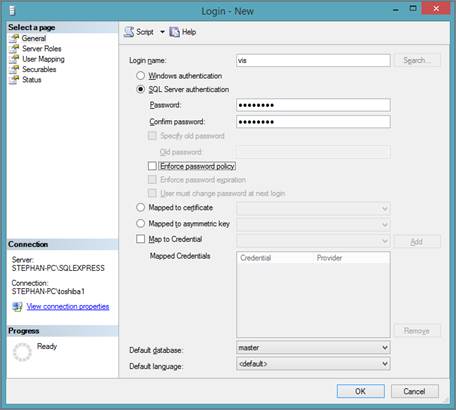
5) Apply this user to the netTerrain database using the security dialog.
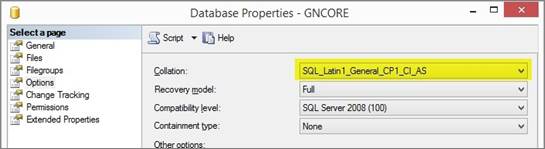
6) Verify that the database collation has been set to “SQL_Latin1_General_CP1_CI_AS”. Change this setting if it is not the correct collation.
7) If you are using an Active Directory user account for SQL authentication, you should create a specific netTerrain active directory account for this purpose. Do not use an individual user’s Active Directory account.
2.2.2.1 Additional database parameters
TCP/IP and named pipes may need to be enabled for the database or database engine. For SQL Server 2008, these parameters can be enabled from SQL Server Configuration Manager under the properties menu.
The firewall on the database server needs to allow traffic for the SQL port 1433. If the firewall is blocking SQL traffic, an exception for port 1433 needs to be added to the firewall configuration settings (check with the server system administrator on how to open that port for the specific Operating System that runs on the server).
2.2.3 Configuring the application server
Once the database is restored on the SQL Server Engine, the application server can be configured properly so that the visualization engine will communicate with the database and display data appropriately.
The web.config needs to be updated with the appropriate connection string settings. The web.config file is in the C:\ProgramData\Graphical Networks\netTerrain\vis folder.
Edit the web.config file and look for the “connectionstrings” tag. The ‘Data Source’ will be the database server and instance information, the catalog is the netTerrain database chosen in the previous section, and the ‘uid’ and ‘pwd’ are the user name and password for the netTerrain user created in the previous sub section.
Example:
<add name="NetTerrain" providerName="System.Data.SqlClient" connectionString="Data Source=SQL Server ipaddress or name;Initial Catalog=gncore5;uid=vis;pwd=vis909303;" />
2.2.4 Installling the mandatory 3rd party components manually
This step is also done automatically by the installer, but if it was skipped (or failed) then you must proceed to install these mandatory components manually.
The netTerrain application requires a redistributable component from Microsoft that needs to be installed on the application server. This component can be installed using a file called ‘vcredist_x86.exe’ located in ‘C:\Program Files (x86)\Graphical Networks\netTerrain\Utilities’. Simply run the executable and follow the installation prompts.
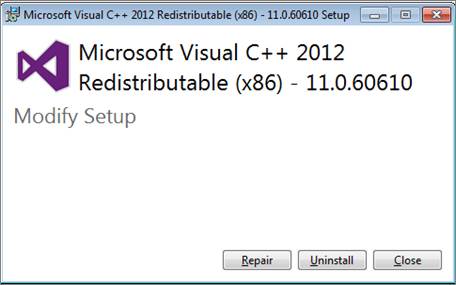
Microsoft Visual C++ redistributables
2.2.5 Installing the catalog
Just as with the more automated process, you must make sure that you have the catalog imagery set up, by going through step 5, specified in the previous section.
2.2.6 Verifying the installation
Open a supported web browser (such as Chrome) and in the address type in http://<servername>/<app> where
Attention!
If you receive the error: ‘500.21 “ExtensionlessUrlHandler-Integrated-4.0” has a bad module “ManagedPipelineHandler” in its module list’, ASP.NET is not registered. Please try running the following command in cmd.exe:
%windir%\Microsoft.NET\Framework64\v4.0.30319\aspnet_regiis.exe -i
You can now finish up the installation by supplying a valid netTerrain license key, as explained in section 2.1.7.
3 Post Installation Settings
The netTerrain installation process includes other non-mandatory settings that you should consider to get the most out of your system.
3.1 SQL Server Active Directory user authentication
In some instances, your SQL server database may be using an Active Directory user for authentication to the netTerrain database. If this is how your SQL server database has been configured, then you will need to change the following parameters in the web.config file and in the IIS application (please note that an active directory user account should have been setup with permissions to the database):
1) In the web.config file replace the SQL server ‘uid’ and ‘pwd’ with “Trusted_Connection=yes”
<add name="NetTerrain" providerName="System.Data.SqlClient" connectionString="Data Source=server name or IP Address;Initial Catalog=gncore5;Trusted_Connection=yes;" />
2) add <identity impersonate="true" /> after the <system.web> section of the web.config file.
<system.web>
<identity impersonate="true" />
<compilation debug="false" targetFramework="4.0" />
<httpRuntime maxRequestLength="10485760" />
<authentication mode="Forms">
  <forms cookieless="UseCookies" loginUrl="~/Account/LogOn" timeout="20" />
</authentication>
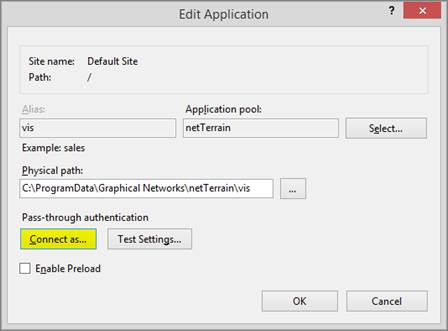
3) Open your IIS configuration manager and select basic settings for the netTerrain web application you setup to use with netTerrain. Typically, this is called “vis”. Then press the “Connect as…” button.
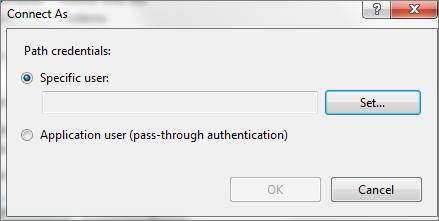
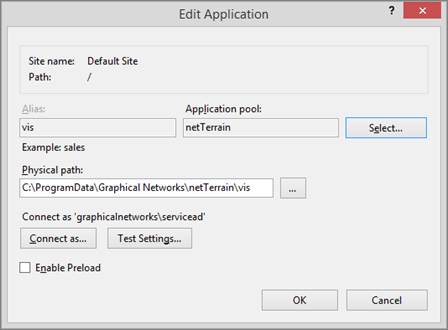
4) Select the “specific user” option and enter the active directory user information. This should match the Active Directory user that was applied to the netTerrain database.
5) Test the login to the netTerrain application. If you can get logged in, then it is successful. If you still cannot log in, please refer to the netTerrain log for further details. This log can be found on the application server typically here: C:\ProgramData\Graphical Networks\netTerrain\vis\Logs. Look for the one with the most recent date. Review the log for error information.
3.2 Active Directory Settings
netTerrain allows you to use existing active directory users for web authentication. To configure active directory, you must setup a group or groups within active directory, assign a user or users to the group or groups and then setup the configuration in the admin console under the Active Directory section.
Go to your AD server and setup one or more groups and assign a user or multiple users to the group or groups.

Attention!
As of netTerrain 6.5, Active Directory (AD) information is no longer stored in the web.config file.
To enable and setup AD, navigate to the admin console and check the box for ‘Support Active Directory Accounts’. Then fill out the corresponding fields. To ensure the correct values were entered, select check availability. ‘Success’ should be returned. Otherwise, you may need to correct your input or debug AD settings and connectivity.
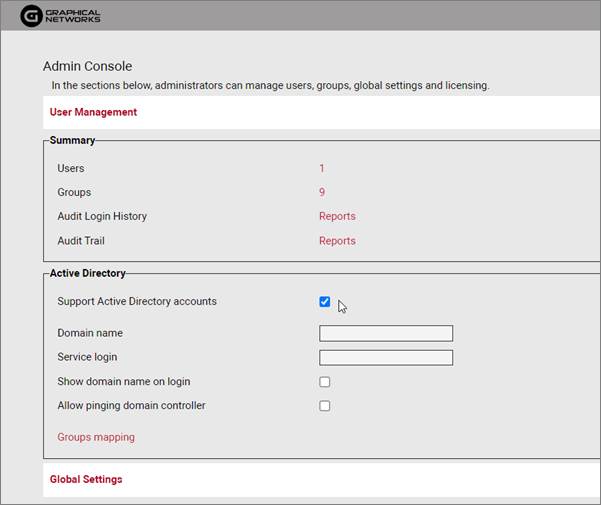
Enabling Active Directory
Service Login: Enter an AD user account that will be used to walk the AD server directory (Typically any AD account that is part of the "Domain Users" group, no additional permissions should be needed). An authorized user account is needed to allow the information within AD to become accessible.
Show domain name on login: If you would like the domain name to appear when someone browses to the netTerrain website. You should leave this off if this is a public facing website.
Allow pinging domain controller: This can help speed up the login time. However, it may not work in all environments if ping is not allowed between the application server and the AD server.
The next step is to configure the group mappings, which is located at the bottom under the ‘Active Directory’ tab.
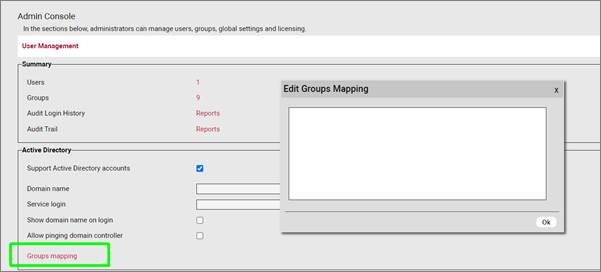
Configuring group mappings
Use one line per mapping with the format displayed below:
Next, go to the users page and select ‘Synchronize AD users’ to retrieve the allowed user accounts.
Once configured you should be able to use an AD user account to log into the netTerrain system.
3.3 Customizing the login page
It is possible to customize the login page and give it some extra sizzle to match your preferences or corporate standards. Open the file called LogOn.cshtml. This file is typically located in the C:\ProgramData\Graphical Networks\netTerrain\vis\Views\Account folder. We recommend doing that with a text editing tool like notepad.
Look for the first section “body”
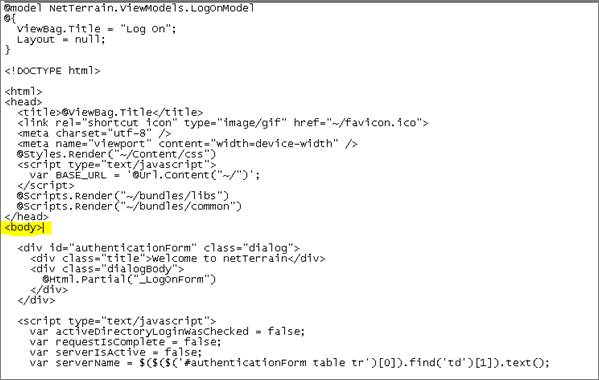
After this section you can add text similar to what is below (modify based on what you would like to display). Place this between the “Body” and the “<div id=” section.
<div style="margin: 25px auto;max-width: 750px;text-align: center;">

Welcome to netTerrain, please login with your active directory credentials or your netTerrain user and password.

In order to use netTerrain please use Internet Explorer 9 or newer, Firefox 12 or newer, Safari 6 or newer (for MAC only), or Chrome version 20 or newer.

If you have problems or questions please email support@graphicalnetworks.com or call us at at 240-428-1029.

</div>
Do not modify any other sections within the file as it may affect the login process. Any changes you make to the logon page should be backed up, since files are overwritten after each update.
3.4 Logout timeout settings
If you would like to increase or decrease the default logout time for the netTerrain application, open the web.config file and modify the following setting:
The unit for the timeout here is in minutes.
3.5 Authentication settings
Unless you use some directory services like AD, you may want to consider hardening your netTerrain security settings by specifying your password policies and more. In the web.config file you can set some parameter to match your IT security mandates around things like password length, complexity and more.
Look for the MembershipProviders section in your web.config file and in there you’ll see an array of parameters which can be modified:

MembershipProviders for authentication settings
At Graphical Networks we believe that you should set your security settings any way you like so that you can comply with an array of possible mandates, even if they make little sense. Having said that, we certainly hope you don’t fall into the common trap of setting up passwords that are hard to remember and easy for a computer to guess, hence our default values for these parameters may not necessarily reflect the common myths surrounding password strength.
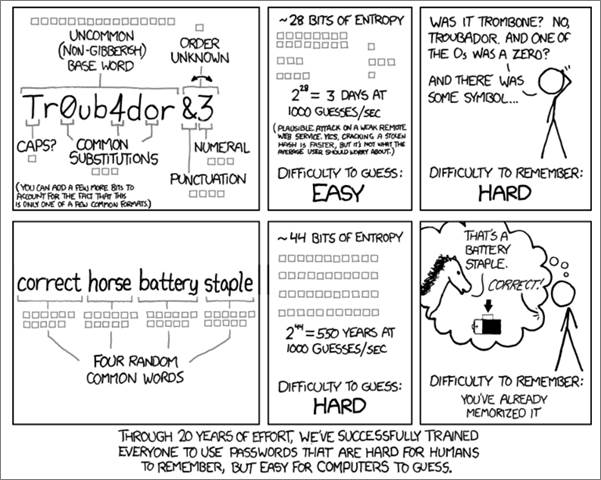
xkcd webcomic on password strength
The parameters you can modify here, which are quite self-explanatory, include:
enablePasswordRetrieval Default: falseenablePasswordReset Default: truerequiresQuestionAndAnswer Default: falserequiresUniqueEmail Default: falsemaxInvalidPasswordAttempts Default: 2minRequiredPasswordLength Default: 6(and yes, you should immediatelly change this one to a lot more unless you plan to use directory services)requireLowerCaseLetter Default: falserequireUpperCaseLetter Default: falserequireDecimalDigit Default: falseminRequiredNonAlphanumericCharacters Default: 0passwordAttemptWindow Default: 10applicationName Default: ‘/’
4 Settings
One of our mantras as a software company is to try to deliver a product that you can “manage by exception”. This means that ideally it should already be configured in such a way that it accommodates your most likely needs. Only in case of an exception, where some setting needs to be changed, would you need to tap into them and change it. Hence, manage by exception.
Even though we get better and better at guessing what you need out-of-the-box, there are still plenty of situations where you want to configure something that departs from the default values set in the software when you initially install it. Also, as we keep delivering product, more and more settings pop up, so we thought it would be useful for the more advanced users to get a detailed view of these (in)famous settings.
4.1 The admin console vs settings.xml
Some of the settings are nicely displayed in the netTerrain administration console, which is very easy to use. In there you can currently adjust so-called global settings, which are parameters that affect the whole project, including things such as:
- Search and table view results per page.
- Email notification settings and GUI notifications.
- Default diagram/page setup.
- Displays and effects.
- Import/export buttons that you want shown in the tool.
- IP toolset, collector download and more.
These and more settings are nicely explained in the Admin guide.
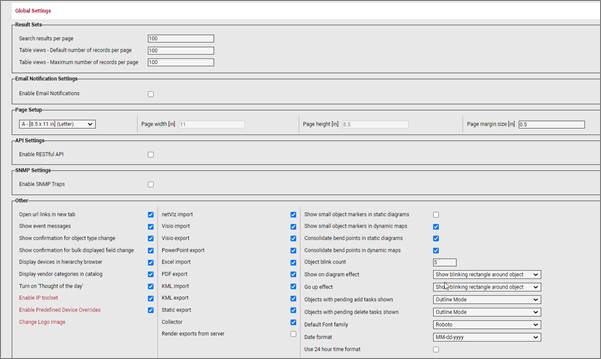
Global settings section in the admin console
Anything that doesn’t make it into the GUI (because it may be a bit too obscure of a setting or perhaps we don’t want somebody to just easily change it from the console) goes into a file called Settings.xml. This file can be found on the netTerrain app server inside the netTerrain root folder and can be edited with a simple text editor like notepad.
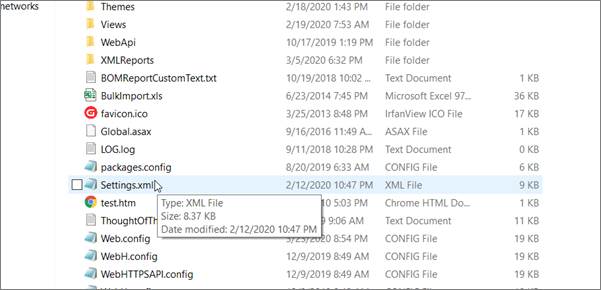
Settings.xml file inside the netTerrain root folder
Now that we know what this settings.xml file does, we can dive deep into its bowels and look at what these settings do.
4.2 Authentication and security settings
These settings deal with how you login, and how netTerrain behaves in certain scenarios when it comes to security. As you know, in the web.config file you control the basic configuration parameters, including the application connection string and more. In there you will find a few more settings related to authentication, such as your password strength and so on in case you are using native authentication. Let’s review the parameters:
PreserveLoginUrl: this setting controls whether the URL should be preserved on your browser.AutoLoginAsReadOnly: turns login-less access to the system on or off. If turned on, you will be granted access to netTerrain automatically in read-only mode (you won’t be associated with a user, of course), and you can log in later from within the tool if you want.MaximumFailedLoginAttempts: self-explanatory.ActiveDirectorySyncGroupFilter, ActiveDirectorySyncUserFilter, ActiveDirectoryUserFilter: Active Directory settings to tune your AD to properly synch up with netTerrain groups and users.ActiveDirectoryShowInAdminConsole: show AD settings in the admin console.ActiveDirectorySyncGroupFilter: active Directory custom filters.ActiveDirectoryUseGroupDistinguishedNameInSyncUserFilter: sets which distinguished name to use in SyncUserFilter.ActiveDirectoryUseDomainControllerAccountLockoutPolicy: When ‘true’ doesn’t lock a user after N failed login attempts counting on the DC.OpenIdAzureRolesManagement: uses Azure application roles to set user permissions.AuthenticationCookieTimeoutMinutes: self-explanatory.OAuthAuthenticationAllowInsecureHttp: should only be set to false when working in an environment closed off to the Internet.<!-- Microsoft Open ID authentication parameters. -->: self-explanatory.<!-- 2FA. -->: These parameters deal with the setup of multi-factor authentication.
4.3 Directories
There seems to be an endless array of settings related to folder, paths and the like. Unless you must do something esoteric like integrating the output of these folders and paths with some external system and you must read it from a path or folder other than the default, then there shouldn’t be a need to ever touch these. I am not going to explain the meaning of each, since they are quite self-explanatory, so here they are in their full glory:
- QuotesFile
- LocalizationFile
- WebApiModulesPath and WebApiNetPipeAddress
- DevExpressFilesPath
- NetVizImportQueuePath
- VisioImportQueuePath
- SupportLink
- SevenZipAppPath
- ThemesPath
- DevExpressDefaultConnectionStringName
- SQLTablesPath
- SQLExpressionsPath
- DynamicReportsPath
- ImagesPath
- ImagesUserUploadedPath
- RTFPath
- LogPath
- VendorsOidsPath
- MibFilesPath
4.4 Default Global settings
This is a loose categorization of parameters that have to do with default settings that affect all users globally and are not related to more specific categories listed here or in the other two blogs. Below we’ll briefly describe what each setting does.
4.4.1 DefaultDiagramId
Like the name suggests, with this parameter we define which diagramId should be the default diagram that users access in the absence of a cached diagramId. Normally this id corresponds to the top-level diagram and it shouldn’t be changed.
However, in some scenarios you may want new users that access the system (or existing users flushing the cache) to access a diagram other than the top level.
4.4.2 DefaultThemeName
This is the default theme or skin you want your users to see when they log into netTerrain. Each user can later override this with their own skin.
4.4.3 AllowSymbolsInExpressions
This parameter is a bit obscure. When set to true you can use symbols in your expressions (see database and scripting guide). We recommend leaving it false unless you work in an environment closed off to the internet.
4.4.4 DevExpressDefaultDashboard
This parameter lets you define the default dashboard view that will appear when users click on the report button.
4.4.5 UseMetricSystem
Sets the metric system as the default for measurement units.
4.5 Notifications
Notification parameters include the ones you see for errors as well as those quirky quotes of the day and other alerts.
4.5.1 ShowErrors and ErrorLog
When set to use you will see error notifications on the bottom right corner of netTerrain and errors will be logged.
4.5.2 IntervalHideQuote and IntervalHideHelpMessage
These two settings let you set the display time of quotes and help messages (in milliseconds).
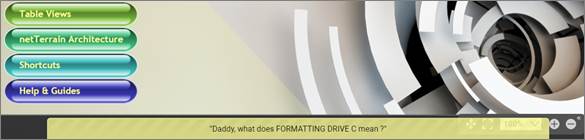
Quote of the day notification
4.5.3 HelpMessageShowCount
This setting lets you determine how many times you want to display each help message category for new users that join netTerrain.
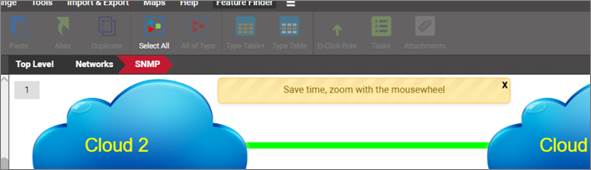
Help notifications
4.5.4 ShowAlertIf90PercentsCapacityReached
When set to yes, this parameter will alert users when your netTerrain object license count has reached 90% of its capacity.
4.6 Usability and visualization
This section is one of the more useful ones as it lets you control certain aspects of the usability and visualization.
4.6.1 SearchStringLength
This parameter determines the minimum size of a search string that does not result in a search error. Users that enter a string with a smaller number of characters will get a search error notification. It should probably always be set to 3 characters.
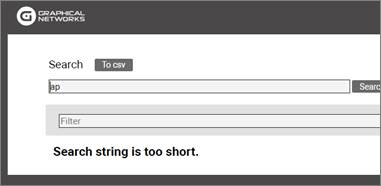
Search error notification
4.6.2 ShowNodeTitle
Show the title (name) of a node when hovering over it.
4.6.3 ShowLinkTitle
Show the title (name) of a link when hovering over it.
4.6.4 ShowFreeTextTitle
Show the title of a free text object when hovering over it.
4.6.5 EnableShortcutsToAddNodeRackDeviceAutomatically
When set to true, you can use simple shortcuts to add nodes, racks, and devices to netTerrain. These will be of the default generic type.
4.6.6 IsInStockColumnEnabled
When this setting is enabled, the “In Stock” option is displayed in the catalog for devices and rack types. Mostly used for warehousing purposes.
4.6.7 IsUniqueAllTypesColumnEnabled
When this setting is enabled, the “is unique across types’ checkbox is enabled for the catalog. We recommend leaving this setting off.
4.6.8 EmbeddedDocumentsFileSizeLimit
This parameter is very useful and determines the maximum file size in bytes that you allow for document uploads when you use the attachment feature. If users try to upload a document larger than this limit, they will get an error notification.
4.6.9 EmbeddedDocumentsExtensions
This parameter is also related to the parameter above and specifies which document extensions you allow users to
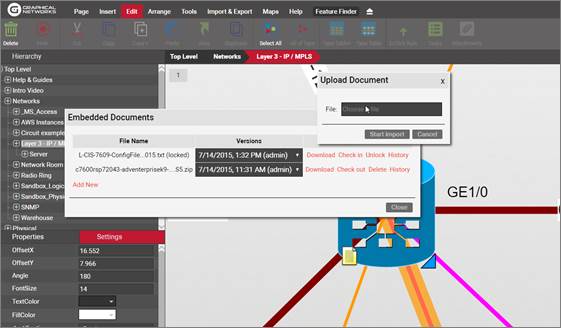
Uploading a document
4.6.10 LinkCreationByMouseHoverOver
When set to true, as soon as you hover the mouse over a node, it’ll display all the snapping points for you to create a link.
4.6.11 DefaultSnapping
DefaultSnapping and DefaultSnappingDynamic are two parameters related to static (non-OSP) and dynamic (OSP-based) diagrams that when set to true, objects on a diagram will snap nicely as soon as you approach some right angle or alignment with an adjacent object.
4.6.12 MinObjectsToShowSize
This one is geeky, and at the same time a bit confusing. This parameter basically lets you control the zoom level that netTerrain needs to set itself with an object node at the center, when the so-called auto-zoom controlled by the AutoZoomToNodeFactor (see below) kicks in.
Auto-zoom happens when you navigate to a diagram and a specific node is the context, such as when you go up from a node, or you reach a diagram by searching for a specific node and the node you come from is small. What exactly small means is what this parameter defines.
The MinObjectsToShowSize parameter is the minimum size in diagram units/himetrics that defines the node as small. To find out if a node is small, netTerrain takes the smallest of the numbers associated with the width and height of the node as per the node settings and compares it to the setting. If the node size as defined above is smaller than the parameter number then auto-zoom kicks in. The zoom level that will be used is defined by the parameter below.
This feature comes in very handy when you have dense diagrams, and it would be hard to see a node without netTerrain automatically zooming you in.
4.6.13 AutoZoomToNodeFactor
This is the zoom-level factor for the auto-zoom feature, as described above. This factor is determined as a percentage of the node size relative to the absolute diagram size.
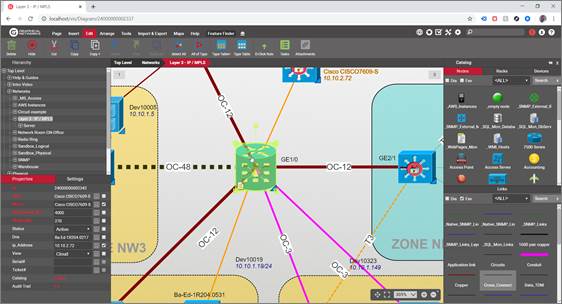
Auto-zooming of a node
4.6.14 ChangeLinksThicknessToZoomLevel
This setting determines the link thickness behavior when zooming in or out, for both static and dynamic diagrams:
-
0: the absolute link thickness is unchanged regardless of the zoom level. This means that as you zoom in the link thickness increases proportional to the zoom level and vice versa.
-
1: the absolute link thickness changes for OSP maps only. This means that the relative thickness remains unchanged so that it always looks the same regardless of zoom level.
-
2: same as above, but for any diagram type.
4.6.15 MinRelativeNodeSizePerc
This parameter determines the minimum possible size of a node dropped on a diagram, relative to the size of the diagram at the given zoom level. This is useful, when you need to drop nodes on a diagram while zoomed in or out and the node happens to have a very small default size. This setting makes sure that you can at least see the node. A parameter of 20, for example, means that regardless of the zoom level, a node you are dropping in (let’s pretend it is rectangular), cannot be bigger than 20% of the length of the visible diagram.
4.6.16 MaxRelativeNodeSizePerc
This parameter determines the maximum possible size of a node dropped on a diagram, relative to the size of the diagram at the given zoom level. This is useful, when you need to drop nodes on a diagram while zoomed in to prevent them from being bigger than the visible part of the diagram itself.
A parameter of 20, for example, means that regardless of the zoom level, a node you are dropping in (let’s pretend it is rectangular), cannot be bigger than 20% of the length of the visible diagram.
4.6.17 DynamicReportsInvalidProperty
A bit obscure, this parameter lets you specify what value you want to display when a property value is invalid within a dynamic query.
4.6.18 Map and general OSP settings
You can set up your Open Street Map server, which will involve a little bit of fiddling here and a whole lot of steps in your environment (see the Outside Plant section on your User Guide).
4.6.18.1 Map layers
Open Street Map, which is the map technology or GIS system we use for our outside plant maps, includes three different layers or types of views to render maps. We have three settings related to those, that let you specify the source of the map tiles that comprise the layers.
- MapSourceStandard: here you set up the source for the standard layer tiles.
- MapSourceTransport: same, but for the transport layer.
- MapSourceLight: same, but for the light layer.
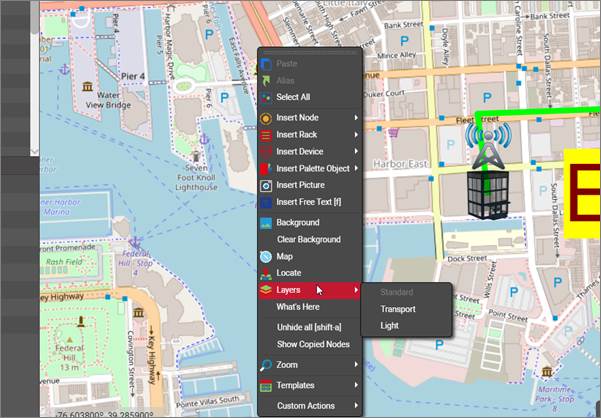
OSM Map layers
4.6.18.2 ZoomedOutObjectMapping
This one is quite important for proper tuning of the outside plant diagrams and deals with the representation of objects that look very small as you zoom out. As opposed to other regular diagrams, in outside plant projects it is very common to have large geographical areas be represented on one diagram by one OSM map. In those diagrams you may have nodes that you only see once zoom in a lot. In zoomed out mode those nodes would then basically disappear. But if that’s the case then you wouldn’t know where to find them when you first access that map.
In the settings.xml file we let you control how you would want those nodes represented in zoomed out mode. We can show clusters of nodes at zoomed out levels, so that at least you know where on the map you have nodes. We can also use halos, which are representations of the nodes that always look the same and have the same size on a diagram regardless of zoom level. The possible values are:
1 - Show clusters and halos
2 - Show halos only
3 - Show nothing
4.6.18.3 Circuit settings
Circuits are special Outside Plant elements that consist of end-to-end connections or services with their own special set of rules. For circuits we provide three settings:
CircuitNameLabel: the representation of the name field in circuit tables views in case you don’t want it to liteally say ‘Name’.CircuitTableDeleteButtonLocation: a bit obscure, this setting lets you control where on a table view you want the delete button to be located. 0 means left, 1 means right.CircuitNamesNotEditable: when set to true, circuit names cannot be edited on the table views after they have been created.
4.6.18.4 Strand settings
Strands are another special Outside Plant element with their own special set of rules. Strands pop up on a cable when a catalog manager creates that cable type in netTerrain with a non-zero strand count property value. For strands we also have some special foo that lets you fine-tune your fiber campus and outside plant diagrams.
StrandStatus0: default status value for the strand when it is first created as part of the cable.StrandColor: default strand color in case no color is aassigned to a strand in the catalog definition.StrandStatusUndefined: the value you want represented for strands when a status is not defined.StrandModeUndefined: same as above, but for strand modes.StrandStatusValues: the list of status values that are permitted for strands.StrandModeValues: same as above but for strand modes. The typical values are “Single,Multi”.AddLinkTypeStrandsQtyValues: list of all the possible strand counts that can be defined for a cable containing strands. The usual values are "0,2,4,6,8,12,24,48,72,144,288,512,1024".StrandNamesNotEditableOnDiagram: when set to true, strands names cannot be changed on a diagram. They are predefined in the catalog.StrandModeNotEditableOnDiagram: same as above but for the mode.HasStrandMarkerPosition: here you can define the position for the marker on a port, if said port has strands connected. The possible values include 0 (bottom right of port); 1 (center) and 2 (bottom left).
4.6.19 BOM settings
Along with all the elements above, in Outside plant projects you can also define a Bill of Materials report that is generated from a circuit layout record. Two settings help you customize these reports:
BOMReportCustomTextFilePath: the location of a file that can contain custom text that appears in every BOM report. The default is the netTerrain root folder.BOMReportBorderColor: self-explanatory.
4.6.20 CLR settings
In the settings.xml file you can also control some settings for the CLR representations in netTerrain, such as labels, font sizes and colors. The names of the settings are self-explanatory:
- BlockCLRByDefault:
- BlockCLRDisplayedField
- BlockCLRLabelsFontSize
- BlockCLRBuildingsLabelsFontSize
- BlockCLRManholesLabelsFontSize
- BlockCLRBoundsColor
- BlockCLREndEqDeviceLabel
- BlockCLREndEqCardLabel
- BlockCLREndEqPortLabel
- BlockCLRDeviceLabel
- BlockCLRCardLabel
- BlockCLRPortLabel
- CLRShowLinkName
4.7 Other Settings
Below is a list of additional settings you can control from the settings.xml. Descriptions for these are usually included in the settings file.
- ExtendedQueryFeatures
- ErrorApiLog
- FixFieldAccordingZoom
- EncryptUpgradeRequest
- MinDiagramToObjectsSquareRatio
- MinDiagramToObjectsSizeRatio
- DiagramObjectCatalogRemoveSearch
- DefaultDiagramGridSpacingX
- DefaultDiagramGridSpacingY
- EnableCatalogJsonExport
- EnableRackAudit
- AuditDate
- AuditStatus
- AuditedBy
- SNMPTrapsSeverity
- MobileAppIOS
- MobileAppAndroid
- BarcodeProperty
- EnableIpam
- IpamDashboardUrl