netTerrain 9.5 Collector Guide

Document Code. GN_D_nT9-08 Last revision: 07/27/2022
© 2022 Graphical Networks LLC. All rights reserved (but some wrongs are still available).
Our “keep the lawyers happy” disclaimer: Graphical Networks and netTerrain are registered trademarks of Graphical Networks LLC. Other product names mentioned in this manual may be trademarks or registered trademarks of their respective companies and are hereby acknowledged.
This document was created with 100% recycled electrons.
Before printing, careful with that PC load letter.
Image: Belgium Hallerbos Forest.
Graphical Networks LLC
Telephone: +1-240-912-6223
Fax: +1-240-912-6339 (where you can send us the purchase orders)
1 About this guide
1.1 Who should use it
The netTerrain collector is an automation engine used to discover network devices or import data into the main netTerrain application from external sources. It is a thick-client application that can be installed as a service on the netTerrain application server or on a separate machine.
This guide is intended for advanced netTerrain users or administrators that want to automate the data entry into process and populate netTerrain on a one-time or regular basis by setting up discovery processes or creating and managing connectors to external systems. In short, geeks like us.
1.2 Assumptions
This guide assumes basic knowledge of database queries, Microsoft Office tools and netTerrain end-user and power-user functions.
Discovery functions may require the user to have knowledge about WMI, SNMP and the Management Information Base (MIB) structure.
2 netTerrain Collector basics
The netTerrain collector is an automation engine that can help minimize the manual data-entry process by collecting data from the network or other systems. It also serves as an event console, being able to collect trap information and status changes for network elements.
It is a thick client application, usually residing on the netTerrain server, that can discover networks and devices, as well as import and reconcile assets from a variety of third-party systems via so-called connectors usually importing the data with RESTful APIs. As such it is an add-on for netTerrain Logical, netTerrain DCIM and netTerrain OSP to aid in the population of network diagrams.
The network discovery engine takes advantage of a variety of protocols to pull data natively from the network, including:
- SNMP
- SNMPv2c
- SNMPv3
- WMI
- netTerrain’s Environmental Monitoring tool which uses IPMI and other protocols
- Ping
- HTTP Basic Web Monitoring
Some of the objects the collector can discover include network devices (routers, switches, servers, etc.), port information, layer 3 network connectivity, layer 2 link connectivity, VLAN information, application information as well as properties from public and private MIBs.
The WMI discovery tool can discover hardware and software characteristics from WMI enabled devices.
In addition, you can import asset information into netTerrain from a variety of commercial IT management products using one of our many pre-defined connectors.
2.1 Main user interface components
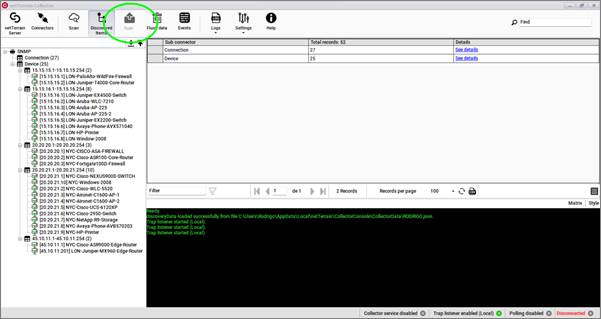
The netTerrain Collector is a thick client application with a simple User Interface (UI) that makes it easy to import data into netTerrain.
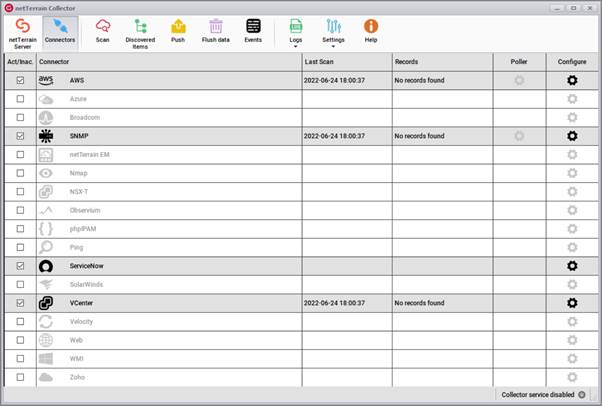
Connectors list
The UI includes two main views: the connectors list, which acts as the main view that is displayed when the user first launches the collector, and the discovered items. The main view displays a list of all the connectors (including discovery).
Discovered items can be accessed by clicking on the 'Discovered Items' button. This view, in turn, shows all the elements discovered by any connectors that were previously configured.

Discovered items
2.2 Installing the netTerrain Collector
The netTerrain collector can be operated from the netTerrain server or from any remote machine connected to the network. To obtain the collector, you download it directly from netTerrain by logging into the application as an end user. Head over to the tools ribbon and click on 'Utilities'->Collector.
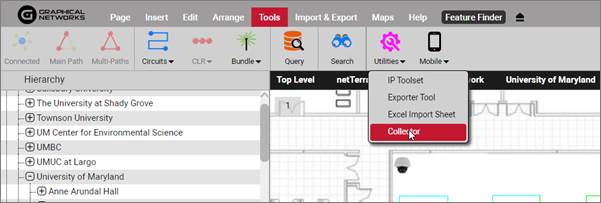
This will start the collector download process. Once the download is complete, click on Open (or run the executable).
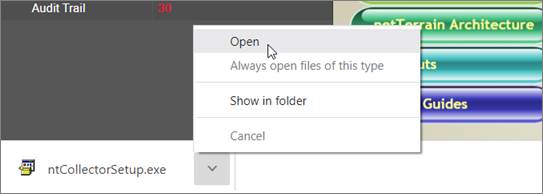
Proceed to click on 'Next', accept the lovely terms and conditions and all the usual stuff.
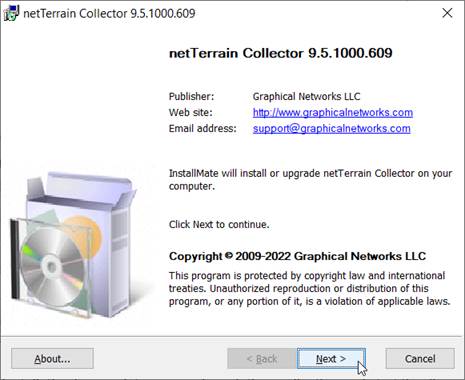
Once the installation is complete you can launch the application and start the discovery process.
In case of issues, if you contact Graphical Networks support we may request the netTerrain Collector version number which can obtained by clicking on the Help button.
About dialog
2.3 Connecting to a netTerrain server
To get started with the collector it is recommended that you first connect it to a netTerrain server instance. Although this is not mandatory, since the collector can work in offline mode, we recommend setting this up right away so that you can push any discovered data to netTerrain.
Click the “netTerrain Server” button on the top left and copy and paste your netTerrain URL in the designated space. If you are using the netTerrain cloud server then the URL of your instance may be pre-populated. You will just need to supply a user and password.
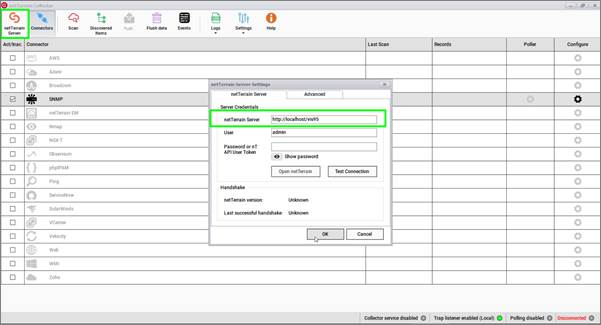
As a next step we suggest testing the connection to make sure the credentials are correct.
2.3.1 netTerrain server connection errors
The collector connection may fail for several reasons. The most common one is that your netTerrain has the API access disabled. To enable API access to the netTerrain server, a netTerrain admin must go to API section in the admin console and enable access to the API as shown below:

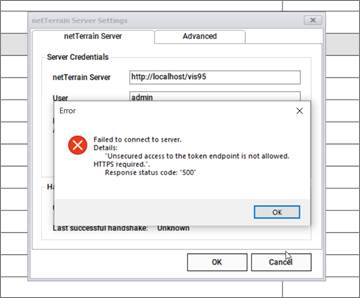
Another common problem is a ‘403’ being thrown for an attempt at accessing the netTerrain server throw a so-called insecure channel, such as netTerrain being hosted on a server without ssl being enabled. Sometimes, by default, netTerrain has insecure access through http disabled. An admin can enable insecure access by switching the 'OAuthAuthenticationAllowInsecureHttp’ tag in the settings.xml file to ‘true’, as shown below:

We do not recommend enabling this set setting in a production environment, and eventually configuring ssl for your netTerrain server for a secure communications channel between clients or collectors and your server.
If, after switching the insecure http tag to true you still get a ‘500’ error with correct credentials you may want to shut down the collector app, restart IIS and restart the collector.
Once you restart IIS and reconnect the collector you should get a valid connection test.
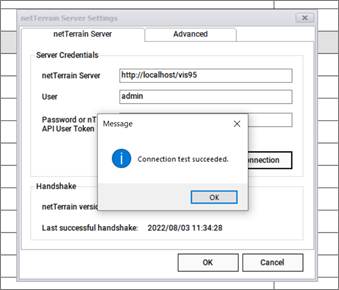
Successful netTerrain server connection
3 Setting up connectors
The netTerrain collector comes equipped with a list of pre-defined connectors to other commercial products.
Since the netTerrain collector includes mechanisms to discover the network directly, such as SNMP or WMI, we tend to distinguish the native discovery processes from the connectors to third-party products, but technically speaking, they are all connectors. However, in this chapter, we will focus on connectors to third-party systems. Native discovery connectors such as SNMP will be reviewed in the next chapter.
3.1 Pre-defined connectors list
To view the list of all connectors, click on the connectors button. This will display a list of all the current connectors included with the collector, which let you import data from the following systems:
• Amazon AWS
• Microsoft Azure
• Nmap
• NSX-T
• Observium
• phpIPAM
• Service Now
• Solarwinds Orion NPM
• CA Spectrum
• VMware VCenter
• Velocity Software
• Zoho
3.2 Configuring a connector
Below we will briefly review each specific connector, but in general terms, the configuration process is pretty much the same for all connectors. As an example, we will configure the VCenter connector.
3.2.1 Main credentials and API endpoints
To configure a connector from the connectors list, simply click on the gear icon on the right. This will open a dialog to start the configuration process.
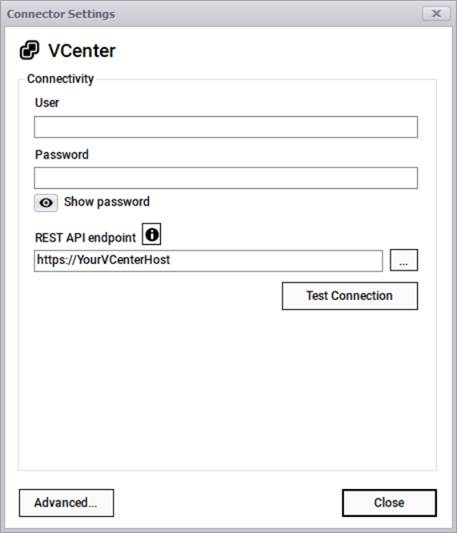
Connector settings dialog
Most connectors will require credentials such as a user and password, to extract data from the source. Also, if the connector imports data from the third-party system via REST APIs, you will have to supply a REST API endpoint. You can also edit the endpoint by clicking on the ellipsis button. Some connectors may require other parameters such as a key.
Once you edited the credentials you can test the connection to the system by clicking on the 'Test connection' button.
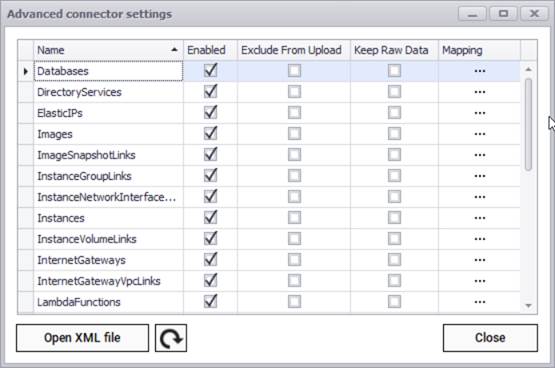
3.2.2 Advanced Settings
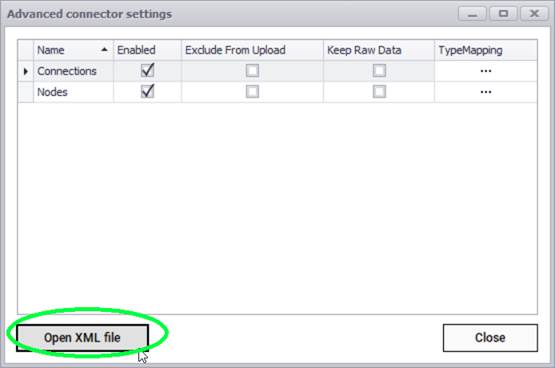
All connectors include an 'Advanced' button with additional settings to fine-tune the import process. The advanced dialog includes additional settings to help you fine-tune the import process from the third-party system into netTerrain

Advanced connector settings for VCenter
In the case of the VCenter connector (above) we can see that there are several rows listing different entity names, such as folder and host. These are so-called sub connectors or entities associated with VCenter and you can specify in a granular fashion which ones you want to discover or synchronize with objects in netTerrain. If you don't want a certain entity name to be discovered, you uncheck it from the enabled column. The specification of how you want to map an entity with netTerrain is done through the TypeMapping button.
You can limit the overall import behavior by excluding certain entities from an upload. Usually, you would do this when you want to discover the entity and simply check it out in the collector without uploading any of the data to the netTerrain server.
In addition, you can choose to import the entity data into the netTerrain database as raw tables, without synching it up with netTerrain nodes or links. This could be useful when you need to have the entity data in the netTerrain database, for example, to then map it to the Integration Toolkit or to create a dashboard report with the raw data, without having to also replicate the information as nodes or links in netTerrain.
All connector configuration data is ultimately stored in an XML file. Advanced users may want to configure the connector by editing the XML file directly. These files do contain some additional power-user settings to fine-tune the connectors.
3.3 Built-in connectors
To view the list of all connectors, click on the connectors button. This will display all the current connectors included with the collector, which let you import data from an ever-growing list of commercial systems
3.3.1 AWS
Amazon Web Services (AWS) provides on-demand cloud computing platforms and APIs to individuals, companies, and governments, on a metered pay-as-you-go basis. AWS includes several monitoring tools, which can be consumed from an external platform via the AWS API set.
The AWS connector can pull information from an AWS account and its associated regions, instances and a host of associated data. To connect to your AWS account, you must provide:
- Region
- Access key
- Secret key
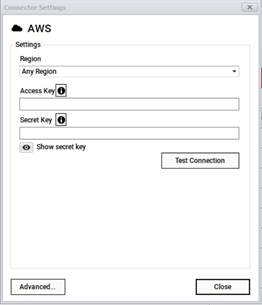
AWS login
After testing the connection successfully, you can specify which entity names need to be imported into netTerrain by using the advanced settings. Currently the AWS connector can pull data for the following entities:
- Databases
- Directory Services
- Elastic IPs
- Images
- Image snapshot links
- Instance group links
- Instance network interface links
- Instances
- Instance volume links
- Internet gateways
- Internet gateway VPC links
- Lambda Functions
- Lambda Layers
- NAT gateways
- Network ACLs
- Network ACL subnet links
- Network interfaces
- Policies
- Roles
- S3 buckets
- Security groups
- Snapshots
- Subnets
- Users
- Volumes
- VPCs
- Workspaces
AWS advanced connector settings
3.3.2 Azure
Microsoft Azure, commonly referred to as Azure, is a cloud computing service created by Microsoft for building, testing, deploying, and managing applications and services through Microsoft-managed data centers.
The Azure connector can pull information from an Azure account and its associated servers, resources and more. To connect to your Azure account, you must provide:
- Subscription Id
- Tenant Id
- Client Id
- Client secret key
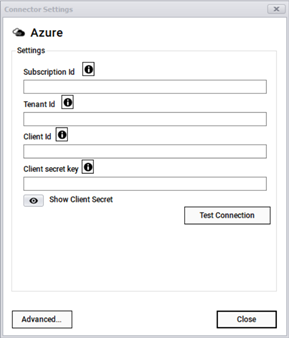
Azure login information
After testing the connection successfully, you can specify which entity names need to be imported into netTerrain by using the advanced settings. Currently the connector can pull data for the following entities:
- Network security groups
- Network security rules
- Resource groups
- Resources
- SQL Servers
- Subscriptions
- Virtual machines
- VM disks
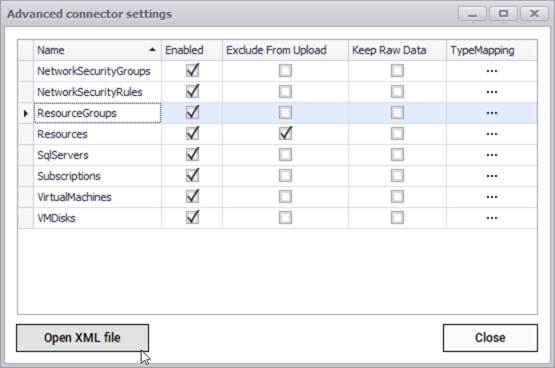
Azure advanced connector settings
3.3.3 NMAP
Nmap is used to discover hosts and services on a computer network by sending packets and analyzing the responses. Nmap provides several features for probing computer networks, including host discovery and service and operating system detection.
The NMAP connector can pull information that is synched up with an NMAP installation. To utilize the NMAP connector, point the Collector to the NMAP.exe file. The default location is typically C:\Program Files (x86)\Nmap\NMAP.exe. Also, it may be necessary to confirm that Npcap is installed.
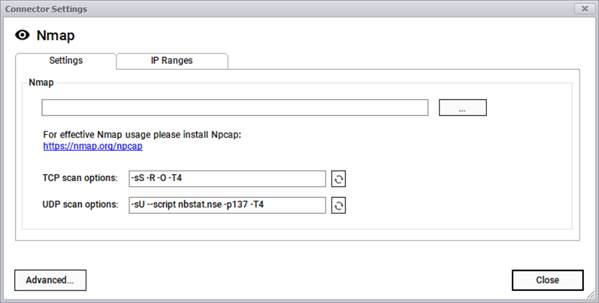
NMAP connector settings
Once the Collector is pointing to the proper NMAP.exe file, use the IP Ranges tab to configure IP address ranges used for discovery. This works in a similar fashion as the collector's native SNMP discovery.
You can add IP ranges manually or import them from a text file. When importing from a text file make sure the IP addresses are properly configured by adding one address per line.

NMAP IP Ranges dialog
You can add as many IP ranges as you want and use the enable/disable options to filter out specific IP ranges for a given discovery cycle.
Currently the NMAP connector can pull data for the following entities:
- Devices
- Software ports
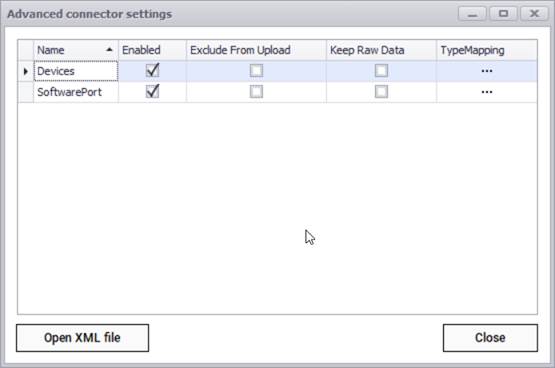
NMAP advanced connector settings
3.3.4 NSX-T
VMware NSX-T Data Center provides an agile software-defined infrastructure to build cloud-native application environments. NSX-T Data Center supports cloud-native applications, bare metal workloads, multi-hypervisor environments, public clouds, and multiple clouds.
The NSX-T connector can pull information from a VMware NSX-T account and its associated resources. This connector uses the classic REST-API endpoint pull approach where it connects to your account via a user, a password, and a REST endpoint.
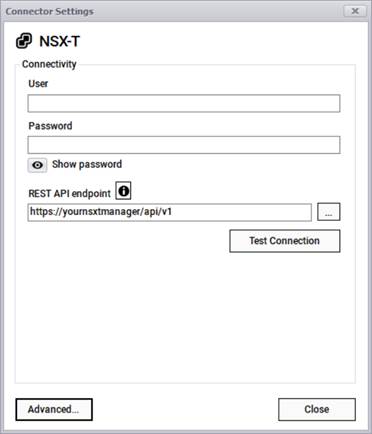
NSX-T connection information
After testing the connection successfully, you can specify which entity names need to be imported into netTerrain by using the advanced settings. Currently the connector can pull data for the following entities:
- Logical ports
- Logical routers T0
- Logical routers T1
- Logical switches
- Node capabilities
- Node interfaces
- Nodes
- Vifs
- Virtual machines

NSX-T advanced connector settings
3.3.5 Observium
Observium is a network monitoring platform supporting the auto-discovery of device types, platforms and operating systems.
The Observium connector can pull information from an Observium account using the classic REST-API pull approach where it connects to your account via a user, a password, and a REST endpoint.
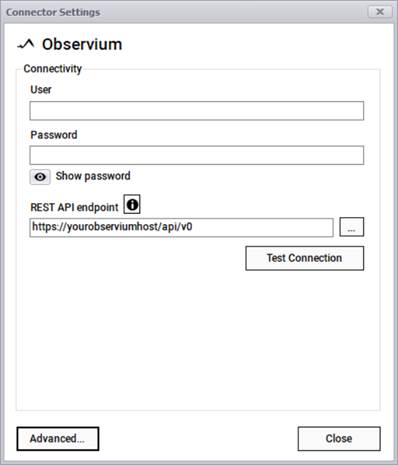
Observium connection information
After testing the connection successfully, you can specify which entity names need to be imported into netTerrain by using the advanced settings. Currently the connector can pull data for devices only.

Observium advanced connector settings
3.3.6 phpIPAM
phpIPAM is an open-source web IP address management application (IPAM).
The phpIPAM connector can pull information from a phpIPAM account using the classic REST-API pull approach where it connects to your account via a user, a password, and a REST endpoint.
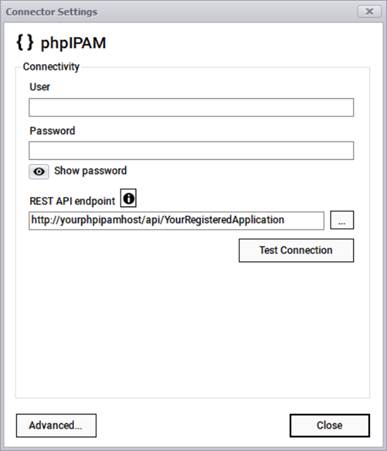
phpIPAM connection information
After testing the connection successfully, you can specify which entity names need to be imported into netTerrain by using the advanced settings. Currently the connector can pull data for the following entities:
- Admins
- Addresses
- Devices
- L2 domains
- Sections
- Subnets
- Tags
- Users
- VLans
- VRFSs
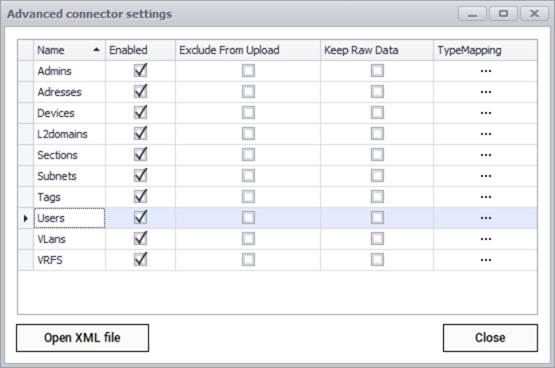
phpIPAM advanced connector settings
3.3.7 ServiceNow
ServiceNow is a cloud computing platform to help companies manage digital workflows for enterprise operations.
The ServiceNow connector can pull information from an account using the classic REST-API pull approach where it connects to your account via a user, a password, and a REST endpoint.
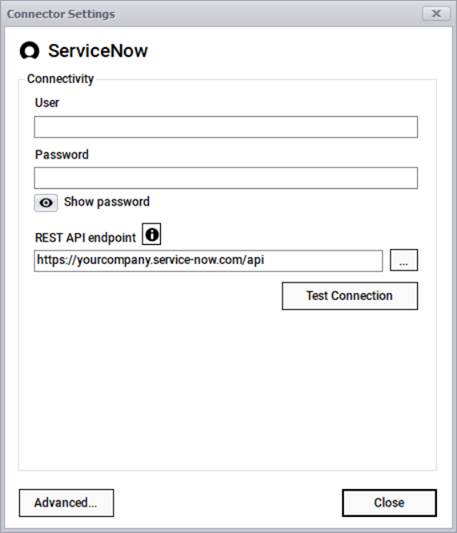
ServiceNow connection information
After testing the connection successfully, you can specify which entity names need to be imported into netTerrain by using the advanced settings. Currently the connector can pull data for the following entities:
- Application
- BigIp
- Circuit
- CMDB
- Computer room AC
- Hardware
- IP device
- IP firewall
- IP phone
- IP router
- Netscaler
- Outlet
- Servers full
- Stock room
- UC warranty
- UC warranty support level
- Users brief
- Warranty
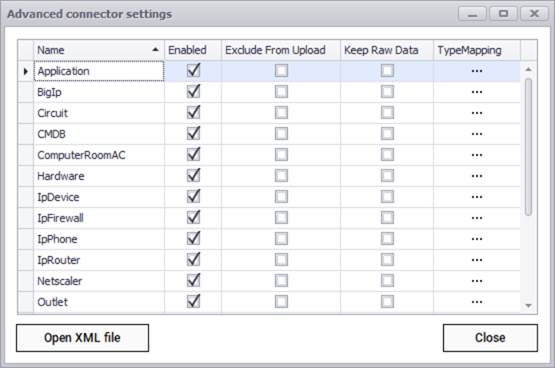
ServiceNow advanced connector settings
3.3.8 SolarWinds
SolarWinds develops software for businesses to help manage networks, systems, and information technology infrastructure. The Network Performance Monitor (NPM) platform is used by companies to discover and monitor computer networks.
The SolarWinds connector for NPM can pull information from a SolarWinds instance using the classic REST-API pull approach where it connects to your account via a user, a password, and a REST endpoint.
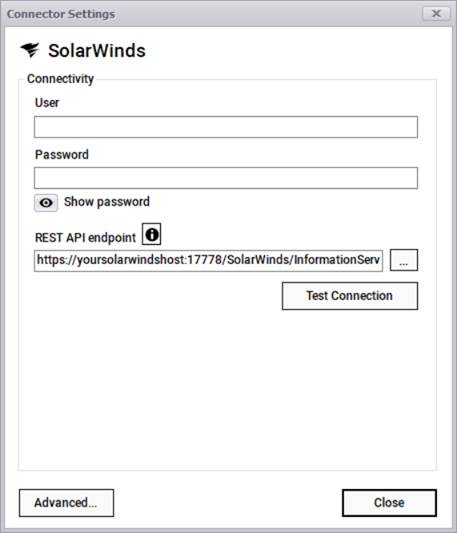
SolarWinds connection information
After testing the connection successfully, you can specify which entity names need to be imported into netTerrain by using the advanced settings. Currently the connector can pull data for the following entities:
- Connections
- Nodes
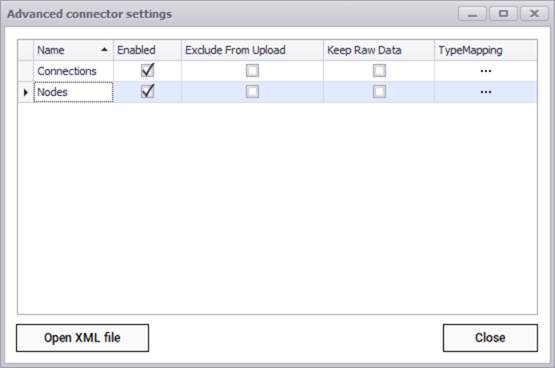
SolarWinds advanced connector settings
3.3.9 Spectrum (CA/Broadcom)
CA Spectrum (Now Broadcom) delivers technologies that automate device discovery and root cause analysis, speeding issue detection and remediation.
The Spectrum connector can pull information from a Spectrum instance using the classic REST-API pull approach where it connects to your account via a user, a password, and a REST endpoint.
x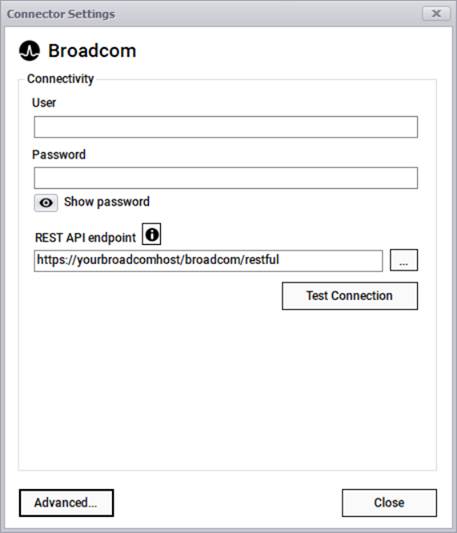
Broadcom connection information
After testing the connection successfully, you can specify which entity names need to be imported into netTerrain by using the advanced settings. Currently the connector can pull data for the following entities:
- Connectivity
- Device
- Landscape

Spectrum advanced connector settings
3.3.10 Vcenter
vCenter Server is the centralized management utility for VMware, and is used to manage virtual machines, multiple ESXi hosts, and all dependent components from a single centralized location.
The VCenter connector can pull information from a VCenter instance using the classic REST-API pull approach where it connects to your account via a user, a password, and a REST endpoint.
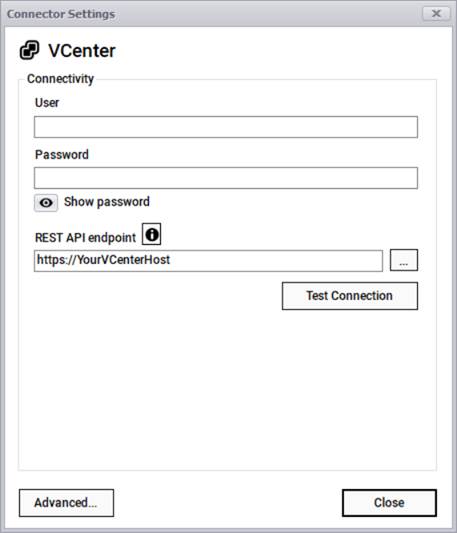
VCenter connection information
After testing the connection successfully, you can specify which entity names need to be imported into netTerrain by using the advanced settings. Currently the connector can pull data for the following entities:
- Folder
- Host
- Host port group
- Host port group port
- Image
- Network
- VCenter
- Virtual switch
- VM
- VM_Disk
- VM_Network Card
- VM_Nic
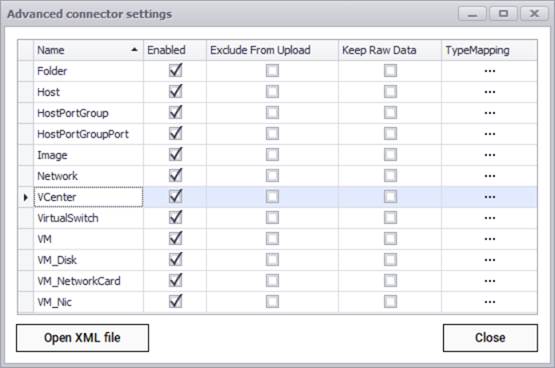
VCenter advanced connector settings
3.3.11 Velocity
The Velocity connector can pull device information from a Velocity instance using the classic REST-API pull approach where it connects to your account via a user, a password, and a REST endpoint.
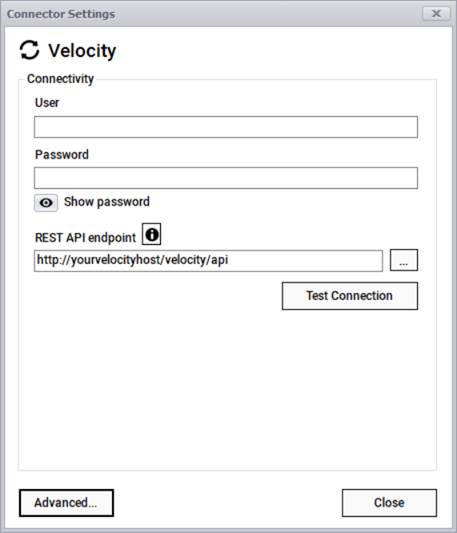
Velocity connection information
After testing the connection successfully, you can specify which entity names need to be imported into netTerrain by using the advanced settings. Currently the connector can pull data for devices only.
3.3.12 Zoho
Zoho CRM is a cloud-based CRM system that is used by corporations to manage their sales pipeline as well as marketing initiatives, support and more.
The Zoho connector can pull device information from a Velocity instance using a RESTAPI interface where it connects to your account via the following parameters:
- Client Id
- Client secret
- User email
- Grant token
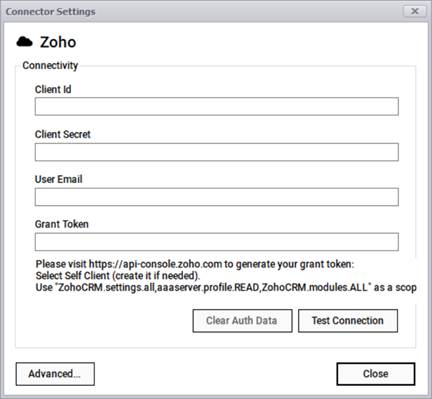
Zoho connection information
After testing the connection successfully, you can specify which entity names need to be imported into netTerrain by using the advanced settings. Currently the connector can pull data for:
- Accounts
- Calls
- Contacts
- Deals
- Leads
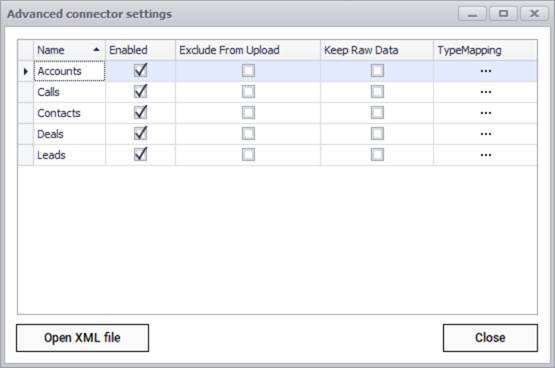
Zoho advanced connector settings
4 Setting up native discovery
Along with connectors, the collector also includes a native discovery engine, currently supporting the following methods or protocols:
- SNMP
- Environmental monitoring (netTerrain EM)
- Ping
- WMI
- Web
Strictly speaking, these methods are also configured and listed like the connectors described in previous chapters, but instead of relying on third-party systems to collect the data, they gather the information directly from the network (the only exception perhaps, being the EM method, which relies on the netTerrain Environmental Module).
In the following paragraphs we will provide the basics for setting up native discovery and review each method.
4.1 SNMP
The Native SNMP auto-discovery module can discover devices from the network, by polling the device management IP addresses. It will then discover properties from those devices using a predefined list of so-called ‘MIB’ (Management Information Base) variables. This component supports all standard SNMP versions:
- SNMPv1
- SNMPv2c
- SNMPv3.
Via SNMP, the collector can discover the following device related information:
-
Standard System MIB properties
-
Any custom (public or private) MIB, which can be mapped to any custom field in netTerrain
-
Interface information, including status, reading from the MIB interface table
-
Layer 3 links (via IP address and routing tables)
-
Layer 2 links (via interface and bridge tables, CDP and LLDP)
-
VLAN information
-
Stacked switches status and configuration
-
Up/down status for devices (this also uses Ping as a primary method, along with SNMP System get as a backup method)
Once devices are discovered, this module behaves much like a device connector in the sense that it maps the discovered elements with devices in netTerrain. As described in the introduction to the chapter, the SNMP method also has a predefined connector listed in the connector list and is called ‘SNMP’. This connector can also be scheduled for automatic discovery and reconciliation, just like any other connector.
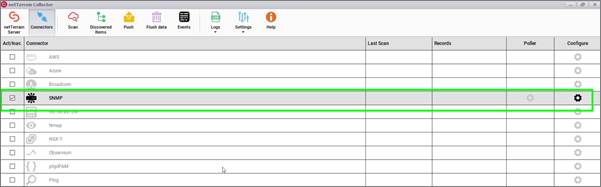
Native SNMP discovery as part of the connectors list
4.1.1 SNMP accessibility and security
A device is considered discoverable when the following is true:
-
The IP address provided to the collector is the management IP address of the device
-
SNMP is enabled on the device
-
The device is, in principle, reachable (such as being on the same network and responding to an SNMP get request)
-
The credentials associated with the IP address are correct
SNMP provides a layer of security in its latest version 3. SNMP version 1 and 2 have no security, except for a so-called 'community string', which is a simple string that needs to be provided along with the management IP address.
SNMP version 3 provides additional security features compared to SNMPv1 and v2s:
- A user identifier
- Authentication of the user who sent the PDU. The authentication protocols include SHA and MD5.
- Encryption of protocol data units (PDUs) to prevent unauthorized users from viewing the contents. SNMPv3 supports AES and DES for encryption.
- A context string parameter
As with SNMPv1 and v2c, each IP address or range can have its own SNMPv3 parameters.
Depending on the security settings for the range in question, you can set the flags that define which security features are needed.
4.1.2 Built-in MIBs
The foundation of an SNMP-based management system is a database containing information about the objects in the network to be queried. This database is referred to as the Management Information Base (MIB) and each resource to be managed in that database is an object. The MIB then is a structured collection of objects in the form of a tree. Associated with each object in the tree is an object identifier (OID) which follows a notation (Abstract Syntax Notation 1 or ASN.1) consisting of a set of integers separated by dots. The figure below illustrates part of the MIB-2 structure.

MIB-2 structure
The Native SNMP discovery uses the following OID prefixes (leafs depicted in red above):
-
System group (OID 1.3.6.1.2.1.1): they obtain basic device information.
-
Interface group (OID 1.3.6.1.2.1.2): they obtain basic interface (port) information. This data can be automatically mapped to the ports defined for a given type in the netTerrain catalog.
-
IP address group (OID 1.3.6.1.2.1.4): they comprise the IP address and routing table MIBs to obtain layer 3 link information between devices.
4.1.2.1 System MIBs
The system MIBs that are currently supported include the list below (we also include the ASN.1 definition for each):
-
sysName: “An administratively-assigned name for this managed node. By convention, this is the node's fully-qualified domain name”.
-
ipAddress
-
sysObjectId: “The vendor's authoritative identification of the network management subsystem contained in the entity. This value is allocated within the SMI enterprises subtree (1.3.6.1.4.1) and provides an easy and unambiguous means for determining `what kind of box' is being managed”.
-
sysUpTime: “The time (in hundredths of a second) since the network management portion of the system was last re-initialized”.
-
sysContact: “The textual identification of the contact person for this managed node, together with information on how to contact this person”.
-
sysDescr: “A textual description of the entity. This value should include the full name and version identification of the system's hardware type, software operating-system, and networking software. It is mandatory that this only contain printable ASCII characters”.
-
sysLocation: “The physical location of this node”.
-
sysServices: “The value which indicates the set of services that this entity primarily offers. The value is a sum. This sum initially takes the value zero, Then, for each layer, L, in the range 1 through 7, that this node performs transactions for, 2 raised to (L - 1) is added to the sum. For example, a node which performs primarily routing functions would have a value of 4 (2^(3-1)). In contrast, a node which is a host offering application services would have a value of 72 (2^(4-1) + 2^(7-1))”.
-
ifNumber: “The number of network interfaces (regardless of their current state) present on this system”.
4.1.2.2 Interface MIBs
When port monitoring is enabled, the collector can discover interface properties for devices using the interfaces group MIB . The properties that can be monitored include:
-
ifDescr: “Textual string containing information about the interface. This string should include the name of the manufacturer, the product name and the version of the hardware interface”.
-
ifType: “The type of interface, distinguished according to the physical/link protocol(s) immediately `below' the network layer in the protocol stack”.
-
ifSpeed: “An estimate of the interface's current bandwidth in bits per second. For interfaces which do not vary in bandwidth or for those where no accurate estimation can be made, this object should contain the nominal bandwidth”.
-
ifPhysAddress: “The interface's address at the protocol layer immediately `below' the network layer in the protocol stack. For interfaces which do not have such an address (e.g., a serial line), this object should contain an octet string of zero length.
-
ifAdminStatus: “The desired state of the interface”.
-
ifOperStatus: “The current operational state of the interface”.
-
ifLastChange: “The value of sysUpTime at the time the interface entered its current operational state. If the current state was entered prior to the last re-initialization of the local network management subsystem, then this object contains a zero value”.
Of special interest are the ifAdminStatus and ifOperStatus, which can be used to represent status values in netTerrain and be used as a visual override to change the port colors. Possible values for these parameters are:
-
up (1)
-
down (2)
-
testing (3)
4.1.2.3 IP address table and routing table MIBs
When link monitoring is enabled, the collector can discover layer-3 topology for routers or devices that store routing table information in the IP group MIBs. Discovered links will include the following properties:
- ipRouteDest: “The destination IP address of this route. An entry with a value of 0.0.0.0 is considered a default route. Multiple routes to a single destination can appear in the table, but access to such multiple entries is dependent on the table-access mechanisms defined by the network management protocol in use”.
- ipRouteAge: “The number of seconds since this route was last updated or otherwise determined to be correct”.
- ipRouteMask: “Indicate the mask to be logical-ANDed with the destination address before being compared to the value in the ipRouteDest field”.
- ipRouteIfIndex: “Index value which uniquely identifies the local interface through which the next hop of this route should be reached. The interface identified by a particular value of this index is the same interface as identified by the same value of ifIndex”.
- ipRouteMetric1: “Primary routing metric for this route. The semantics of this metric are determined by the routing-protocol specified in the route's ipRouteProto value. If this metric is not used, its value should be set to -1”.
- ipRouteNextHop: “IP address of the next hop of this route”.
- ipRouteType: “Type of route”.
- ipRouteProto: “Routing mechanism via which this route was learned”.
The ipRouteType is an integer value with the following translation table:
-
1: other
-
2: invalid
-
3: direct
-
4: indirect
The collector will store the actual integer value for each route and append the string value when it reconciles the routes as links in netTerrain.
The ipRouteProto is an integer value with the following translation table:
-
1: other
-
2: local
-
3: netmgmt
-
4: icmp
-
5: egp
-
6: ggp
-
7: hello
-
8: rip
-
9: is-is
-
10: es-is
-
11: ciscoIgrp
-
12: bbnSpflgp
-
13: ospf
-
14: bgp
4.1.3 Setting IP addresses and ranges
The first step in setting up SNMP discovery involves the creation of IP address ranges (or single IP addresses) in the connector settings dialog. This is necessary because the SNMP scanning process requires an IP address management to discover the devices. As mentioned before, the Collector supports SNMPv1, SNMPv2, and SNMPv3.
To insert the IP addresses in the settings, open the settings dialog for the SNMP connector.
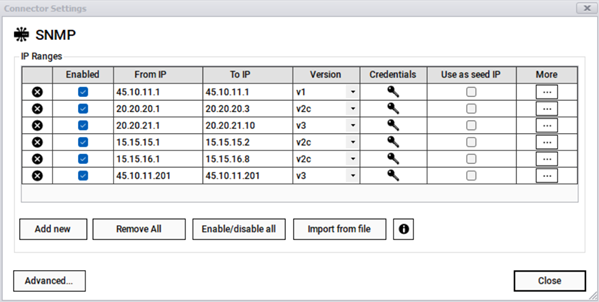
Connector settings to enter IP addresses
IP address ranges can be added manually or imported from a file. To add them manually, click on the "Add new” button and enter one at a time making sure the 'From IP' and 'To IP' fields are properly formatted to an IP address (without the CIDR notation). If a given entry has the same value for both fields, then you are effectively entering a single IP address, which is totally valid.
To delete an entry, simply click on the 'X' button. You can remove all entries with the 'Remove All' button. Warning aside, use with caution!
If you don't want a specific range or address to be scanned during a cycle, you can uncheck it from the 'Enabled' box. This comes in handy when you want to run a discovery against a smaller set of IP addresses without having to remove the remaining addresses from the list. You can enable or disable all addresses with the 'Enable/disable All' button.
The SNMP version can be changed under the 'Version' drop down. The community strings for SNMP can be entered in the 'Credentials' section. By default, the community string is 'public'.
4.1.3.1 Importing IP addresses from a file
Individual, or groups of IP address ranges can be entered by importing them from a file. A sample of the formatting is provided below:

Sample IP file upload
All properties used for each range, including credential data for SNMPv2 and v3 can be included in the spreadsheet. Credential information is encrypted in the collector but notice that to enter it from the spreadsheet itself, it needs to be provided in clear text, so it is highly recommended that you delete the file after using it for the import process.
Once you have the file handy, import it into the collector by clicking on the 'Import from file' button. After you select the (properly formatted) file, IP addresses will be displayed on the IP address range table for further editing.
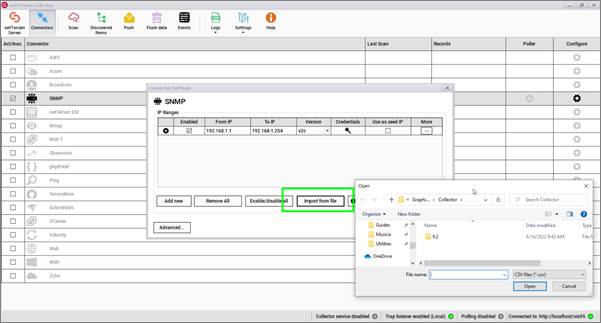
Importing IP addresses from a file
4.1.4 Using IP seed discovery
The default method for discovering devices is to scan all enabled ranges one at a time. A second method for discovering devices is to set one individual IP address as a so-called 'seed'. When an IP address is set as a seed, the collector starts the discovery process with that specific device, and then tries to "crawl" the network by inspecting other existing IP addresses configured on that device.
The seed discovery process can be configured from the 'Advanced' dialog to include specific means to crawl the network, including the crawling depth and methods.
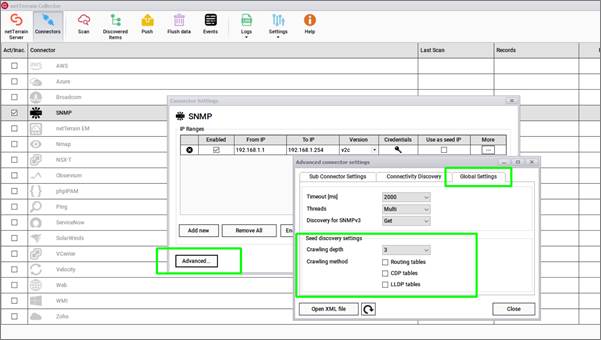
Seed discovery settings
The crawling depth refers to the number of "jumps" (hops, or layers) the collector must traverse until it considers the discovery process exhausted. The larger the depth, the longer it takes to process the discovery. While any of the discovery branches that originated from the original seed has not been exhausted, the collector will try to keep discovering new devices as long as the IP addresses discovered from the previous node correspond to actual management IP addresses of new devices and said devices can be accessed.
A sufficiently large depth may ensure that you discover your entire network. This is so, because the collector will prevent getting into any loops and eventually IP addresses start repeating themselves, and/or you run out of new IP address to discover.
The crawling methods are the different IP address tables that the collector can use to find new potential IP addresses to discover. These must come from each discovered node and include the following:
-
Routing tables: the layer 3 table stored in routers to enable IP packet forwarding
-
CDP tables: Cisco specific layer 2 tables used to forward packets from one edge to the next
-
LLDP tables: CDP-like layer 2 forwarding tables
We recommend keeping the default settings for a crawling process in case seed discovery is to be used.
Attention!
You can only have one IP address entry set for seed discovery, and said entry needs to consist of a single IP address ('From IP' and 'To IP' must coincide).
4.1.5 Advanced SNMP settings
For more specific settings the 'Advanced connector settings' dialog includes three tabs to fine tune your SNMP discovery processes.
Advanced SNMP Settings
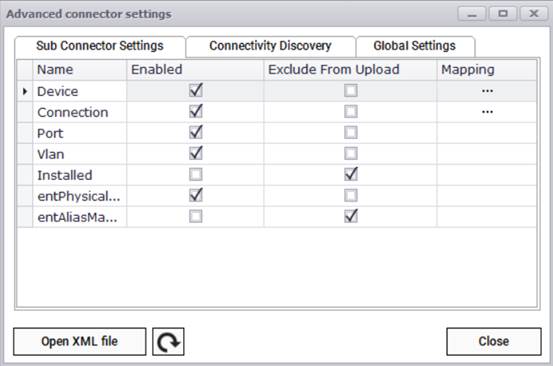
4.1.5.1 SNMP entities
The sub connectors settings tab lets you control the granularity of the information you will be retrieving from the network by letting you specify which entities to enable, upload and map, including:
-
Devices
-
Connections
-
Ports
-
Vlans
-
Installed software
-
entPhysical Table
-
entAlias Mapping Table
4.1.5.2 SNMP connectivity
The second tab controls the granularity of the link information you will be retrieving from the network.
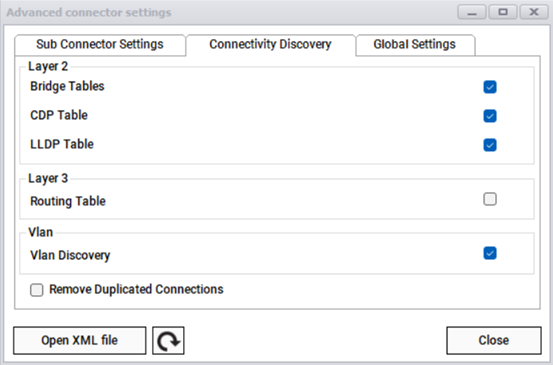
When the Layer 2 option is checked, the collector will scan one or more layer 2 table data for the managed device to determine what layer 2 links were configured for that device. netTerrain will then display these links as lines between that device and the endpoints.
Layer 2 table options include:
-
Bridge tables, pulled from the bridge MIB data
-
CDP /LLDP tables
If you want layer 2 information to be discovered, we recommend having all options checked.
When the Layer 3 option is checked, the collector will scan IP address tables and routing tables for the managed device to determine what routes were configured for that device. netTerrain will then display these routes as layer 3 links between that device and the endpoints.
The Vlan section lets you check whether Vlans should be discovered or not. When checked, any Vlans associated with ports will be displayed as table reports in netTerrain associated with said ports.
During the link discovery process the collector may create duplicate connections if any link is discovered independently via two or more different discovery protocols. By default, the ‘Remove Duplicated Connections’ should be checked to prevent these duplicate connections from being created.
4.1.5.3 Advanced XML file configuration
Additional advanced features can be fine-tuned from the XML file associated with the SNMP connector by clicking on the 'Open XML file' button.
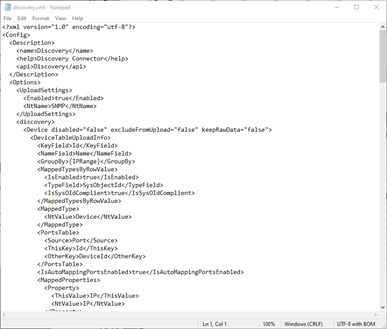
SNMP XML File
The file lets you manually map entities, fields and other advanced parameters.
4.1.5.4 SNMP Global settings
This tab controls general SNMP discovery parameters like the timeout associated with a Get command, the number of threads used for the discovery, and the method used for SNMPv3 discovery.
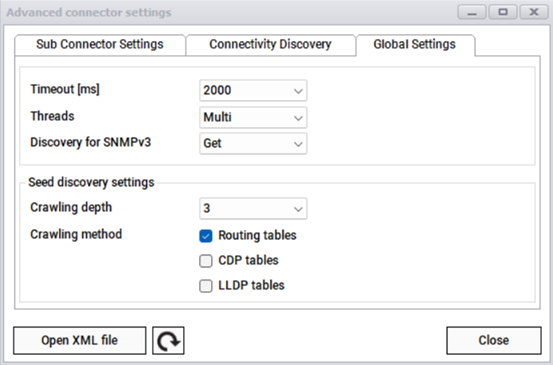
In this tab, as described in the seed discovery sub chapter, you can control the parameters for a seed discovery process, such as the crawling depth and methods.
4.1.6 SNMP Trap listener
SNMP traps are unsolicited asynchronous messages sent by SNMP-enabled devices, usually related to issues, warnings and errors that may be important for a manager. SNMP traps constitute a popular passive monitoring technique that helps network administrators understand any performance deviation and device health related issues. The netTerrain Collector supports SNMP traps and visualizes them on the netTerrain event console. These can be enabled or disabled through the trap listener configuration dialog. You can access to the SNMP Trap Listener clicking on the settings button of the menu or clicking on the trap listener on the status bar at the bottom of the Collector UI.

Collector admins can start and stop the SNMP trap listener from the SNMP trap listener configuration dialog and enable or disable to the process of running it on application or services starts.
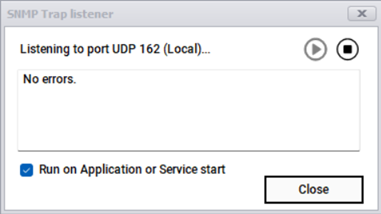
Once the trap listener is enabled, the collector will not automatically receive traps unless devices themselves are configured to forward traps. Also, you may have to configure devices to forward traps to a specific IP address for the collector to receive them.
Once the trap forwarding is properly configured and the trap listener is enabled, the collector will start receiving traps and display them on the event console.
Event console
4.2 WMI and Ping
Windows Management Instrumentation (WMI) consists of a set of extensions to the Windows Driver Model that provides an operating system interface through which instrumented components provide information and notification. Through WMI devices allow management information to be shared between management applications.
Ping operates by sending Internet Control Message Protocol (ICMP) echo request packets to the target host and waiting for an ICMP echo reply. netTerrain can represent objects discovered via an ICMP request as generic nodes.
WMI and Ping are additional methods supplied to enhance your native discovery processes. In both cases, for the methods to work, target devices need to have WMI and/or ping enabled.
4.2.1 WMI
WMI is mostly used to discover and import windows server properties into netTerrain. To use WMI discovery you first have to enable the feature on the target servers. To enable WMI go to administrative toolsàservices and find the windows management instrumentation feature. You will need to start it as a service.
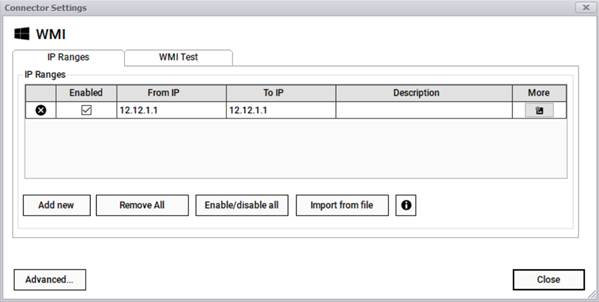
Once enabled, proceed to insert the target IP addresses in the settings dialog, which you can open from the WMI connector settings button.
IP address ranges can be added manually or imported from a file. To add them manually, enter one at a time making sure the 'From IP' and 'To IP' fields are properly formatted to an IP address (without the CIDR notation). If a given entry has the same value for both fields, then you are effectively entering a single IP address, which is totally valid.
Once a range is entered, a new row is automatically generated for new entries. To delete an entry, simply click on the 'X' button. You can remove all entries with the 'Remove All' button. Warning aside, use with caution!
If you don't want a specific range or address to be scanned during a cycle, you can uncheck it from the 'Enabled' box. This comes in handy when you want to run a discovery against a smaller set of IP addresses without having to remove the remaining addresses from the list. You can enable or disable all addresses with the 'Enable/disable All' button.
Additional security settings for the WMI discovery process can be entered for each row by clicking on the 'advanced configuration' button.
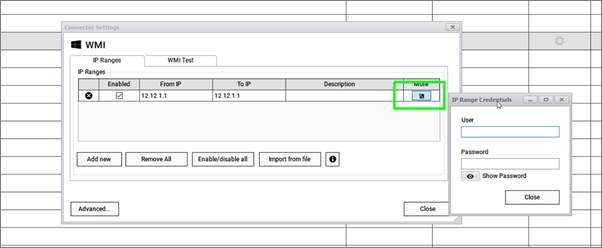
IP range credentials for WMI
A WMI test can be performed from the WMI Test tab, providing the collector with your target server host, user and password parameters.
After setting up the WMI IP ranges and credentials, you can specify which entity names need to be discovered and imported into netTerrain by using the advanced settings. Currently the WMI connector can pull data for the following entities:
- BIOS
- Disk
- Memory
- IO
- Process
- Processor
- System
- System enclosure
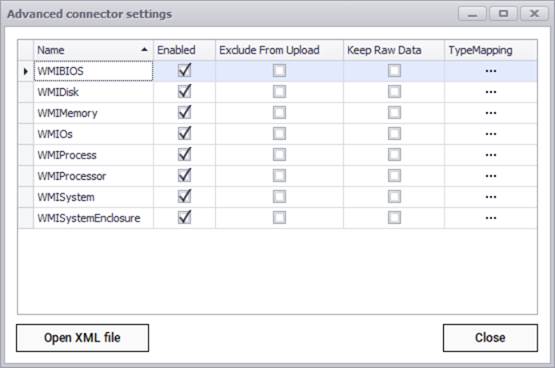
WMI advanced connector settings
4.2.1.1 Ping
The ping connector simply checks for host connectivity using an ICMP request to the host. Just like with SNMP or WMI, add the appropriate IP ranges using the connector settings dialog.
In the settings tab, max ping attempts, ping timeout, and time to live settings can be changed from its default values. Additionally, a quick ping test can be performed to check for host connectivity.

Ping settings
5 Discovery and reconciliation
In this chapter we will go over the scanning (discovery) and netTerrain reconciliation process, along with all the related settings and actions associated with that, such as flushing the data, logging, additional settings and more.
5.1 Scanning
Scanning is the process of running a discovery for each enabled connector. including the native discovery connectors. During this process, the collector connects to the third-party sources or the network and attempts to discover data from said sources to bring it into the collector as raw data. This process does not include the reconciliation of discovered data into netTerrain. The latter is done during the so-called 'Pushy', which we will review later.
This scan is quite straightforward and can be done in manual fashion or automatically.
5.1.1 Manual scanning
To manually scan the network all you do is click on the 'Scan' button from the main toolbar.

Manual scanning
After pressing the scan button, the collector will start a discovery process for each connector that is enabled in your connectors list.
Attention!
A new scan will wipe out all the existing discovered items in the collector. To be clear, no items are deleted from netTerrain itself, just the raw data appearing in the collector interface is flushed and then rediscovered when you start the scan.
Scanning process
The collector shows the discovery progress on the command window and logs every call and progress milestone in the daily log file (more on that below).
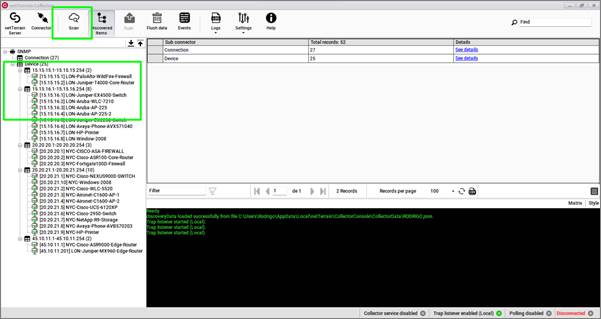
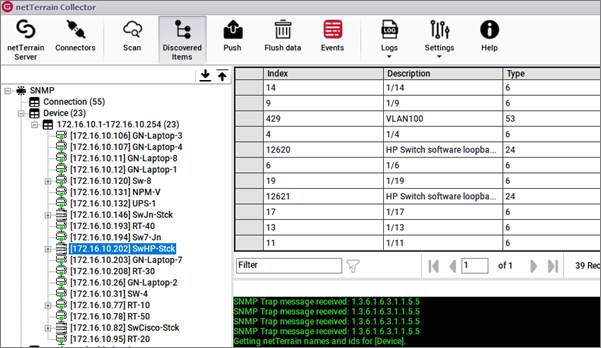
When the discovery process is complete, click on the 'Discovered Items' button to view all the records associated with each connector and sub connector that ran during the process.
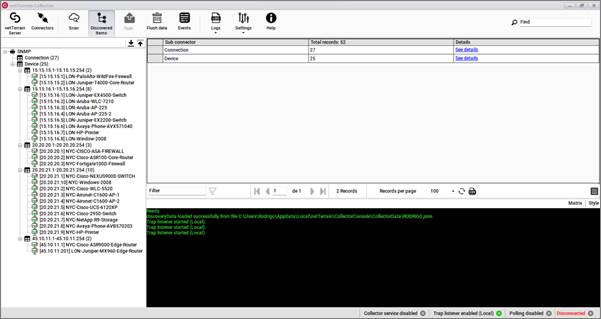
Discovered items
5.1.2 Automatic scanning
Not much to explain here: scans can be automated by running the collector as a service. We will review the process of setting that up properly later in the guide, but all you need to know is that on a scheduled basis, an automated scan goes down the list of enabled connectors just as it would in a manual process.
5.2 Pushing data to netTerrain
The scan process reviewed above discovers the data from the network or third-party data sources and brings it into the collector as raw records. However, a scan does not reconcile any data with existing netTerrain diagrams. The latter is accomplished with a push.
5.2.1 Data reconciliation process
The data push is the process the collector goes through to reconcile discovered data with existing nodes and links in netTerrain by sending the data from the collector to netTerrain and comparing what was discovered in the latest cycle with what exists in your netTerrain project.
The reconciliation of the data refers to the following three actions, which by default are set to true:
- Inserts: any newly discovered records that do not exist in netTerrain will be inserted as new objects
- Updates: any properties that changed for discovered objects already existing in netTerrain will be updated in netTerrain accordingly
- Deletes: any objects that exit in netTerrain and no longer exist in the original source will be deleted in netTerrain
To start a push process, simply click on the 'Push' button on the toolbar and the collector will go over each enabled connector and push the data to netTerrain. When the collector is set as a service and running the discovery process in automated fashion a push occurs automatically as long as the 'Push data to netTerrain' setting is se to true (more on that later).
Starting a push process
5.2.2 Modifying default actions
It is possible to change the default behavior of the push actions on a connector basis by editing the XML file of a given connector. Click on the 'Open XML file' button to open the XML file that represents the connector settings.
Advanced reconciliation configuration using the XML file
In the XML, find the 'Reconciliation' section and proceed to edit each entry as needed.

Reconciliation settings
5.2.3 Object matching parameters
During a push process the collector needs to somehow match up discovered records with existing objects in netTerrain. It does that by selecting a key field from the source and matching it up with the Name field in netTerrain.
In addition, the XML configuration file lets you map the entity, parent names and fields from the source with a type, parent object and custom fields in netTerrain.
5.2.4 Preventing deletes with low record counts
It is possible that for some reason (such as a connectivity issue) the collector finds zero (or low count) records for a given connector. If you have the DeleteObjects parameter set to true, the collector will delete all records associated with the connector when it shouldn't. To prevent that, you can use the ' DeleteIfCountMoreOrEqualThan' parameter in the XML by setting it to 1 (or some value greater than zero.
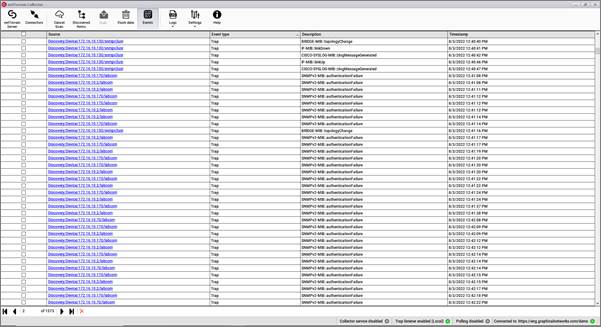
5.3 Event console
With the new event console, now you can preview the incoming traps from your network before pushing the data to the netTerrain server or when you don’t have connectivity to the netTerrain server.

Click on the Events button of the menu and you will access the list of events (SNMP traps) received from your monitored devices.
The following information will be display on the console:
- Source: IP address of the device
- Event type
- Description
- Timestamp
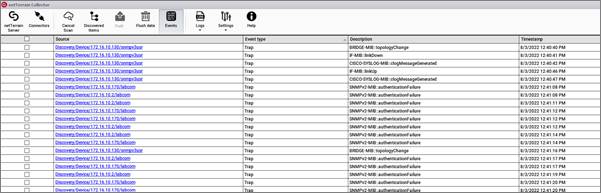
Event console
As mentioned earlier, to start receiving SNMP traps you must configure your SNMP devices to send traps to the IP address of the machine where the collector is installed.
If you click on the source link, the collector will forward you to the corresponding entry in the associated with the discovered instance.
5.4 Automating the process
The entire process described in the previous sections can be automated so that it runs in the background, without a user having to manually start the discovery and reconciliation every time data needs to be synchronized between the sources and netTerrain.
5.4.1 Setting up the scheduler
An automated process requires the collector to run the so-called scheduler. The scheduler itself is triggered in the system when the collector runs a service, so to set up the collector as a service, first make sure you start the collector as an administrator.
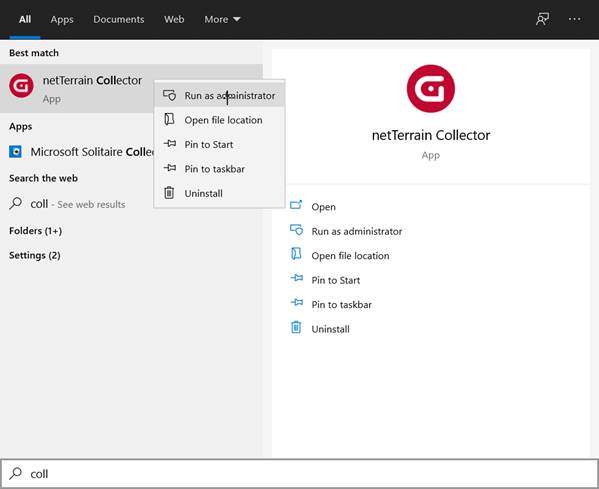
Running the collector as an administrator
Proceed to click on the settings->scheduler button, which will open the scheduler dialog. The scheduler deals with the frequency of the insert/update/delete process that reconciles the data between the data source and netTerrain
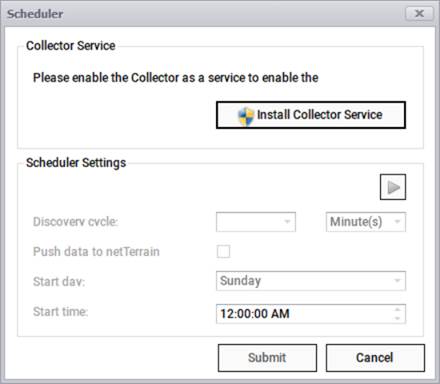
Scheduler dialog
Then click on the 'Install Collector Service' button to install the collector as a service on your computer or server. Then proceed to set the scheduler parameters, such as the cycle and the start day and time.
You can set the scheduler to run immediately upon activation, or to only start on a cycle every “X” hours or days. If you click the ‘Run Discovery right now’ option, the netTerrain Collector will start immediately after you click on the ‘Start Scheduler’ button. This automated process will cycle through all enabled connectors and run a discovery from the source. If the 'Push data to netTerrain' is checked, then for each connector the scheduler will push the data to netTerrain immediately after each scan cycle finished.
Tip:
It is recommended to set the discovery cycle to a value that is high (such as 24 hours) to avoid excessive load and/or network traffic. In general configuration data does not change often enough to require a refresh on the netTerrain inventory in real-time or near real-time. In many cases it is not even necessary to automate the discovery since a manual process can be triggered once a day or even once a week.
5.4.2 Setting up the poller
The poller deals with the frequency of state information (status) update for devices that have already been imported into netTerrain and that exist in the original data source.
To set up the poller click on Settings-> Poller. From the poller dialog you can set up the cycle (in seconds), the number of retries per connector, and other native discovery parameters such as timeouts and values used for status.
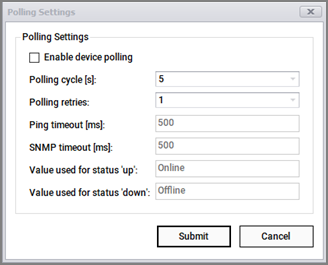
Polling Settings
Once enabled, the Collector will poll currently discovered devices. By default, devices will be assigned the “Online’ and “Offline” status. This can be modified by changing the “Value used for status ‘up/down’ sections.
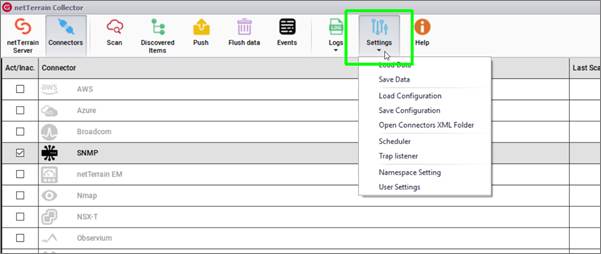
5.5 Settings and other features
From the Settings button you can load and save previously discovered data and connector configurations. You can also open the connector XML folders, configure the scheduler and poller (as seen previously) and change the namespace and user settings.
We have already seen how to work with the scheduler and poller so in the following sections we will review the rest of the options and features.
Settings Tab
5.5.1 Saving and loading existing data and configurations
After you configure a connector or run a scan you can save the configuration data or discovered data to a Json file. You can load previously discovered data and configurations as well.
Saving and loading configurations comes in handy when, for instance, multiple connectors are used for a discovery setup. It may be easier to first configure one connector, then save the settings to a local file. From there, the file can be used to load common settings across other connectors.
Saving data is useful for testing purposes or when you need to run the discovery on an isolated network and then perhaps send it to another collector that can connect to netTerrain for a data push.
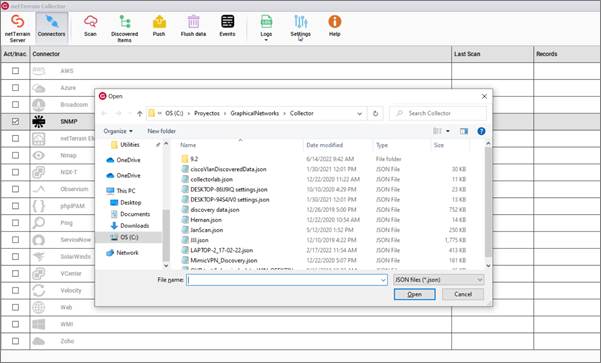
Loading existing data from a Json file
The steps to load and save configurations and data are quite self-explanatory. It is important to note that both configuration and data reside in Json files and as such it may be a bit confusing to know which one is which. The good news is that the collector detects if you are trying to load, say configuration data, but the file you selected was a data dump instead. The collector will ask you if you want to proceed and load the file correctly, regardless of whether it is connector configuration or discovery data.

5.5.2 Namespace
The namespace displays the current host name by default. If needed, the namespace of the Collector can be changed in the “Namespace settings” tab.
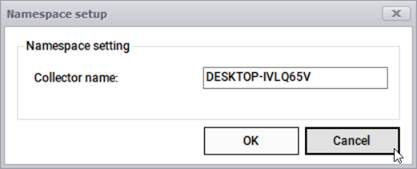
Namespace Settings
This comes in handy when you want to run the collector in different isolated networks that may reuse the same IP addresses. Using different namespaces in those cases allows you to run and push the data safely into one netTerrain instance.
5.5.3 User settings
The appearance of the Collector can be modified using skins. This changes the background, tab, icons, and text colors matching a specific theme, akin to the themes you can set up in netTerrain. As of now, the four options are dark, light, rainbow dark, and rainbow light and they can be changed by opening the user settings dialog.
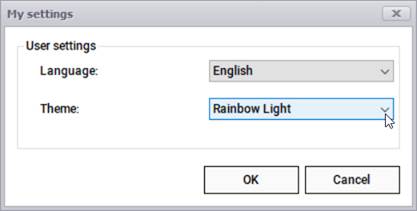
User settings
5.5.4 Flushing Data
In some cases, you may want to remove all the existing discovered records from the collector, by flushing the data. This can be easily done by clicking on the 'Flush data' button.
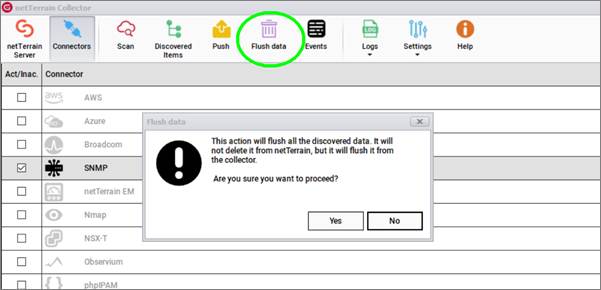
Attention!
By flushing the data, you are simply removing the raw data displayed in the collector. The act of flushing the data does not remove anything from your netTerrain project.
5.5.5 Logs
The collector displays the main activities happening at any time in the command window. However, all this activity and more are also logged in text files. Any activations of the colector, exceptions, discovery, push actions, scheduled and polled data as well as other events are logged in a series of files located in the Logs subfolder under the CollectorConsole folder that resides in the netTerrain local app data installation.
netTerrain creates a daily log for all activities and all the log text files are preserved in the logs folder until an administrator actively removes the files from the folder.
The Logs button provides several options:
- Open application logs: opens the current daily log using your default text editor
- Clear application log: clears the current daily log (not the log history of previous days)
- Open Logs location: opens the folder that contains all logs
- Log level setting: let's you change the verbosity of your log
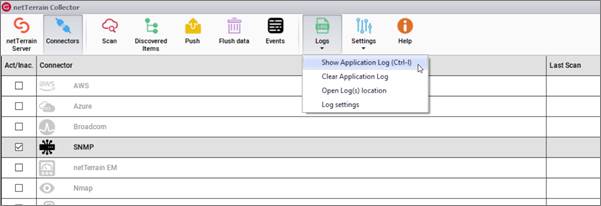
Logs menu