netTerrain 9.5 Administrator Guide

Document Code. GN_D_nT9-03 Last revision: 08/11/2022
© 2022 Graphical Networks LLC. All rights reserved.
Our “keep the lawyers happy” disclaimer: Graphical Networks and netTerrain are registered trademarks of Graphical Networks LLC. Other product names mentioned in this manual may be trademarks or registered trademarks of their respective companies and are hereby acknowledged and stuff.
If rash, irritation, redness, or swelling develops, discontinue reading. Safety goggles may be required during use. Do not eat this guide, it’s not yummy. This disclaimer is not intended as legal advice. For that, better call Saul.
Image: Northern Lights
Graphical Networks LLC
Telephone: + 1 - 240 - 912 - 6223
Fax: +1- 240 - 912 - 6339 (where you can send us the purchase orders)
1 About this Guide
This document is divided into the following chapters:
-
Chapter 1, “About this Guide”.
-
Chapter 2, “User Management”, which provides instruction on managing users.
-
Chapter 3, “Group Management”, which provides information about group management and group exceptions.
-
Chapter 4, “Global Settings”, explains global settings available in the admin console that affect all users in the project.
1.1 Who should use it
This guide is intended for netTerrain admin users: administrators for the netTerrain application tasked with managing users, groups and other system settings. You are the gatekeepers of order and sanity in the documentation universe.
Attention!
To access the administrative console, a user must be part of the admin role in netTerrain.
1.2 Assumptions
This guide assumes that users have basic knowledge of browser navigation and general computer and networking skills. A basic understanding of netTerrain functions, such as navigating diagrams and working with objects doesn’t hurt, in case users start babbling about diagram filters or displayed fields and you don’t want to have that deer-in-the-headlights look. When in doubt, mumble.
2 User Management
Users in netTerrain are accounts that have been granted a certain permission level (or role) to access netTerrain in some capacity. A user’s role is (usually) inherited from its parent group. Users can, however, override a group’s set of permission with their own per-diagram roles.
Users are managed in the user section of the admin console. The admin console can be accessed from anywhere in netTerrain by clicking on the admin console button, as shown below. You must be an administrator to see that button.

Admin console button (shown in mojito lime)
If you want to return from the admin console to the project, you can do the following:
- Click on the project button (globe icon), which takes you back to the project’s top level
- Click on the left arrow icon, to the left of the project button, which takes you back to the last diagram you visited in the project
- Click on the browser back button, which will take you to the previous project diagram if you came from the project during the current session

Using the project button and arrow to return to the project
2.1 Adding users
To add new users, access the admin console and click on the user counter number (this is a hyperlink).
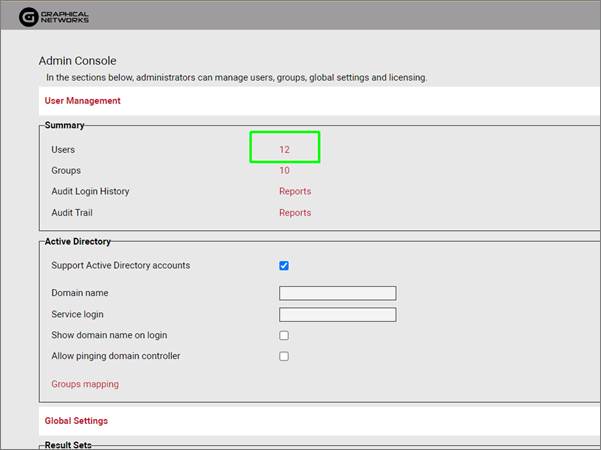
This will show you the complete list of users and from there you can click on the ‘Create New’ button to start adding more users.
Adding new users in netTerrain
You can also add a user directly from the admin console by clicking on the ‘Add New button’.
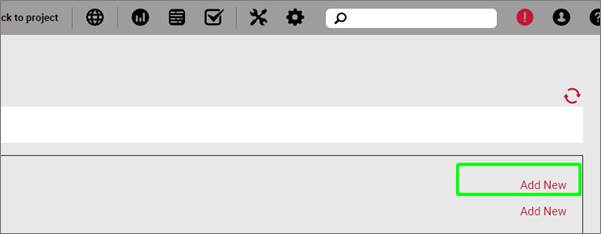
Adding users straight from the console
The add user dialog has a series of fields, some of them mandatory, that identify the properties of the new user.
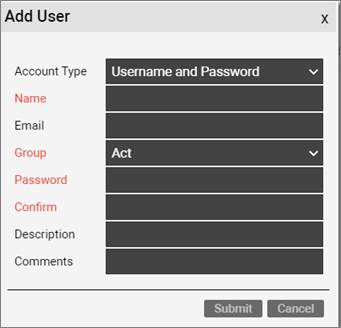
Add user dialog
1) Account Type: Combo box that allows you to specify if the user to be added is a native netTerrain user or an Active Directory user type.
2) Name: This is the username assigned to the account. It may contain spaces in between characters, but any leading and trailing whitespaces will be truncated
3) Email: The email address field is not mandatory.
4) Group: A user must belong to a group in order to inherit roles for accessing netTerrain. The group can be a system or custom defined group.
5) Password: password settings can be defined in the web.config file, but in general it must be 6 characters (or more) long with a maximum length of 100 characters. The password field must also be confirmed.
6) Confirm: Retype the password.
7) Description: A data field that can be used to populate additional information about the user. This is not a required field.
8) Comments: A data field that can be used to populate additional comments about the user. This is not a required field.
Users can change their passwords after they log into the system, so using a temporary generic password is acceptable for the initial setup process. When using active directory, there is no need to create users as they are synchronized automatically from the AD database.
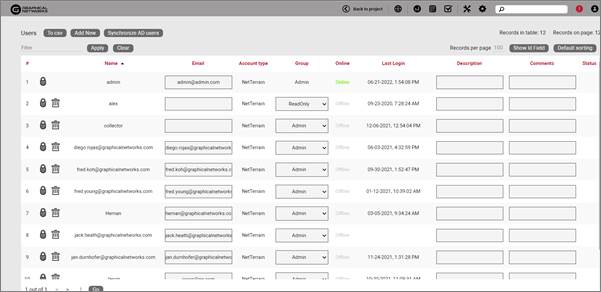
2.2 User table
All users in netTerrain are depicted in the user table, which, as mentioned above, can be accessed from the Admin console user count button, as depicted below.
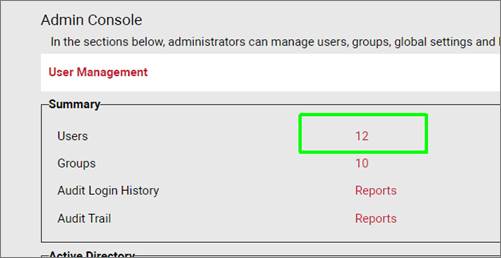
Accessing the user table
The user table contains a variety of options for managing users. A screenshot of the table is depicted below.
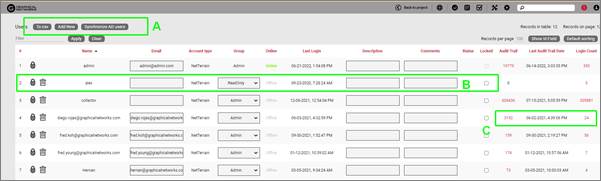
User table
In addition to the create new user button, section A above also has two more buttons to export the user table to csv and to synchronize users with Active Directory.
Section B above shows the column headers for each property. For convenience, these headers are sortable so for example, we can display all users alphabetically and in ascending order. Click twice on the column header to sort the table in descending order.
2.2.1 Locked users
You will also take note of the locked status indicator. If any of your users try to log in unsuccessfully more than N times in a row, their accounts will be locked. The number N can be changed in the web.config file. As an administrator, you can unlock any user simply by unchecking that lock status. If your account is locked and you are the only admin, well that’s not good... Not to worry, just contact us and we will provide you a script to unlock you from the database backend.
2.2.2 Deleting users
To delete a user, simply select delete from the desired user row. Note that this option is only available when the user is offline. Consider that by deleting a user from netTerrain its audit trail will also be removed from the system. In many cases it is better to just assign a user to the ‘No Access’ group to avoid losing the audit trail records.
2.2.3 User groups
To change the group a user belongs to, select the group dropdown of the specific user row. Once an option is chosen, the group setting will automatically be saved. Please note your license count may be affected when adding or removing users from any group that is an editor or better. These roles include:
-
Admins
-
Power Users
-
Editors.
Any user belonging to a group that includes any of the above roles requires an “Editor” license.
Attention!
If the system is not licensed for the appropriate editor license count, you may not be able to change a user to certain groups, like Admins, Power Users and Editors. We gladly accept purchase orders to fix that issue in no time.
2.3 Audit trail
The last three columns in the user table (see section C above) refer to the audit trail, which consists of a history of user changes in netTerrain. In simple terms, a history of who changed what and when.
To review the history of a user, simply click on the audit trail counter link. This will open the Audit Trail report window. This window allows you to select the audit trail based on the Action and Time Frame.
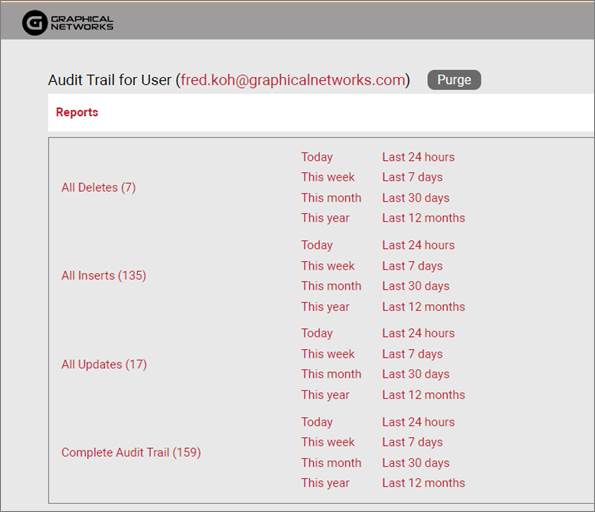
Audit Trail Reports
Audit trail actions include:
- All Deletes: To see all the deletes performed within the time frame selected.
- All Inserts: View of all the inserts performed within the time frame selected.
- All Updates: View of all updates performed within the time frame
- Complete Audit Trail: View of all Deletes, Inserts and Updates within the time frame selected.
The audit trail has various field names that help determine what the user has changed in the netTerrain system. The audit trail table can also be downloaded to a csv file by clicking the “To csv” button.
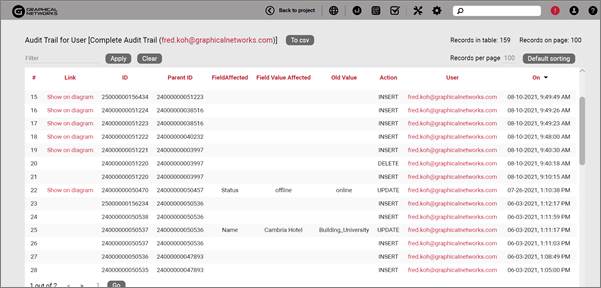
Audit trail table
The audit trail table contains the following fields:
1) #: A sequence number that represents the row being viewed.
2) Link: this allows for navigation to the object that is being referenced in the Audit Trail. There will be no link for an object that has been deleted.
3) ID: this is the object ID referenced in that audit trail row. Remember that all objects in netTerrain have unique ID numbers.
4) Parent ID: if the object has a parent, this is the ID for the object’s parent.
5) Field Affected: this column refers to the table field that was affected by an update
6) Field Value Affected: this is the current (or changed) value.
7) Old Value: the original field value that was changed.
8) Action: the following actions are audited in netTerrain:
a. Update: the user has updated a data field value. The new and old values can be compared by reviewing the “Field Value Affected” and “Old Value” columns.
b. Insert: this means a user has created a new node, device, link, free text or other object in netTerrain.
c. Delete: this means that a user has deleted an object from the system. Typically a node, device, link, free text or other object in netTerrain.
9) User: user’s name that made the change.
10) On: date and timestamp for the when the change was made.
2.3.1 Accessing the audit trail from the project and catalog
Audit trails can be viewed not only on a per user basis, as explained above, but also on a per diagram, per object and per object type basis. Access on a per diagram and per object basis occurs from the project, whereas the access on a per object type basis occurs from the catalog, as depicted in the screenshots below. Note that in all cases the audit trail buttons and tables are only accessible for administrators.
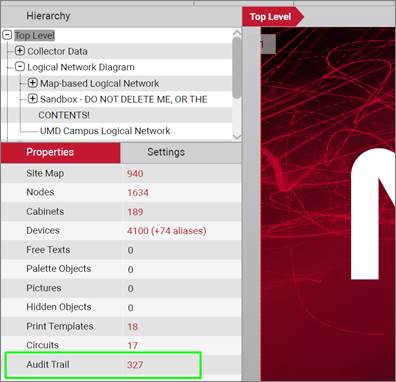
Accessing the audit trail for a specific diagram (bottom left link)
Below you can see how to access the audit trail for a specific link.
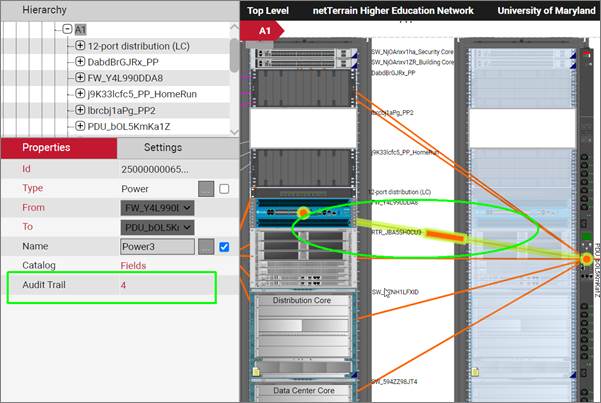
Accessing the audit trail for a link instance from its properties
And finally, below you can see how to access the audit trail for a given object type in the catalog.
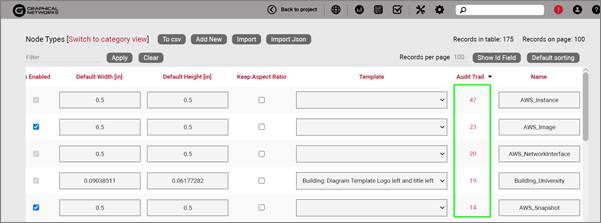
Audit trail link for catalog objects (on right side)
2.4 Filters
All tables in netTerrain have a filter text box that let users narrow the list view by filtering out any records that have values matching the filter string. For example, typing the string ‘chr’ in the filter box will filter out any user records that do not contain that string sequence in any of its properties.
To use filters, simply type in the desired string and hit ‘Enter’ or click on the ‘apply’ button.
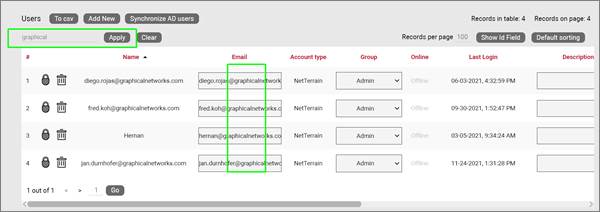
Filtering users
To remove the filter, simply remove the string from the filter box and hit ‘Enter’ or alternatively, click on the ‘clear’ button next to apply.
2.5 Active Directory
The Active Directory connection between the netTerrain application and your AD server can be setup from the admin console.
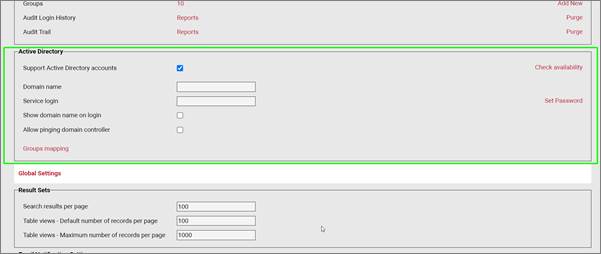
Active Directory settings (in green)
To enable Active Directory login, check the ‘Support Active Directory accounts’ option.
In addition, you need to specify the AD domain name and service login for netTerrain to be able to scan AD accounts correctly.
Please refer to the installation guide for a complete setup of Active Directory.
2.5.1 Azure Active Directory
netTerrain supports Azure Active Directory (AAD) for user authentication. Setting AAD up involves some edits in the database and the web.config file. If you would like to set up netTerrain to support AAD, please email us at support@graphicalnetworks.com.
3 Group Management
netTerrain groups come in two flavors: system groups and custom (or user) created groups. Groups are logical constructs that contain users and share the same roles and diagram permissions.
By inheriting roles and permissions, users can login to netTerrain with the proper credentials.
3.1 Security roles and default group types
netTerrain has a security model based on 8 roles: No access, Diagram Read-Only, Read-only, Annotator, Updater, Editor, Power User and Admin. These roles comprise the following permission levels, and each one inherits the permission level from the previous one:
1) No access: this role is mostly used to ‘park’ users that may not have access to the project but should not be deleted from the database. This role can also be assigned on a per diagram basis, so that users may have no access to certain parts of the project.
2) Diagram Read-Only: users may view data and diagrams, but lack the permission levels to modify, add or remove data from the database or diagrams. Users will not be able to view the object properties or settings.
3) Read-only: users may view data and diagrams, but lack the permission levels to modify, add or remove data from the database or diagrams.
4) Annotator: users can add, edit and delete their own comments and palette objects. The rest of the data can only be accessed in read-only mode.
5) Updater: users can modify object properties but cannot add new objects, move them on a diagram or delete them from the database.
6) Editor: users that have full permission to make any modifications in the project.
7) Power-User (or catalog managers): in addition to data-entry functionality in the project, power users can manage the catalog.
8) Admin: these users have the highest permission level and full access to the system. They can create new users and groups as well as run the audit trail reports and change global settings.
Based on these 8 roles, netTerrain has 8 pre-built system groups that cannot be deleted plus a ‘NotDefined’ system group. This group is mainly for internal usage but may be used for parked users as well.
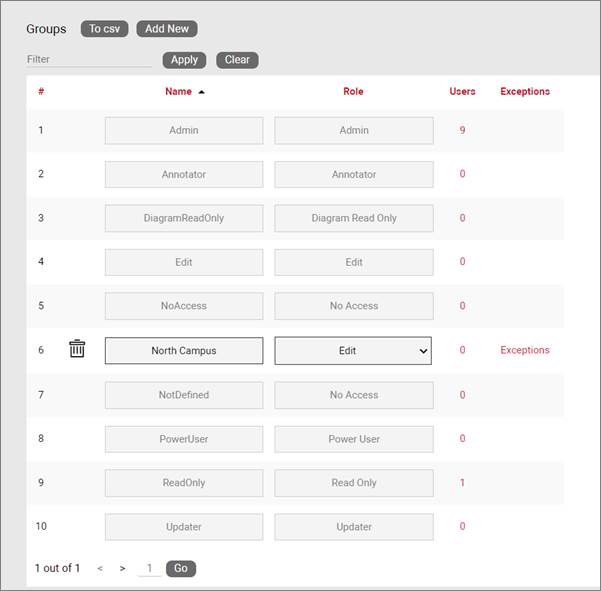
List of netTerrain system groups (grayed out) and one custom group
As explained previously, netTerrain supports Active Directory (AD) so that groups defined in AD can be synchronized with netTerrain group roles.
3.2 Group table
Just as with users, the admin console also has a group table to aid the tasks of group management. To view existing netTerrain groups, select the group link from the admin console page, as depicted below.

Accessing the group table
A group table view will be depicted, showing the already familiar options for sorting, exporting to csv, filtering and deleting groups. Note that system groups cannot be deleted.
3.3 Custom groups
In the netTerrain security model, users are always assigned a group, whether this is done manually, or through AD group mapping. New groups can be created so that users can be assigned to those new groups, instead of just relying on the system groups. When creating a new group, a default role is assigned to it. This role can be overridden later on a per diagram basis.
For small deployments, having one group per role will suffice. Deployments that consist of several departments with overlapping roles may require the creation of multiple groups with the same role level. For example, a large company with a purchasing, a NOC and an engineering department (each with at least one user per role), may require the creation of the following groups assigned to the following access levels:
- Purchasing RO: read-only viewers in the purchasing department
- Purchasing DE: data-entry viewers in the purchasing department
- Purchasing PU: power users in the purchasing department
- Purchasing Admin: administrator for the purchasing department
- NOC RO: read-only viewers in the NOC department
- NOC DE: data-entry viewers in the NOC department
- NOC PU: power users in the NOC department
- NOC Admin: administrator for the NOC department
- Engineering RO: read-only viewers in the engineering department
- Engineering DE: data-entry viewers in the engineering department
- Engineering PU: power users in the Engineering department
- Engineering Admin: administrator for the engineering department
3.3.1 Creating new groups
Creating new groups is a simple task. From the admin console page, select the ‘Add New’ button in the group row.

Adding a group
The group form includes two fields:
1) Name: the name of the group being created. Try to name these groups in a way that they describe the default role. That way, it will be easier to later associate users to it. The name can have leading and trailing whitespaces.
2) Role: this is the default (and highest) level of access for this group. When overriding permissions on a per diagram basis, the role will be equal or lower than the default.
3.3.2 Adding users from the groups table
Users can be added to a specific group directly from the groups table. Notice that for any group, a user counter link is provided. This link shows the count of all the users assigned to that group and provides a shortcut to the users table filtered by that group.
To add a user to a specific group simply click on the user counter link, and then from the filtered user view click on the ‘Add New’ button and proceed to add the user just as described in the previous chapter.
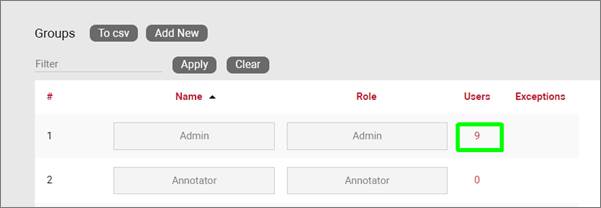
User counter link shortcut to filtered users table
3.4 Managing group exceptions
Each group can have a set of exceptions, which override the default access to a particular diagram. Consider this scenario for a given group:
- Root diagram A: we want to grant users of this group editor access
- Root diagram B: we want to grant users read-only access
- Root diagram C: we want to grant them no access
In this case, we should use a group with its default role being an editor, and then create two exceptions for diagrams b and c. Note the following rules when creating exceptions:
1) Exceptions can only have permission levels equal or less than the default access role
2) If an exception is created for a certain diagram, it will be deleted if the diagram is deleted
3) By default, all children of a certain diagram that is in an exception list, inherit the exception for that group
4) Exceptions can only be assigned to custom groups
To add an exception to a group, select the exceptions link on the groups table.
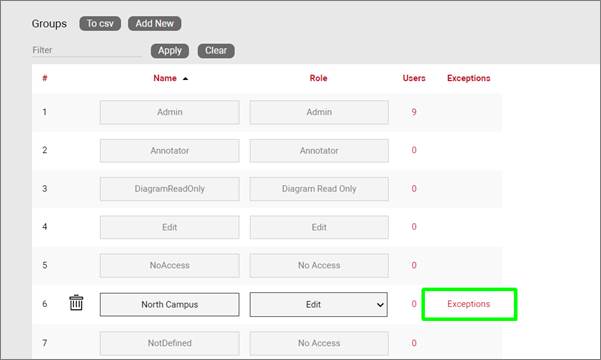
Accessing the exceptions tree
This link will bring up the project hierarchy, which, upon right click on any leaf in the tree, provides the ability to override the permission to that diagram:
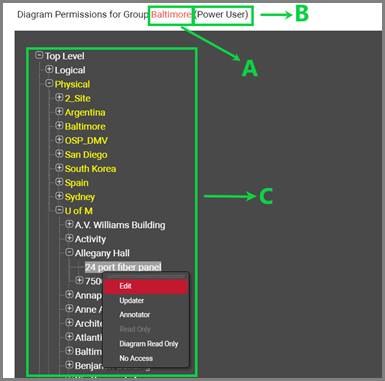
Assigning permissions on a per diagram basis
Note the following elements in this view:
a) The name of the group where exceptions are being placed
b) Default role of the group
c) netTerrain project hierarchy
Once an exception is assigned to a node in the hierarchy via mouse right-click, that node, and all children underneath will override the permission level to the one selected from the right click context menu, using the following color coding:
- Red: No access to diagram
- Orange: Diagram Read-only access
- Yellow: Read-only access
- Green: Annotator access
- Blue: Updater access
- White: Edit rights (essentially not overridden)
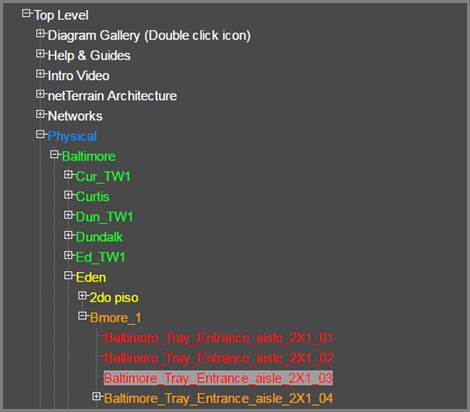
Permission color schema
What about the Power-user and admin rights for exceptions? You may be wondering why those are not shown in the list of options for exceptions. Exceptions are used to control access to project diagrams, and in the context of a diagram, there is no higher permission level than an editor. As far as diagram access goes, an editor has the same permission level as a power-user or an admin.
4 Global Settings
The netTerrain admin console includes a ‘Global Settings’ section to manage certain aspects of the user interface and licensing. These settings impact the entire netTerrain project. The global settings are broken up into four sub-sections:
1) Result Sets: settings for how tables in netTerrain should be displayed
2) Email Notification Settings
3) Page Setup: settings for how netTerrain should display pages
4) API Settings
5) Other: miscellaneous settings and importer settings
6) License Info
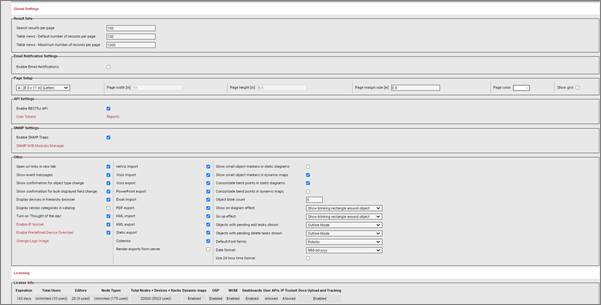
Global Settings page
4.1 Result sets
The ‘result sets’ sub section in global settings provides the ability to set the default number of records displayed on tables and search results.
1) Search results per page: limits the number of records displayed on a given page when using the search feature. The default setting is 100.
2) Table views default per page: sets the default number of records displayed for a given page. The default setting is also 100.
3) Table views max records per page: limits users from requesting a set of records greater than the value on a given page, with a default setting of 100.
Attention!
Note that increasing the values can cause longer load times for table pages. It can also be a good excuse to increase those trips to the coffee machine.
4.2 Email Notifications
netTerrain can send email notifications to users when certain changes occur in the project. This feature is akin to the concept of visual overrides: when a property for a certain object type changes to a certain value, a user or group of users can receive an email. For example, the administrator can set up a rule that whenever the status of a room changes to “decommission”, the Data Center Manager receives an email. This behavior is defined in the email notifications section.
To enable email notifications, first make sure the option is checked:
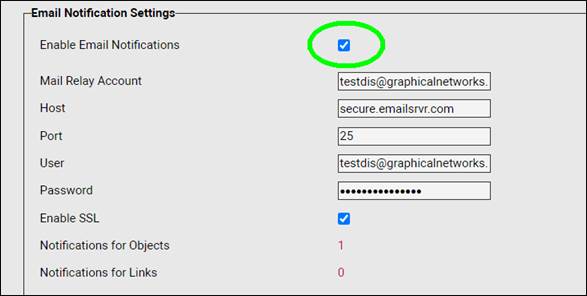
Enabling email notifications
Once notifications are enabled, proceed to set up the email account information, including:
- Mail relay account (account from which notifications will be sent)
- The email server host name
- The port number
- User and password for the email account
- SSL
The next step is to set up the actual notifications. You can create notifications for node objects as well as links. Click on the number next to the category (say, Nodes) and create a new object notification:
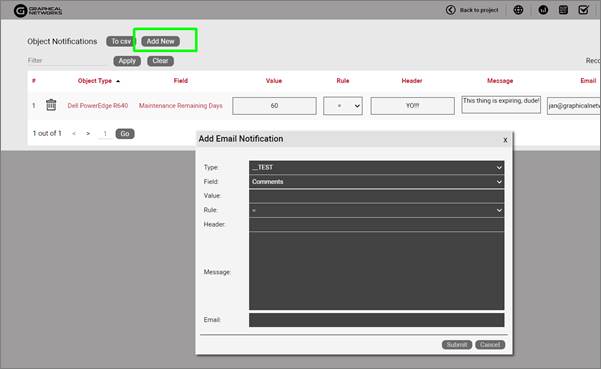
New notifications dialog
The notifications dialog first lets you pick which object type you want notifications to be triggered for. Then you pick the field and value along with the rule. The rest is also self-explanatory: you can type an email header and a message.
If you want more than one recipient for the email, separate the email addresses with commas.
4.3 Page Setup
The page setup area is used to determine default settings for new diagrams created in netTerrain. These settings include:
1) Page Size (standard options)
2) Page width
3) Page height
4) Page Margin
5) Page color
6) Grid
Notice that while the Page Size value is set to some standard size, the width and height options are greyed out. If the specific size you want is not available in a standard option, simply choose the custom option which then enables you to customize the height and width to your liking for any new pages generated in netTerrain.
Also notice that page sizes can be overridden in the project on a per page basis.
4.3.1 Default page size and margins
You can set the default page width, height and margins from this section of the admin console. All these settings are determined in inches. If you change any value, existing diagrams will not be changed, these settings only work as defaults for newly created diagrams.
4.3.2 Default page color
The page color opens the color dialog and lets you define the default background color a page should have when it is newly created
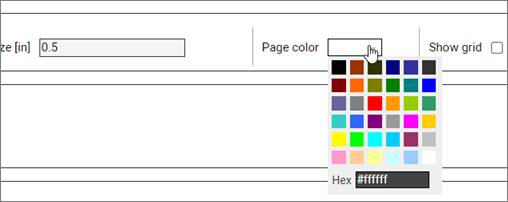
Setting the default page background color
4.3.3 Default grid settings
As with the other settings, you can specify the default grid settings for newly created diagrams. When this setting is checked, any new diagram created in netTerrain will display the grid by default.
Tip:
All size related values in these dialogs are assumed to be in inches. If you want to use floating numbers, use a dot to determine the fractional part of the number, such as ‘11.5’.
4.4 API Settings
If you want your end users to be able to leverage the netTerrain RESTful API, then make sure you check the ‘Enable RESTful API’ checkbox. Once this option is checked, end user can try out REST commands directly from the Swagger documentation available from the Help ribbon.
4.5 Miscellaneous Settings
Any miscellaneous settings that are not included in the first two sub sections can be managed from here.
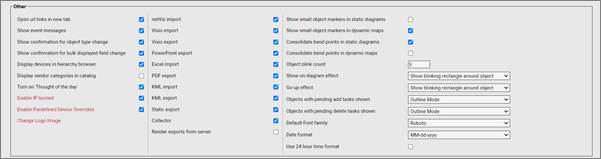
Other Admin Settings
4.5.1 Open URL links in new window
This setting controls the mode by which hyperlinks are treated. Hyperlinks (URLs) can either open in a new window or in the current netTerrain window.
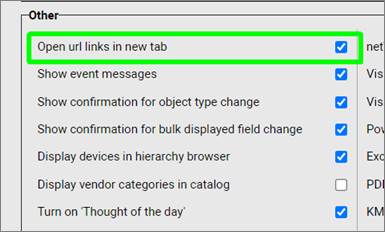
Open URL links in new window setting
4.5.2 Show event messages
This setting controls the enabling or disabling of user triggered database operation notifications. These event messages are the green dialogs that pop up on the bottom right corner after a database operation has been triggered by the user.
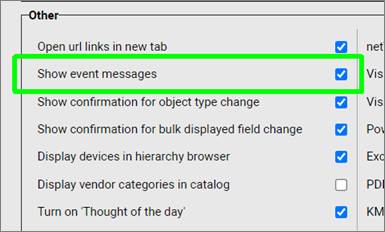
Show event messages setting
If you get complains from users about these notifications being too frequent or annoying, it may be time to turn them off here.
4.5.3 Show confirmation for object type change
When this setting is checked, every time a user is about to change the type of an instance, a dialog requesting confirmation of that action appears. The idea behind this confirmation is to warn users about this operation that does not have an undo action. Once your users become very proficient in netTerrain and savvy about the day to day documentation you may consider turning this setting off.
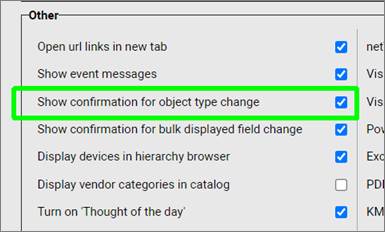
Show confirmation for object type change setting
4.5.4 Show confirmation for bulk displayed field change
When this setting is checked, every time a user is about to apply the changes to a displayed field for all instances of that type, a dialog requesting confirmation of that action appears. Same as above, the idea behind this confirmation is to warn users about an operation that does not have an undo action. In the same vein as the previous warning, once your users become very proficient in netTerrain and savvy about the day to day documentation you may also consider turning this setting off.
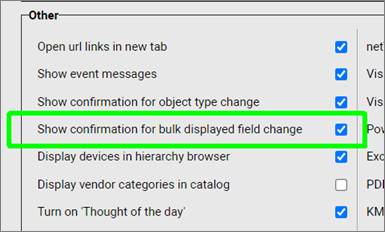
Show confirmation for bulk displayed field change setting
4.5.5 Display Devices in hierarchy Browser
By default, netTerrain will not display a device in the hierarchy browser unless the device has been double clicked. If this setting is enabled, all devices will be displayed in the hierarchy browser.
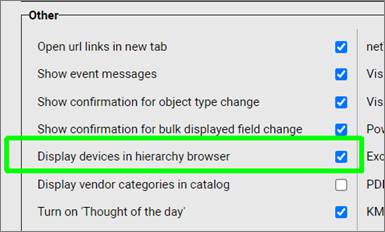
Display devices in hierarchy browser setting
4.5.6 Vendor Categories
This is a pretty cool feature that enables or disables vendor categories in the catalog pane on the project side: If you prefer to work with your own categories and think that a long list of vendors in the categories drop-down box is intrusive, we recommend disabling this here.

Enabling the vendor categories option in the catalog
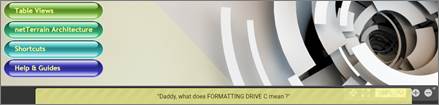
4.5.7 ‘Thought of the Day’
As one of our world-famous quotes say "Mix a little foolishness with your serious plans: it's lovely to be silly at the right moment." We take that advice very seriously, so we add a bit of sizzle to your netTerrain experience by providing some funny quotes every time you log in. Well, at least we think they are funny.
TotD quotes are stored in a text file and netTerrain pulls them randomly as display pop up messages each time a user logs onto the system (unless they re-login on a diagram that is not the top level). The quote is displayed for a few seconds after the user logs on.
The thought of the day file is in the “Vis” folder on the netTerrain application server. The file is called “ThoughtOfTheDay.txt” and this name can be changed from the web.config file. Want to add your own quotes? Just open the TotD file and edit it with your favorite text editor.

Thought of the day text file
In the extremely unlikely event that you find this feature annoying, we’ll let you turn it off from the admin console, as displayed below. Please call us so we can also recommend you a mental health professional, or maybe good spot to go rest for three months for a much-needed vacation.
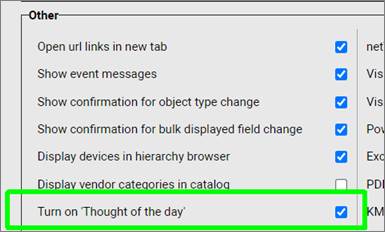
Thought of the day setting
4.5.8 IP Toolset
The enable IP toolset option controls the activation or deactivation of IP address-based programs executed from a client machine. When checked, this option will enable any programs that are configured in the IP Toolset Apps section (depicted below).
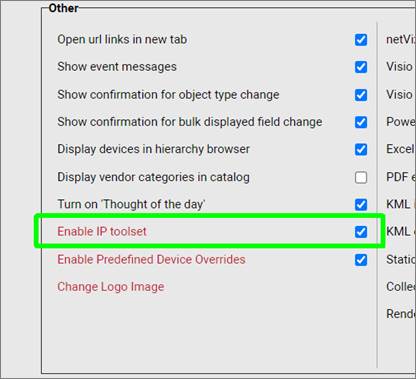
IP toolset setting
These programs only work on a client machine, if the IP toolset application has been installed on that machine. Also, these programs must exist in the client machine, since the activation is client based (browsers themselves cannot allow the execution of client programs for security reasons).
Any clients that need to utilize this feature must run the IP toolset installer on their machine. To get the toolset installer, the user can download it from the Tools->Utilities menu.
As can be seen from the screenshot below, this option provides a link to a table containing all the programs that the administrator configures.
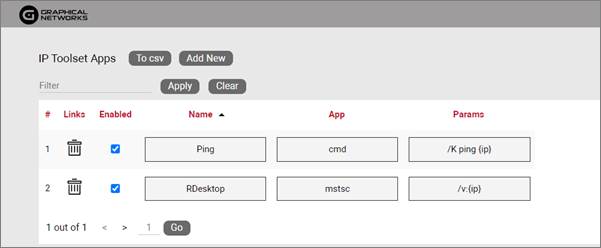 IP Toolset App list
Any number of applications can be configured by an administrator and if the IP Toolset is enabled they will show up for any user (regardless of whether they have the app installed on the client machine or not) as a context menu list when clicking on a free text, displayed field or property value that has the format of an IP address.
To add a new application, proceed as follows:
1) Click on the Add new button
2) Type in the Application name, as you want it to appear for end users
3) Fill out the appropriate information in the application “App” field. Note that because this is a server-side setting, the server cannot possibly know where each client has the corresponding application installed. As such, only applications that can be executed directly from the windows start->run dialog using the same ‘App’ descriptor will work. For example, the telnet app will only work for every client in the organization, if every one of them can also launch the telnet app directly from their windows start->run dialog using the same string as the one entered in the App field (usually ‘Telnet’).
4) Enter the appropriate parameters for the application. The syntax for this is the same as the one that would be passed in the client machine when using the application followed by the {ip} parameter, which will pass the IP address of the text or property that triggered the app.
The image below shows the execution of the ping command, as seen by an end user.
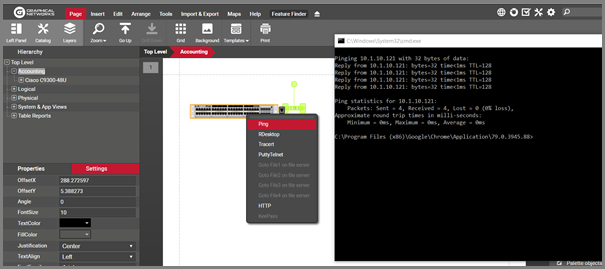
IP Toolset execution example
Attention!
Try to limit the number of apps to essential and ubiquitous ones for a number of reasons:
1) Obscure applications may not be available or installed on every machine.
2) The visibility of applications cannot be controlled in a granular fashion. Every user sees the same apps.
3) Too many applications would clutter the project-side context menu.
4.5.9 Predefined status visual override for devices
As netTerrain, along with the collector gets closer to a monitoring solution and not just a documentation tool, we keep adding features to make real-time alarming and notifications easier. One such feature is the global status visual override for devices.
Now if you want to display any device in, say, red, if it is alarmed, you don't have to create a visual override for each device. Instead, you can create a global visual override that applies to all devices and you can do so for multiple criteria. This global override only applies to the status field, which is the field that will be mapped automatically with the collector for real-time status updates in case you are using our SNMP discovery to report on device status.
To enable the status visual override for devices, do the following:
- First check the 'Enable Predefined Device Override' checkbox
- Click on the settings hyperlink to create a new global override
- From the Predefined Device Override page, click on the 'Add New' button
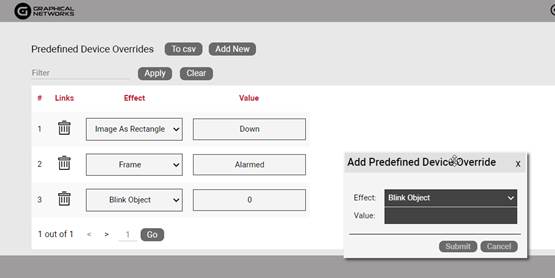
- Choose an effect you want for all your devices
- Pick a Value for which, any devices that matches it, will display the effect
- Submit
We typically recommend, pairing this feature with our own discovery and using values that match the status values imported from SNMP or some connector corresponding to 'Down' states. That way you can visually see when a device is a down in near-real time!
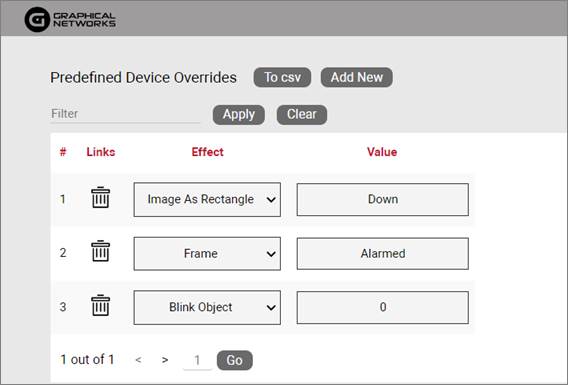
Typical 'Down' status values for devices, when paired with auto discovery
4.5.10 Company logo image
If you wish to replace the default Graphical Networks logo that shows up in netTerrain, with your own, you can do this easily from here:
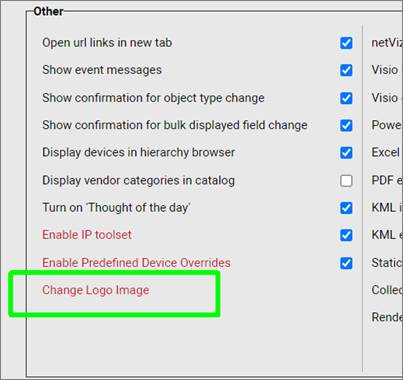
Link to change application logo
After clicking on the link, browse to the folder that has the image you want to use in netTerrain. This will replace the current one.
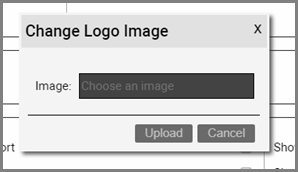
Changing the logo image for the netTerrain application
4.5.11 Enabling and disabling import / export buttons
Whether it’s for security reasons or to reduce clutter, certain administrators don’t want specific import or export buttons to be available in netTerrain. This can be controlled from the 8 checkboxes displayed below.
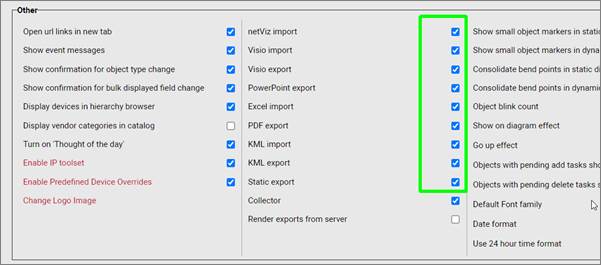
Enabling or disabling import / export buttons
Any option that is checked will then enable the corresponding importer or exporter in the project toolbar. These include:
- netViz import
- Visio import
- Visio export
- Power Point export
- Excel import
- Enable PDF export
- Enable KML import
- KML export
- Enable static exports
The export buttons on the netTerrain toolbar can be enabled or disabled individually. The example below shows a toolbar where all imports and exports are enabled.

netTerrain import/export ribbon
The static exports in netTerrain provide a mechanism to export a diagram to both static HTML as well as PNG.
Attention!
Enabling the importers and exporters does not necessarily make them work. In particular, the Visio and netViz buttons will only work if the application server has been properly configured. Please consult the import – export guide.
Also notice that if only one of the Visio options is checked, the toolbar button will show up in the project with the other menu being disabled.
4.5.12 Enabling the collector
The collector is netTerrain’s new multi-tenant discovery engine. It is outside of the scope of this guide to go over the collector specifics, but it is important to know that it can be enabled from here, which means that end users can then download it from the Tools menu in the project to perform network discoveries.
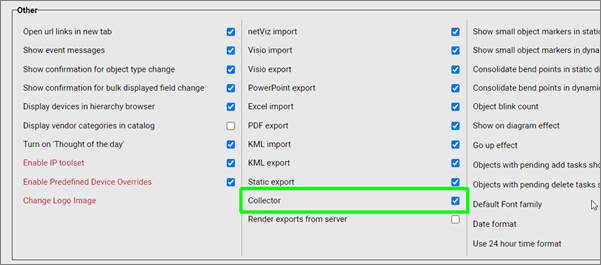
Enabling the collector
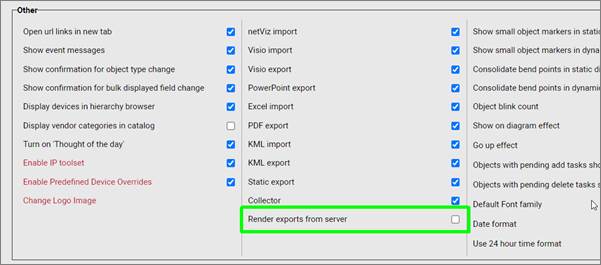
4.5.13 Rendering exports from server
Visio, Power Point and PDF exports can be rendered from the client or from the server. This checkbox controls that mechanism. Both mechanisms have somewhat obvious pros and cons Server rendering simplifies the process for the user but requires the applications to be installed in the server, which can be complicated. Client rendering is a lot easier, but requires very client going through a small setup.
For more details on the import and export mechanisms available in netTerrain, please see the Import/Export Guide.
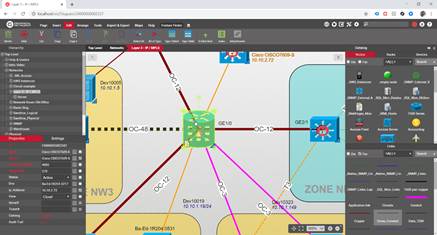
4.5.14 Controlling OSP-related small markers
In OSP maps (see End-User guide) zoomed out states can prevent users from even seeing nodes on that map. When the show small object markers in dynamic maps feature is checked, then all nodes on a map will display a so-called ‘halo’ or marker, once the user is zoomed out beyond a point where the nodes would normally disappear (due to being small).
This feature is also available for static maps (not OSP related), but we do recommend leaving this setting unchecked for static maps.
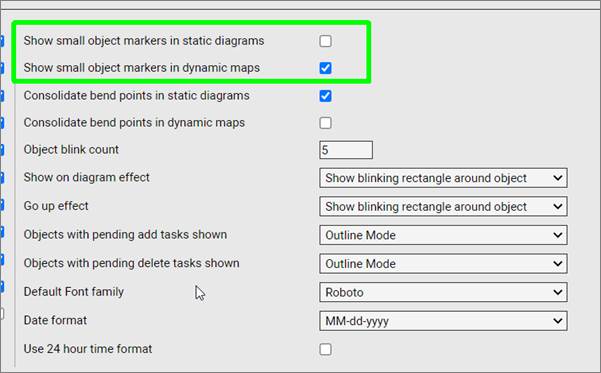
Controlling the usage of markers (halos) in static and dynamic maps
4.5.15 Bend point consolidation
netTerrain simplifies the creation of bend points by consolidating what seem to be redundant bend points. In some cases though, particularly for dynamic maps, you may need some very fine tuning of your bend points, where your consolidation could stand in the way of a smoother creation of links with bend points.
To prevent that, netTerrain lets you control whether you want bend points to be consolidated automatically or not.
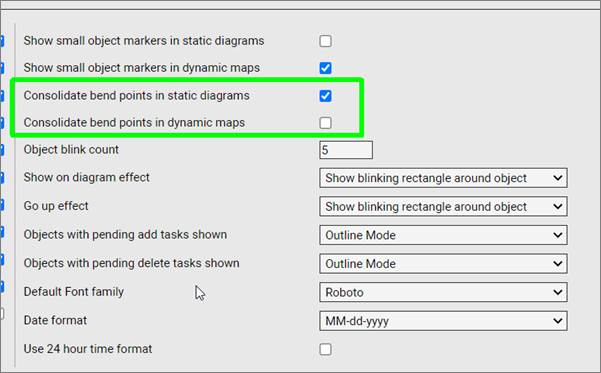
Bend point consolidation setting
4.5.16 Object blink count
This setting controls how many times an object will blink when being redirected from an object search table or from another page where object blinking applies (such as when using the ‘up’ button).

Object blink setting
4.5.17 Show on Diagram effect
This setting lets you choose what happens when you press a “Show on diagram” link or when you use the feeling lucky search option. The show on diagram link will appear after a search is performed or a table view is generated. After you click in the show on diagram link, one of the following effects is triggered:
- Show blinking rectangle around object
- Blink object
- Show big red arrow
- Select object
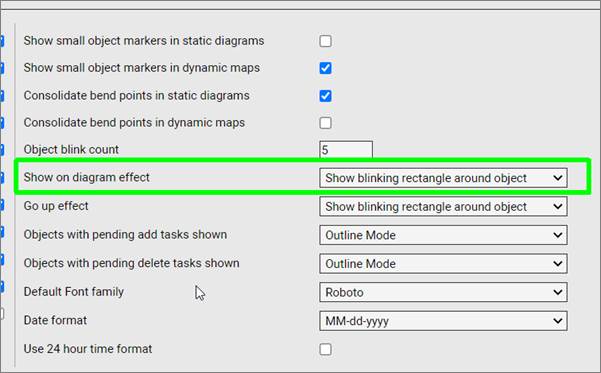
Show on diagram effect
4.5.18 Go up effect
This setting lets you choose what happens when you press the ‘Go up’ button or shortcut. After you press the up option or shortcut one of the following effects is triggered:
- Show blinking rectangle around object
- Blink object
- Show big red arrow
- Select object
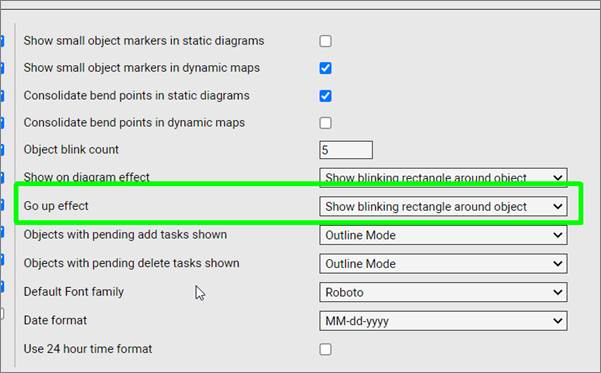
Go up effect
4.5.19 Workorder settings
The work order feature in netTerrain can distinguish nodes that have pending tasks from regular nodes (or nodes with tasks that are closed). In the admin console you can choose how these nodes with pending tasks are rendered. The rendering options include:
- Outline mode – this is essentially a grey rectangle that defines the rect object boundaries of the node
- Faint mode – this is similar to how you would see a node after you cut it and before you paste it
- Normal mode - boring
- Hidden – for when you want some mystery in your netTerrain diagram and hide these nodes with pending tasks from everybody
These rendering modes can be controlled separately between insert and delete tasks, as shown below:
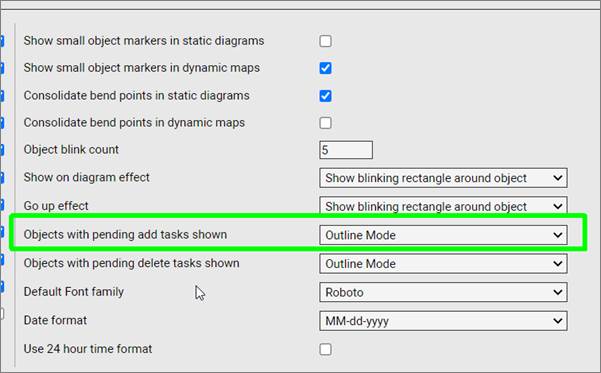
Setting for WO rendering affecting objects with insert tasks
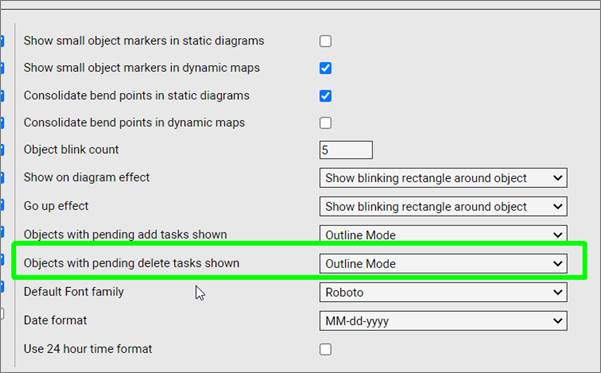
Setting for WO rendering affecting objects with delete tasks
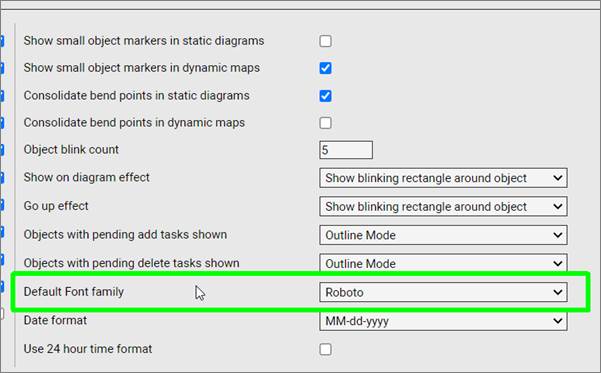
4.5.20 Default Font family
You can set the default font for text created in netTerrain by changing the 'Default font family' setting.
4.5.21 Date format
To change the date format used in any fields or text displaying dates, choose the appropriate date format from the combo box.

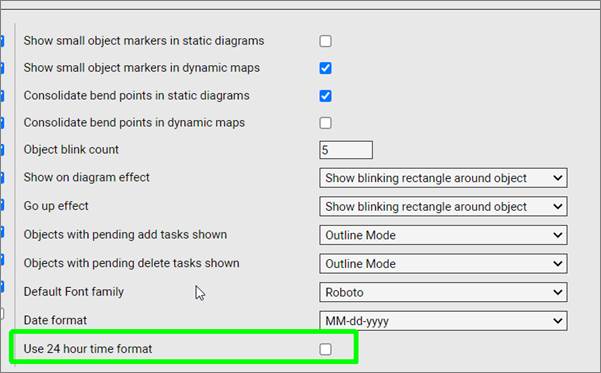
4.5.22 24 hour time format
Similar to the date format feature, you can also change the format used to display dates by switching to the 24-hour time format.
4.6 License Information
The license info section details information about that particular netTerrain deployment and what it has been authorized for, as well as a button to add a new license key.

License info section
1) Expiration: The number of days remaining until the installation requires a new license. This is usually only relevant for yearly or trial versions of netTerrain. If you have a permanent netTerrain license the value should be ‘ Never’.
2) Editors: Maximum number of users that can be created in netTerrain with a default role of editor or higher.
3) Node types: Maximum number of node types in the catalog. netTerrain Logical usually allows an unlimited number of types, whereas netTerrain DCIM only allows 10.
4) Nodes: Maximum number of nodes that can exist in the project.
5) Devices: Maximum number of device nodes that can exist in the project.
6) Racks: Maximum number of rack nodes that can exist in the project.
4.6.1 Activating a new key
To activate a new netTerrain license key, simply select the link at the bottom of the admin console page. A new dialog to prompt the loading of a license key will pop up.
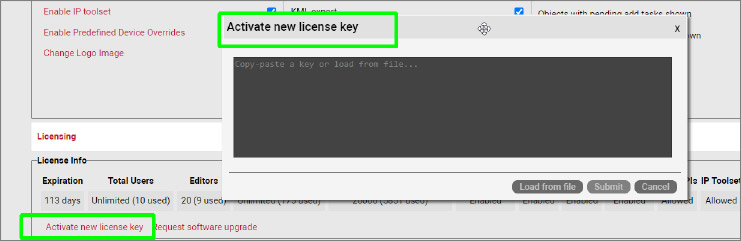
License key dialog
You can enter a license key by simply copying and pasting the key provided by Graphical Networks or you can load it as a bin file using the ‘Load from file’ button. After submitting, the new license key settings are applied immediately. A restart of IIS is not necessary.
Contact Graphical Networks sales to request a new license key (sales@graphicalnetworks.com) or enter a ticket in the Graphical Networks customer portal.
4.7 Requesting a netTerrain upgrade patch
To upgrade the netTerrain server to a new version you can now request the upgrade patch directly from the admin console. This feature gives you the option to upgrade netTerrain via an upgrade Zendesk ticket, or email.
To start the upgrade process, head over to the admin console and scroll all the way down to the ‘Request software upgrade’ link:

Requesting a software upgrade
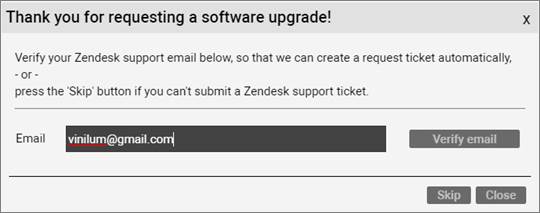
4.7.1 Upgrade via Zendesk ticket
When clicking on this link, the admin can start the upgrade request process and automatically generate a Zendesk upgrade request ticket. This process requires the admin to have a valid Zendesk email to verify against the support account:
After verifying the Zendesk user, the admin can create the ticket, which will include some basic licensing and count information to speed up the upgrade request on our end (before we used to request this information manually in a process that was also error-prone and led to a lot of back and forth emails).
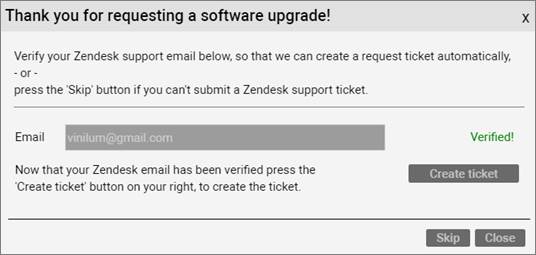
Verified Zendesk user
4.7.2 Upgrade via ticket
In some cases you may not be connected to the internet or perhaps you don’t have a Zendesk account (you should, it’s free…), in which case you can request the software upgrade via email. You can do that by skipping the automated Zendesk ticket process:
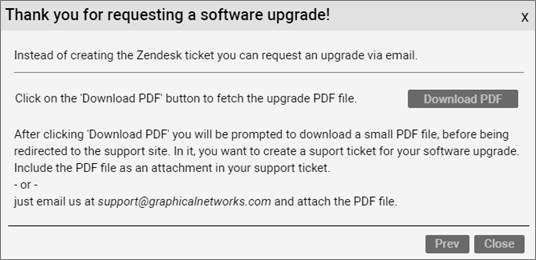
Upgrading via email
The process is super simple: download the PDF file that will include the same licensing information that is sent to Zendesk, and instead, attach it in an email:
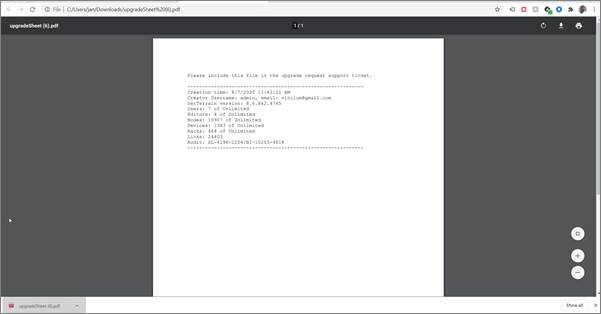
PDF upgrade sheet used by Graphical Networks to process the upgrade
4.8 Additional settings using the settings.xml file
In the netTerrain administration console you can currently adjust many global settings, as discussed above. There are, however, more settings that can help you control different aspects of the netTerrain software.
Anything that doesn’t make it into the GUI (because it may be a bit too obscure or perhaps we don’t want somebody to just easily change it from the console) goes into a file called Settings.xml. This file can be found on the netTerrain app server inside the netTerrain root folder and can be edited with a simple text editor like notepad.
4.8.1 Authentication and security settings
These settings deal with how you login, and how netTerrain behaves in certain scenarios when it comes to security. As a side note, there is another file called web.config, which is the file that controls the basic configuration parameters, including the application connection string and more. In there you will find a few more settings related to authentication, such as your password strength and so on in case you are using native authentication.
Let’s review the parameters:
- PreserveLoginUrl: this setting controls whether the URL should be preserved on your browser.
- AutoLoginAsReadOnly: turns login-less access to the system on or off. If turned on, you will be granted access to netTerrain automatically in read-only mode (you won’t be associated with a user, of course), and you can log in later from within the tool if you want.
- MaximumFailedLoginAttempts: self-explanatory.
- ActiveDirectorySyncGroupFilter,ActiveDirectorySyncUserFilter,ActiveDirectoryUserFilter: Active Directory settings to tune your AD to properly synch up with netTerrain groups and users.
- AuthenticationCookieTimeoutMinutes: self-explanatory.
- OAuthAuthenticationAllowInsecuteHttp: should only be set to false when working in an environment closed off to the Internet.
- Microsoft Open ID authentication parameters: self-explanatory.
- 2FA parameters: These parameters deal with the setup of multi-factor authentication
4.8.2 Directories
There seems to be an endless array of settings related to folder, paths and the like. Unless you must do something esoteric like integrating the output of these folders and paths with some external system and you must read it from a path or folder other than the default, then there shouldn’t be a need to ever touch these. I am not going to explain the meaning of each, since they are quite self-explanatory, so here they are in their full glory:
- SQLTablesDirectoryName
- SQLExpressionsDirectory
- QuotesFile
- DynamicReportsDirectoryName
- ErrorLogDirectory
- EmbeddedDocumentsPath
- WebApiModulesPath and WebApiNetPipeAddress
- DevExpressFilesPath
- NetVizImportQueuePath
- VisioImportQueuePath
- SupportLink
- SevenZipAppPath
- CollectorSettingsFileName
- ThemesPath
- DevExpressDefaultConnectionStringName
4.8.3 Default Global Settings
This is a lose categorization of parameters that have to do with default settings that affect all users globally and are not related to more specific categories listed here or in the other two blogs. Below we’ll briefly describe what each setting does:
4.8.3.1 DefaultDiagramId
Like the name suggests, here we define which diagramId should be the default diagram that users access in the absence of a cached diagramId. Normally this id corresponds to the top level diagram and it shouldn’t be changed. However in some scenarios you may want new users that access the system (or existing users flushing the cache) to access a diagram other than the top level.
4.8.3.2 DefaultThemeName
This is the default theme or skin you want your users to see when they log into netTerrain. Each user can later override this with their own skin.
4.8.3.3 AllowSymbolsInExpressions
This one is a bit obscure. When set to true you can use symbols in your expressions (see database and scripting guide). We recommend leaving it false unless you work in an environment closed off to the internet.
4.8.3.4 DevExpressDefaultDashboard
This parameter lets you define the default dashboard view that will appear when users click on the report button.
4.8.4 netTerrain notifications and IT visualization parameters
Notification parameters include the ones you see for errors as well as those quirky quotes of the day and other alerts.
4.8.4.1 ShowErrors and ErrorLog
When set to use you will see error notifications on the bottom right corner of netTerrain and errors will be logged.
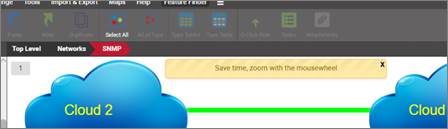
4.8.4.2 IntervalHideQuote and IntervalHideHelpMessage
These two settings let you set the display time of quotes and help messages (in milliseconds).
Quote of the day
4.8.4.3 HelpMessageShowCount
This setting lets you determine how many times you want to display each help message category for new users that join netTerrain.
Help notifications
4.8.4.4 ShowAlertIf90PercentsCapacityReached
When set to yes, this parameter will alert users when your netTerrain object license count has reached 90% of its capacity.
4.8.5 Usability and visualization
This section or set of parameters in the settings.xml file is one of the more useful ones as it lets you control certain aspects of the usability and visualization.
4.8.5.1 SearchStringLength
This parameter determines the minimum size of a search string that does not result in a search error. Users that enter a string with a smaller number of characters will get a search error notification. It should probably always be set to 3 characters.
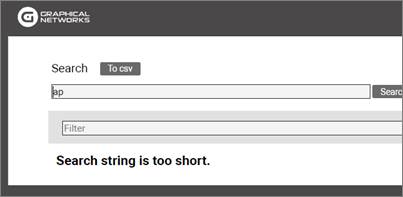
Search error notification
4.8.5.2 EnableShortcutsToAddNodeRackDeviceAutomatically
When set to true, you can use simple shortcuts to add nodes, racks and devices to netTerrain. These will be of the default generic type.
4.8.5.3 EmbeddedDocumentsFileSizeLimit
This parameter is very useful and determines the maximum file size in bytes that you allow for document uploads when you use the attachment feature. If users try to upload a document larger than this limit, they will get an error notification.
4.8.5.4 EmbeddedDocumentsExtensions
This parameter is also related to the parameter above and specifies which document extensions you allow users to upload to netTerrain.
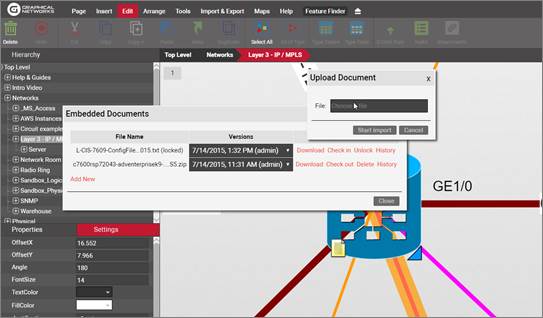
Uploading a document
4.8.5.5 LinkCreationByMouseHoverOver
When set to true, as soon as you hover the mouse over a node, it’ll display all the snapping points for you to create a link.
4.8.5.6 Snapping
when set to true, objects on a diagram will snap nicely as soon as you approach some right angle or alignment with an adjacent object.
4.8.5.7 MinObjectsToShowSize
This one is geeky, and at the same time a bit confusing. This parameter basically lets you control the zoom level that netTerrain needs to set itself with an object node at the center, when the so-called auto-zoom controlled by the AutoZoomToNodeFactor (see below) kicks in.
Auto-zoom happens when you navigate to a diagram and a specific node is the context, such as when you go up from a node, or you reach a diagram by searching for a specific node and the node you come from is small. What exactly small means is what this parameter defines.
The MinObjectsToShowSize parameter is the minimum size in diagram units/metrics that defines the node as small. To find out if a node is small, netTerrain takes the smallest of the numbers associated with the width and height of the node as per the node settings and compares it to the setting. If the node size as defined above is smaller than the parameter number then auto-zoom kicks in. The zoom level that will be used is defined by the parameter below.
This feature comes in very handy when you have dense diagrams and it would be hard to see a node without netTerrain automatically zooming you in.
4.8.5.8 AutoZoomToNodeFactor
This is the zoom-level factor for the auto-zoom feature, as described above. This factor is determined as a percentage of the node size relative to the absolute diagram size.
Auto-zooming of a node
4.8.5.9 MinRelativeNodeSizePerc
This parameter determines the minimum possible size of a node dropped on a diagram, relative to the size of the diagram at the given zoom level. This is useful, when you need to drop nodes on a diagram while zoomed in or out and the node happens to have a very small default size.
This setting makes sure that you can at least see the node. A parameter of 20, for example, means that regardless of the zoom level, a node you are dropping in (let’s pretend it is rectangular), cannot be bigger than 20% of the length of the visible diagram.
4.8.5.10 MaxRelativeNodeSizePerc
This parameter determines the maximum possible size of a node dropped on a diagram, relative to the size of the diagram at the given zoom level. This is useful, when you need to drop nodes on a diagram while zoomed in to prevent them from being bigger than the visible part of the diagram itself.
A parameter of 20, for example, means that regardless of the zoom level, a node you are dropping in (let’s pretend it is rectangular), cannot be bigger than 20% of the length of the visible diagram.
4.8.5.11 DynamicReportsInvalidProperty
A bit obscure, this parameter lets you specify what value you want to display when a property value is invalid within a dynamic query.
4.8.5.12 ShowNodeTitle, ShowLinkTitle and ShowFreeTextTitle
When any of these parameters is set to true then a user that hovers the mouse over a node or a link will see the name of that object pop up as a tooltip on the screen next to the mouse pointer.
4.8.5.13 IsInStockColumnEnabled
When this parameter is set to false, then the ‘In Stock’ option is not displayed for devices and racks in the catalog. Only when this parameter is set to true, will netTerrain control instance counts for inventory control (see Power User Guide).
4.8.6 Settings for fiber and outside plant diagram tuning
The features and functionality surrounding our outside plant tool seem to be prone to these settings controlled by the settings.xml file. This is probably the case because you can configure your Open Street Maps server and then control various visualization and functionality aspects of your circuits, strands and fiber circuit layout records.
4.8.6.1 Map and general OSP settings
You can set up your Open Street Map server, which will involve a little bit of fiddling here and a whole lot of steps in your environment (see the Outside Plant section on your User Guide).
4.8.6.1.1 Map layers
Open Street Map, which is the map technology or GIS system we use for our outside plant maps includes three different layers or types of views to render maps. We have three settings related to those, that let you specify the source of the map tiles that comprise the layers.
- MapSourceStandard: here you set up the source for the standard layer tiles.
- MapSourceTransport: same, but for the transport layer.
- MapSourceLight: same, but for the light layer.
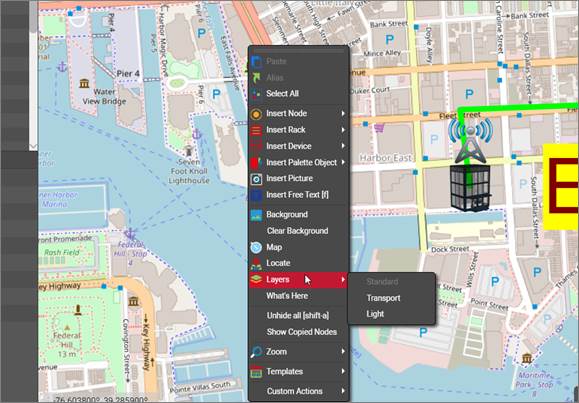
OSM map layers
4.8.6.2 ZoomedOutObjectMapping
This one is quite important for proper tuning of the outside plant diagrams and deals with the representation of objects that look very small as you zoom out. As opposed to other regular diagrams, in outside plant projects it is very common to have large geographical areas be represented on one diagram by one OSM map. In those diagrams you may have nodes that you only see once zoom in a lot. In zoomed out mode those nodes would then basically disappear. But if that’s the case then you wouldn’t know where to find them when you first access that map.
For that purpose, we let you control how you would want those nodes represented in zoomed out mode. We can show clusters of nodes at zoomed out levels, so that at least you know where on the map you have nodes. We can also use halos, which are representations of the nodes that always look the same and have the same size on a diagram regardless of zoom level. The possible values are:
- 1 – Show clusters and halos
- 2 – Show halos only
- 3 – Show nothing
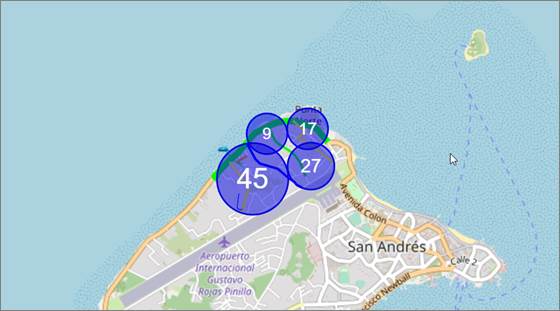
Outside plant map showing clusters
4.8.6.3 Circuit settings
Circuits are special Outside Plant elements that consist of end-to-end connections or services with their own special set of rules. For circuits we provide three settings:
- CircuitNameLabel: the representation of the name field in circuit tables views in case you don’t want it to literally say ‘Name’.
- CircuitTableDeleteButtonLocation: a bit obscure, this setting lets you control where on a table view you want the delete button to be located. 0 means left, 1 means right.
- CircuitNamesNotEditable: when set to true, circuit names cannot be edited on the table views after they have been created.
4.8.6.4 Strand settings
Strands are another special Outside Plant element with their own special set of rules. Strands pop up on a cable when a catalog manager creates that cable type in netTerrain with a non-zero strand count property value. For strands we also have some special foo that lets you fine-tune your fiber campus and outside plant diagrams:
- StrandStatus0: default status value for the strand, when it is first created as part of the cable.
- StrandStatusUndefined: the value you want represented for strands when a status is not defined.
- StrandModeUndefined: same as above, but for strand modes.
- StrandStatusValues: the list of status values that are permitted for strands. The usual values are “0,2,4,6,8,12,24,48,72,144,288,512,1024”.
- StrandModeValues: same as above but for strand modes. The typical values are “Single,Multi”.
- AddLinkTypeStrandsQtyValues: list of all the possible strand counts that can be defined for a cable containing strands.
- StrandNamesNotEditableOnDiagram: when set to true, strands names cannot be changed on a diagram. They are predefined in the catalog.
- StrandModeNotEditableOnDiagram: same as above but for the mode.
- HasStrandMarkerPosition: here you can define the position for the marker on a port, if said port has strands connected. The possible values include 0 (bottom right of port); 1 (center) and 2 (bottom left).
4.8.6.5 BOM settings
Along with all the elements above, in Outside plant projects you can also define a Bill of Materials report that is generated from a circuit layout record.
Two settings help you customize these reports:
- BOMReportCustomTextFilePath: the location of a file that can contain custom text that appears in every BOM report. The default is the netTerrain root folder.
- BOMReportBorderColor: self-explanatory.
5 Setting Up a Local OSM Server
This section describes how to set up a local OSM server in your environment, in case you can’t (or don’t want to) use the default OSM setup accessing the online OSM map base.
5.1 Getting ready
We assume that you (or your company) has a license of netTerrain OSP. We also assume that you possess some basic knowledge of browser navigation and general computer and networking knowledge. A basic knowledge of netTerrain functions, such as navigating diagrams and working with objects is also preferred. You (the lucky soul tasked with setting this up) should also be familiar with Linux commands, preferably Ubuntu 18.04. If you are not, brace yourself for impact cause it will get a bit nasty.
5.1.1 Pre-installation
Your Ubuntu server should meet the following requirements:
-
15 or more Gb available disk space (If you plan on downloading large maps, i.e. continents, large countries, then more space may be needed.)
-
4 Gb or more RAM
-
An account with root privileges
-
Network Connectivity
5.1.2 Updating the Server
To make sure the Ubuntu server is up to date use the following commands:
5.1.3 Installing OpenStreetMap Dependencies
To allow OpenStreetMap (OSM) to work, several dependencies are needed. The OSM tile server stack is a collection of programs and libraries that work together to create a tile server. This tutorial demonstrates the most standard version that is also used on the main OpenStreetMap.org tile server.
To install OSM and all of its dependencies use:
sudo apt-get install libboost-all-dev git-core tar unzip wget bzip2 build-essential autoconf libtool libxml2-dev libgeos-dev libgeos++-dev libpq-dev libbz2-dev libproj-dev munin-node munin libprotobuf-c0-dev protobuf-c-compiler libfreetype6-dev libtiff5-dev libicu-dev libgdal-dev libcairo-dev libcairomm-1.0-dev apache2 apache2-dev libagg-dev liblua5.2-dev ttf-unifont lua5.1 liblua5.1-dev libgeotiff-epsg curl
When prompted type “y” and press Enter. Brew some coffee since this may take a while (depending on your system).
5.1.4 Installing PostgreSQL / PostGIS
On Ubuntu there are pre-packaged versions of both PostgreSQL and PostGIS, so these can simply be installed via the Ubuntu package manager.
The PostgreSQL database is the database we’re going to store map data and PostGIS adds some extra graphical support to it. To install, enter:
sudo apt-get install postgresql postgresql-contrib postgis postgresql-10-postgis-2.4 postgresql-10-postgis-2.4-scripts
When prompted type “y” and press Enter.
5.1.5 Creating a Unix User
This step is optional. If you wish to add a non-root account to render the maps, perform the following (for username and password enter whatever suits you):
5.1.6 Creating a Database User
Enter the username of the local user account you wish to render maps with:
At the prompt answer yes for superuser (although this isn't strictly necessary).
While still working as the “postgres” user, set up PostGIS on the PostgreSQL database (again, substitute your username for renderaccount below):
createdb --encoding=UTF8 -o=**_username_** gis

psql --username=postgres --dbname=gis -c “CREATE EXTENSION postgis;”

psql --username=postgres --dbname=gis -c “CREATE EXTENSION postgis_topology;”

psql --username=postgres --dbname=gis -c “CREATE EXTENSION hstore;”

psql (this will put you at a “postgres=#” prompt)

ALTER TABLE geometry_columns OWNER TO **_username_**; ALTER TABLE spatial_ref_sys OWNER TO **_username_**; \q exit
5.2 Installing OSM2PGSQL
In order to help import and manage OpenStreetMap data into a database, we need some additional software. We will be using osm2pgsql.
5.2.1 Creating a Directory for OSM2PGSQL
To create a directory for OSM2PGSQL data enter the following:
5.2.2 Installing Perquisites for OSM2PGSQL
For OSM2PGSQL to work some dependencies are needed:
sudo apt-get install make cmake g++ libboost-dev libboost-system-dev libboost-filesystem-dev libexpat1-dev zlib1g-dev libbz2-dev libpq-dev libgeos-dev libgeos++-dev libproj-dev lua5.2 liblua5.2-dev
When prompted type “y” and press Enter.
5.2.3 Building OSM2PGSQL
To build and recompile pieces for OSM2PGSQL to function enter these commands:
If the output from the make command ended with “[100%] Built target osm2pgsql”) continue:
5.3 Installing Mapnik
Mapnik is an open source toolkit for rendering map, which supports a variety of geospatial data formats and provides flexible styling options for designing many kinds of maps.
5.3.1 Mapnik and Dependency Installation
The default version of Mapnik should be installed along with a few dependencies:
sudo apt-get install autoconf apache2-dev libtool libxml2-dev libbz2-dev libgeos-dev libgeos++-dev libproj-dev gdal-bin libmapnik-dev mapnik-utils python-mapnik
5.3.2 Checking Mapnik Install
To see if Mapnik installed properly enter the following:
If there are no errors with a blank >>>, then continue. If not, check to make sure that all the dependencies for Mapnik where installed:
5.3.3 Installing mod_tile and Renderd
mod_tile is an Apache module that handles requests for tiles; Renderd is a daemon that renders tiles when mod_tile requests them. We will use the “switch2osm” branch of mod_tile, which is modified so that it supports a standard Ubuntu server rather than one of OSM’s rendering servers.
5.3.4 Compiling mod_tile
Here we will download the mod_tile file and compile it, as follows:
cd ~/src

git clone -b switch2osm git://github.com/SomeoneElseOSM/mod_tile.git

cd mod_tile

./autogen.sh

./configure

make

sudo make install

sudo make install-mod_tile

sudo ldconfig
5.4 Stylesheet Configuration
In this section we proceed to download and configure a style sheet. The style we’ll use here is the “standard” map on the openstreetmap.org website also known as the OpenStreetMap Carto.
5.4.1 Downloading OpenStreetMap Carto
Move to the ~/src directory and clone the openstreetmap-carto repository:
5.4.2 Installing a Carto Compiler
Install the compiler:
To check the version enter carto -v. The version response should be 1.1.0 or higher. Now we have to convert the carto project into something that Mapnik can understand:
carto project.mml > mapnik.xml
5.5 Loading Data
We’ll use “download.geofabrik.de” as our download location, though there are many others. In the example below we will use data from Azerbaijan to test you can use any continent/country, but starting with a country that is not huge is best.
5.5.1 Downloading the Map Data
Download the data from GeoFabrik:
Here “/asia/azerbaijan” is used as an example. Enter the continent and country of your choice:
5.5.2 Installing the Map Data into the Database.
To add the map data to the database use the following command. Also, remember to change the file path at the end of the command to the file that you downloaded in the previous step.
osm2pgsql -d gis --create --slim -G --hstore --tag-transform-script ~/src/openstreetmap-carto/openstreetmap-carto.lua -C 2500 --number-processes 1 -S ~/src/openstreetmap-carto/openstreetmap-carto.style ~/data/azerbaijan-latest.osm.pbf
This command can take several hours depending on how big the map is. After the command finished executing, it should end with something like “Osm2pgsql took 238s overall”.
It’s worth explaining a little bit about what those options mean:
| -d gis | The database to use. |
| --create | Load data into an empty database rather than trying to append to an existing database. (to append change to “--append”) |
| --slim | osm2pgsql can use different table layouts; “slim” tables works for rendering. |
| -G | Determines how multipolygons are processed. |
| --hstore | Allows tags for which there are no explicit database columns to be used for rendering. |
| --tag-transform-script | Defines the lua script used for tag processing, potentially making the style logic simpler. |
| -C 2500 | Allocates 2.5 Gb of memory to osm2pgsql to the import process. Depending on how much memory you have you may want to lower or raise the memory used. |
| --number-processes 1 | Uses 1 CPU. If have more cores you can raise the number. |
| -S | Create the database columns in this file. |
| * The last argument is the data file to load. | |
5.6 Installing Shapefiles and Fonts
Although most of the data used to create the map are directly from the OpenStreetMap data file, some shapefiles are needed for low-zoom countries and fonts are needed for countries that use non-Latin characters.
5.6.1 Shapefile Installation
To download and index the shape files use:
Sometimes this can take a while to complete, but it is finished it should end with “script completed”.
5.6.2 Font Installation
To install the fonts use:
5.7 Setting up the Web Server
The config file for “renderd” is “/usr/local/etc/renderd.conf”. Edit that with a text editor such as nano (If nano is not installed use:
sudo apt-get install nano).
5.7.1 Editing the renderd.conf File
Use:
In the “renderd” section change the num_thread value if you have less than 4Gb of memory:
The “ajt” section corresponds to a “named map style” called “ajt”. You can have more than one of these sections if you want, provided that the URI is different for each. The “XML” line will need changing to something like:
In the URI section, you enter whatever you want, but /hot/ allows for tiles to be generated easily:
To exit nano and save changes press Ctrl + x. At the prompt Enter y (for yes) and then press Enter.
5.8 Configuring Apache
As of now, Apache does not know that the mod_tile and renderd exist. Here we will allow Apache, mod_tile, and renderd to communicate.
5.8.1 Create Directories for mod_tile and Renderd
Use:
sudo mkdir /var/lib/mod_tile

sudo chown **_username_** /var/lib/mod_tile

sudo mkdir /var/run/renderd

sudo chown **_username_** /var/run/renderd
5.8.2 Setting up Communication for mod_tile
We need to tell Apache about the “mod_tile”, hence we need to edit the mod_tile.conf file as follows:
Add the following to the file:
To exit nano press Ctrl + x. At the prompt enter y (for yes) and then press enter.
Now run the mod_tile:
That will say that you need to run “service apache2 reload” to activate the new configuration, but we’ll do this later.
5.8.3 Setting up Communication for Renderd
Now we need to tell Apache about Renderd using:
Now add the following between the “ServerAdmin” and DocumentRoot” lines as follows:
LoadTileConfigFile /usr/local/etc/renderd.conf

ModTileRenderdSocketName /var/run/renderd/renderd.sock
Timeout before giving up for a tile to be rendered
Timeout before giving up for a tile to be rendered that is otherwise missing
5.8.4 Restarting Apache
Save it and reload Apache twice to allow the configuration changes to load:
5.9 Configuring netTerrain
For netTerrain to generate maps from the OSM server, some files need to be modified. This allows for communication between netTerrain and the OSM server.
5.9.1 Editing the Web.config File
On the host system that has netTerrain installed, edit the Web.config file. Navigate to C:\ProgramData\Graphical Networks\netTerrain\vis. Then open Web.config (you can use a simple text editor).
Find:
Change the following:
To:Save the file and exit
If you point a web browser at: http://serveripaddress/index.html you should get Ubuntu/apache’s “It works!” page.
Attention!
If the OSM server is within your network, use the private ip address of the server.
This can be found using the ifconfig command.
If the OSM server is not within your network, use the public ip address of the server.
5.10 Running Renderd
Now it’s time to run Renderd and try to render some tiles. First, we will run Renderd in the foreground and then in the background.
5.10.1 Running Renderd in the Foreground
Use:
You may see some warnings here – don’t worry about those for now. You shouldn’t get any errors. If you do, save the full output in a pastebin and ask a question about the problem in a proper forum such as help.openstreetmap.org
Open http://serveripaddress/hot/0/0/0.png in a web browser.
You should see a map of the world in your browser and some more debug stuff on the command line, including “DEBUG: START TILE” and “DEBUG: DONE TILE”. Ignore any message such as “DEBUG: Failed to read cmd on fd” as it is not really an error.
Assuming it all worked, press Ctrl+c to stop the foreground rendering process.
5.10.2 Running Renderd in the Background
First, edit the ~/src/mod_tile/debian/renderd.init” file so that “RUNASUSER” is set to the non-root account that you have used before, such as Username, then copy it to the system directory:
sudo nano ~/src/mod_tile/debian/renderd.init

sudo cp ~/src/mod_tile/debian/renderd.init /etc/init.d/renderd

sudo chmod u+x /etc/init.d/renderd

sudo cp ~/src/mod_tile/debian/renderd.service /lib/systemd/system/
In order to test the start command use:
To make it start automatically every time use:
5.11 Viewing Tiles
This step is optional. In order to see tiles, we’ll cheat and use an HTML file “sample_leaflet.html” in mod_tile’s “extra” folder. This will generate a map on a web browser. This is useful if you already have a map you would like to render.
5.11.1 Copying the mod_tile file to the /var/www/html directory
Copy the sample_leaflet.html file to the /var/www/html directory as follows:
To display when a tile is sent to the browser enter:
every time a tile is requested, and one every time rendering of one is completed.
When you load that page you should see some tile requests. Zoom out gradually. You’ll see requests for new tiles show up. Some low-zoom tiles may take a long time (several minutes) to render for the first time, but once done they’ll be ready for the next time that they are needed.
5.11.2 Loading the Map in a Web Browser
Open the sample_leaflet.html file on a web browser on a different system using:
http://serveripaddress/sample_leaflet.html
5.11.3 Acknowledgements
This guide is based on the Switch2osm guide: https://switch2osm.org/manually-building-a-tile-server-18-04-lts/